Yellow Birthday Party


How cute is this 3-year-old yellow birthday party? I love how the little logo was used throughout. You just can’t go wrong with a color theme. See more details at BirdDog Press.
photos by Julie Afflerbaugh

Les Petites Chefs Birthday Party Report


Seriously. It was a fantastic party! Really amazing. And it would have been equally great for girls or boys. If you live anywhere in the metro Denver area, bookmark Sticky Fingers — if not for a birthday party, then for their kids cooking classes — they are a class-act all the way around. Here’s the report:
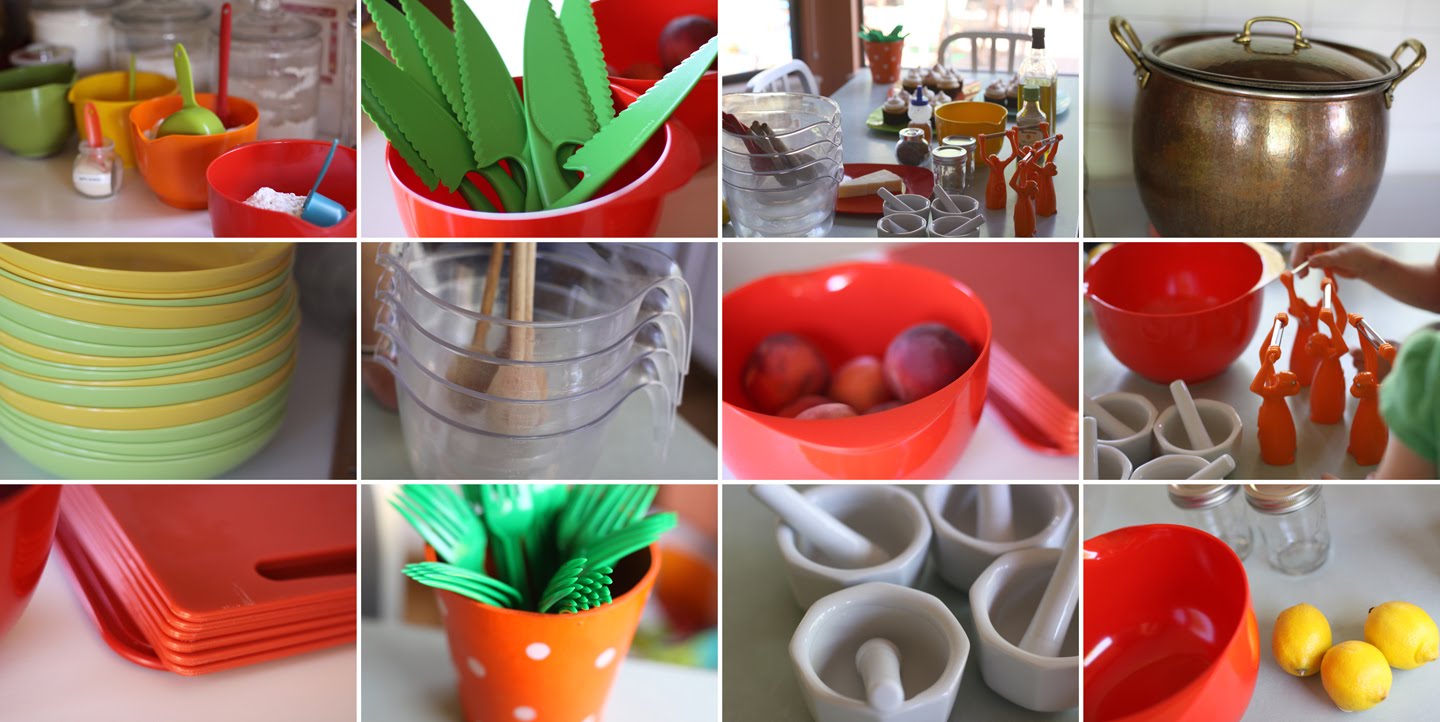
About an hour before the guests arrived, Sticky Fingers showed up to prepare the space. They brought balloons. And the most colorful assortment of kid-friendly kitchen ware. I couldn’t stop taking pictures. (You can click the photos to see them bigger.)
Once the guests arrived, it was time to decorate chef hats. With stamps, stickers, markers, ribbons and every other sparkle-rific material.
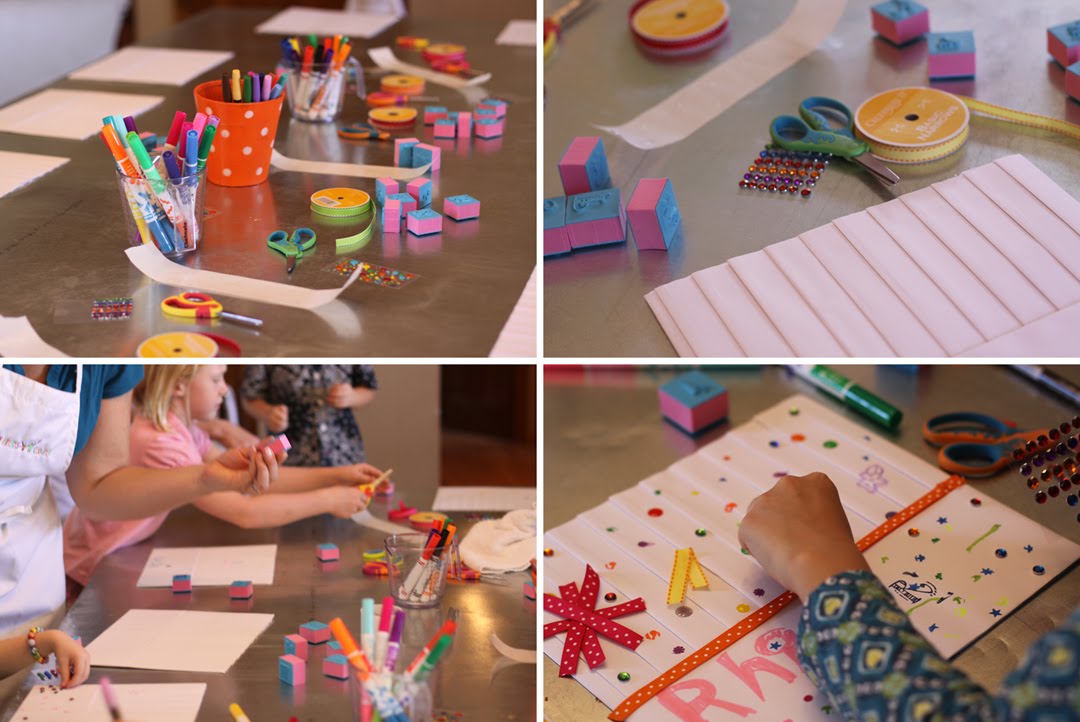

When the chef hats were sufficiently glamorous, it was time to get down to cooking (after thorough hand-washing of course). The recipe was posted on an easel and the kids made the gnocchi from scratch. At each step, the Sticky Fingers girls gave kid-friendly, patient, cheerful instruction (“When you’re using a knife, make a bridge with your hand and then cut under the bridge…”). The guests measured ingredients. Cracked eggs. Grated cheese. Mixed. Kneaded. Rolled and formed. (For those of you who are worriers, please note that there were at least 3 additional hand-washing sessions throughout the cooking process.)


While the gnocchi boiled, they worked in teams using morters and pestles to crush lavender, then mix it with honey, oil and vinegar for the pasta topping.

The gnocchi finished cooking just as the dressing was complete. Then it was time to feast. It was a pretty exotic meal as far as kid food goes — Parmesan and Ricotta Gnocchi over Peaches with Prosciutto and Parmesan plus Honey Lavender Dressing. But the guests loved it!


As everyone finished their meal, we brought out the pretty cupcakes and sang Happy Birthday.


For party favors, Sticky Fingers brought laminated recipe cards featuring Olive’s special recipe. And we included ruffle-y aprons as well (Bonus: I went to Jo-Ann’s to pick up fabric to make aprons, but found these cute red and white ones for $2.50 each. Yay! Because, really, I was out of time and not looking forward to a late night sewing aprons…)
While we opened presents, the Sticky Fingers girls cleaned up every last crumb and loaded up their car. (Best part of hiring out your party!) Olive was super pleased with the whole thing. So were the guests. So was I.
Loads more photos here.


Olive’s Les Petites Chefs Party


I’m really looking forward to Olive’s birthday party this weekend. It’s going to be a busy day — Olive will have her party in the morning, and then be baptized in the afternoon. It’s a double whammy. Although I love putting on fun parties for my kids, I am so lucky I found Sticky Fingers to handle things this weekend — the double event has me feeling too crazy to give the party as much attention as I’d like.
These are the options Sticky Fingers offered for the party activities:
Choose your meal.
• Four Seasons Pizza: roll out honey-wheat dough and personalize with seasonal toppings
• Gnocchi-n-Cheese: squeeze it, roll it, top it! Ricotta gnocchi dressed with a creamy, cheesy pesto sauce and an assortment of seasonal toppings is decadently delicious!
• Upside-Down Pasta and Tomato Sauce: fresh tomatoes, basil and cheese, topped with warm pasta to create better-than-ever spaghetti.
• Noodles & Soup: practice your (butter) knife skills on tofu for your miso soup, peel carrots for a soba noodle salad, then sit down with some chopsticks to the messiest meal of the bunch!
Choose your craft.
• Pasta Art: decorate and string fun pasta shapes onto ribbon to create bracelets, necklaces, bookmarks, & more!
• “I’m the Chef” Placemats: personalize a special placemat that’s yours to use each time you help with dinner! Placemats feature fun mealtime games and will be laminated once decorated.
• One-of-a-Kind Chef Hats: add your own unique flourish to a special white chef’s hat that lets everyone know who’s in charge in the kitchen!
• Cupcake Decorating: a classic birthday treat becomes even more delightful when decorated just as you wish with colored frosting and fun toppings!
Choose a cupcake flavor.
Pick from the many delightful daily and rotating flavors available from Happy Cakes Bakeshop, our cupcake partner!
Olive picked the gnocchi, the chef hats and vanilla-flavored cupcakes. Perfect. Basically, that means my only responsibilities are invitations, decorations (if we choose to do anything in addition to the balloons Sticky Fingers are bringing — I’m hoping to use the Cricut tonight to make up some garlands), and party favors. And let’s be honest, those 3 tasks are my favorite parts of planning a party. I think it’s going to be great!
You can find out more about Sticky Fingers parties and classes here.
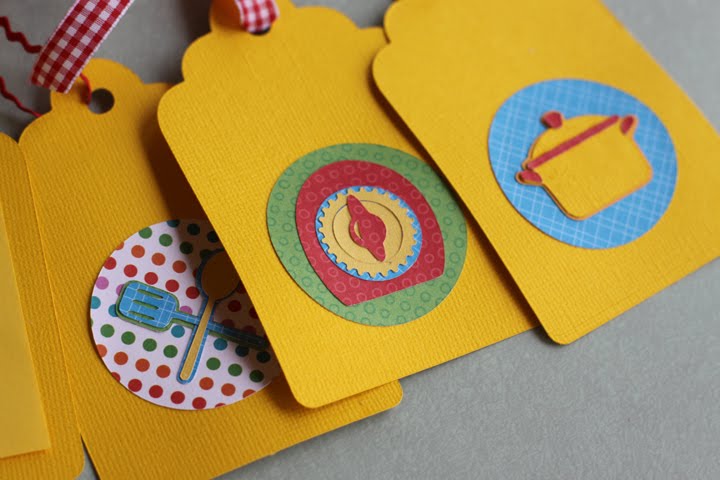
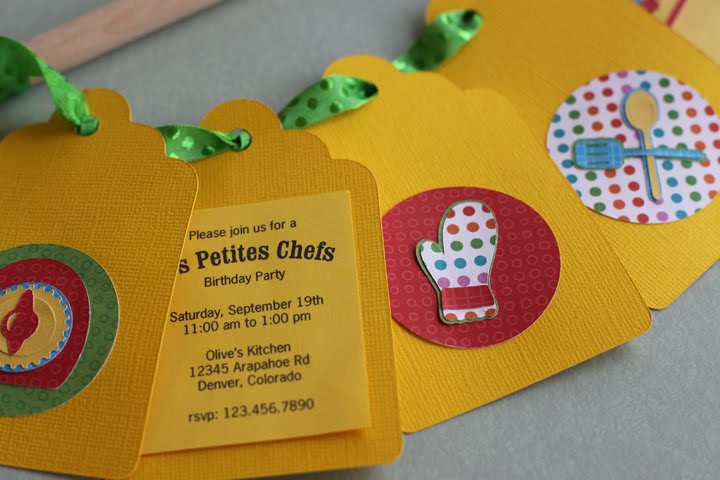
Les Petites Chefs Birthday Party Invitations

It’s going to be such a fun week! Saturday, we’re having a birthday party for Olive. The theme is “Les Petites Chefs” (how chic! how French! how very Julie and Julia of us!) We’re bringing in the ladies from Sticky Fingers Cooking to teach the party guests some kitchen how-to. But more on the party details later. Today, I want to share the invitations.
Last week, I was sent a Cricut die cut machine to test out, so I decided Olive’s party invitations were the perfect reason to pull it out and see what it could do.
After playing around with the Cricut for a while to get comfortable (I had never even seen one of these machines before, so I really had no idea what to expect) Maude and Olive and I designed some invitations that would use a million diecuts and really show off our mad Cricut skillz.


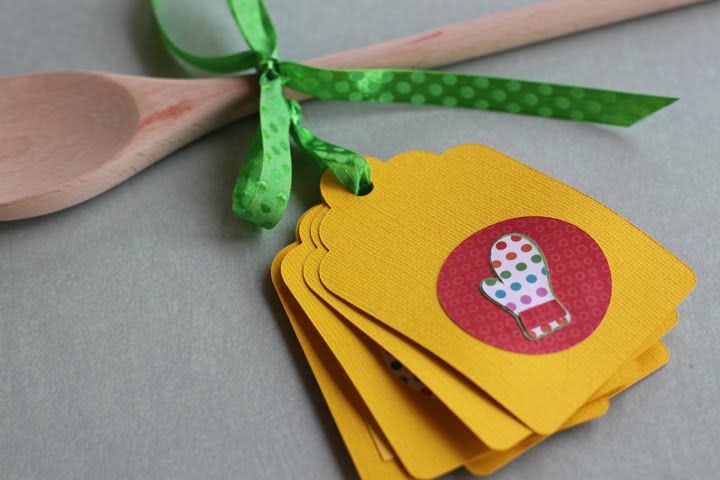
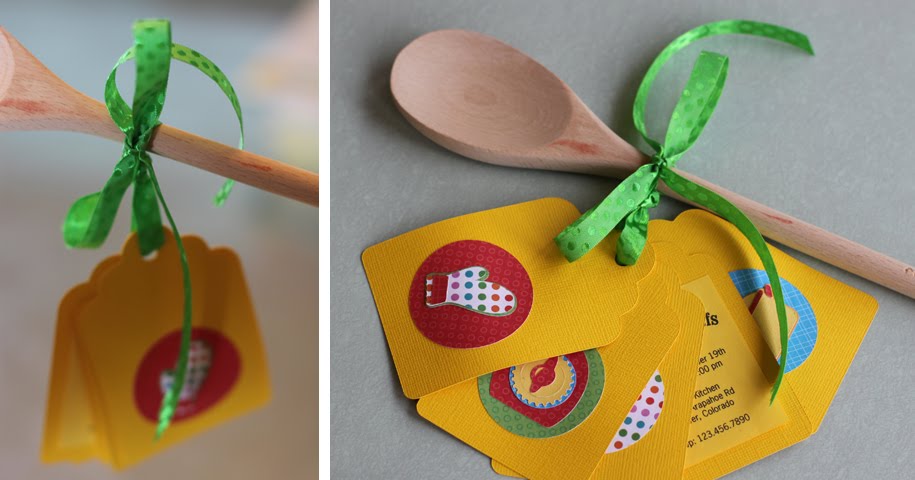
Basically, we cut out oversize hangtags (I’ll note here, that cutting out all sorts of shaped tags in all sorts of sizes and colors will probably be my most used Cricut feature), and used the new From My Kitchen cartridge to cut out assorted cooking-related shapes we could display on the tags.
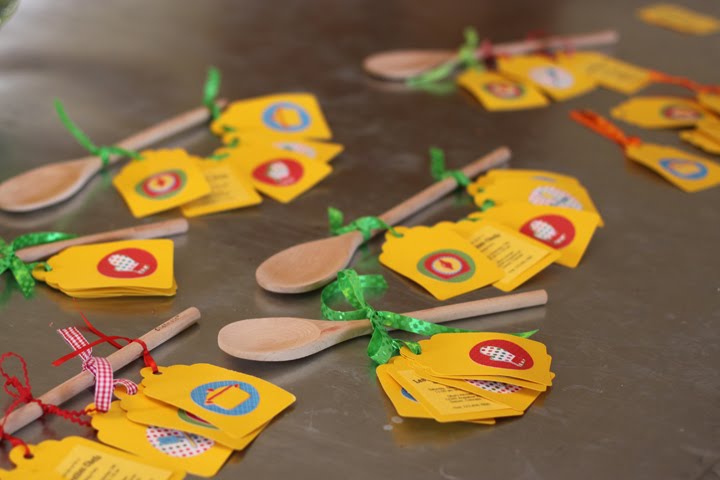
Then we attached the kitchen-themed tags to wooden spoons. So adorable! We actually tried 3 different ways of attaching our little tags, and couldn’t ultimately decide on a favorite. So we gave out invitations using all 3 versions (and used up a bunch of my ribbon scraps in the process — love it.)
What do you think? Next up to work on: party plans and party favors.
———————————–
 Hey. If you want to get in on the Cricut action, there are a couple of big Cricut-related contests going on. Visit Today’s Mama to see their Great Escape Contest — you could win a Cricut or 4 New Cartridges. And Cricut itself, is running a Great Gypsy Escape Contest — win one of 200 Gypsies or one of 20+ travel packages. Nice!
I’ve Got Soul, But I’m Not A Soldier


Guess what happened 5 minutes ago.
Ben Blair found out that The Killers are playing at Red Rocks. Tonight.
So he bought us tickets.
Can’t wait.
photo here
Weekend Report


We played all weekend with our friends the Lattins. Saturday night we hit the divey Morrison Inn for chimichangas. Sunday we all spent the afternoon in our newly painted rocking chairs. And Monday we ate watermelon in their shady backyard before hitting the neighborhood pool. We ended the weekend with shakes, onion rings and burgers at Fatburger.

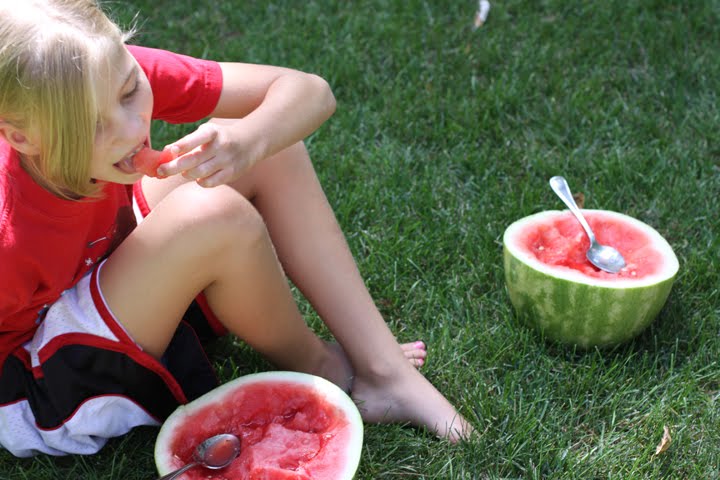
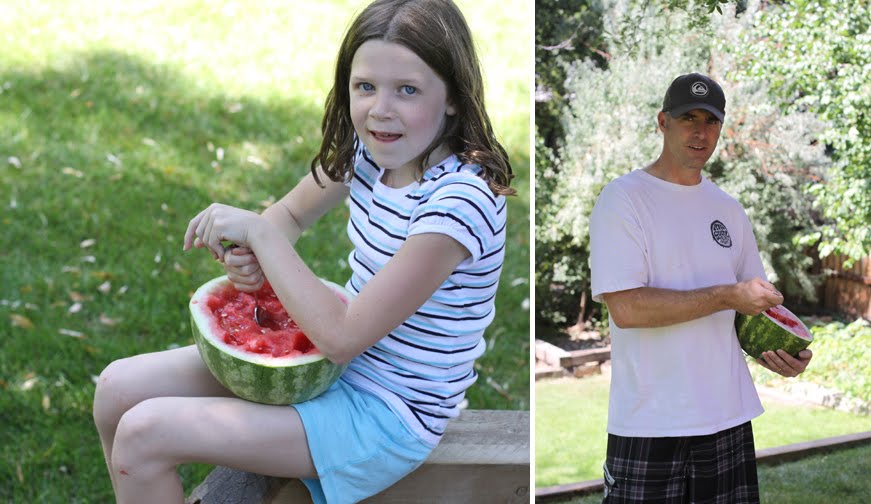
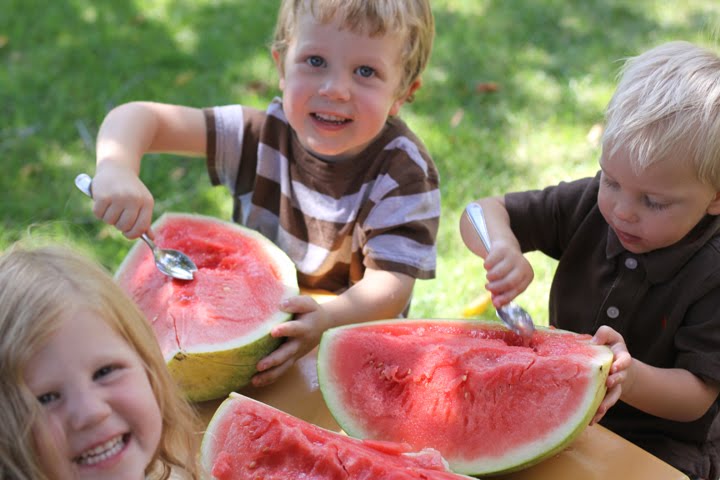
By the way, if you get the chance, I highly recommend the half-a-watermelon idea. It was a wonderful (easy) way to spend a sunny afternoon. Tell me about your weekend. Did it feel like an end of summer celebration? Anyone ready to start thinking Halloween?
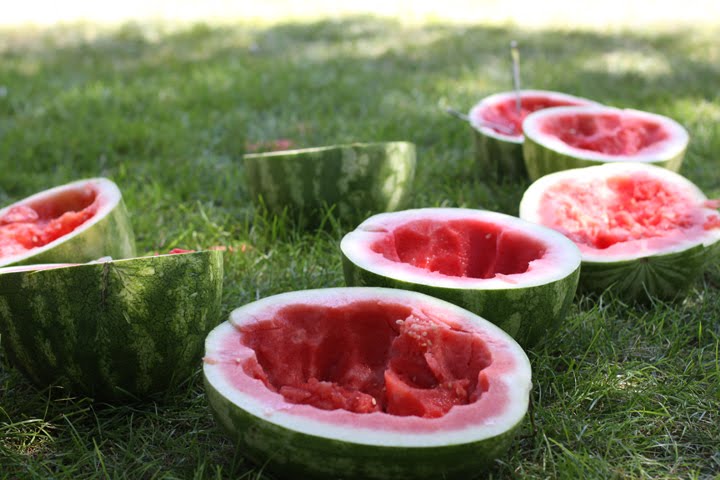
I’m thinking this image captures “end of summer” pretty perfectly.
School Pictures

A new company called Stomping Ground has set out to reinvent school pictures. Their sample portraits are adorable!
Thoughts: Can school pictures be saved? Should our own children be subjected to the tacky school photos of our youth? Would you push your school to hire Stomping Ground vs. Lifetouch (or whoever handles your school photos)?
One last note. Ralph had school pictures taken a few days before school even started. One of the options we could pick: pay an extra fee to have zits photoshopped. Blessed middle school.
Olive’s Turn

 Dip-dye dress by Kandy Kiss. Leggings by Old Navy. Shoes by Salt Water Sandals. Floral headband by Gymboree.
Of course (of course!) Olive wanted (and rightly deserved) a chance to model her back to school clothes. Olive is 7. She is starting to phase out of her pink addiction and on to more sophisticated shades — even some occasional brown.
I’m sure you are tiring of wardrobe posts, so I promise this will be the last for awhile. As with Ralph and Maude, many of these items were already in Olive’s closet. I’ll list sources where available. More pics of Olive’s photoshoot here.
Dip-dye dress by Kandy Kiss. Leggings by Old Navy. Shoes by Salt Water Sandals. Floral headband by Gymboree.
Of course (of course!) Olive wanted (and rightly deserved) a chance to model her back to school clothes. Olive is 7. She is starting to phase out of her pink addiction and on to more sophisticated shades — even some occasional brown.
I’m sure you are tiring of wardrobe posts, so I promise this will be the last for awhile. As with Ralph and Maude, many of these items were already in Olive’s closet. I’ll list sources where available. More pics of Olive’s photoshoot here.
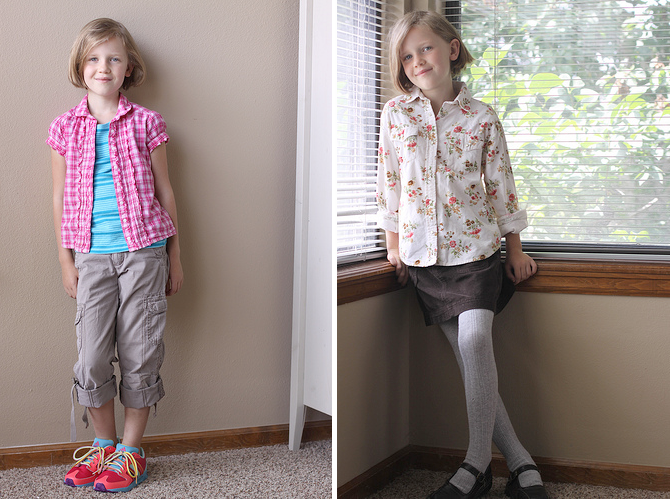 Plaid shirt and roll-up cargo pants by Target. Turquoise tee by Old Navy. Sneakers by Adidas. Western cut floral top by Ralph Lauren. Corduroy mini by Old Navy. Cable-knit tights by H&M;. Brown Maryjane’s by Payless.
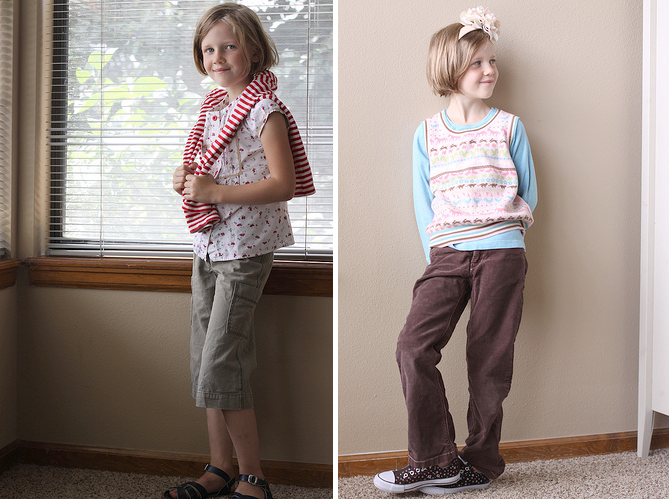 Stripe top by Old Navy. Floral top by Osh Kosh. Capris by Gymboree. Blue layering tee by Mini Boden. Sweater vest by GapKids. Brown velour-ish trousers by H&M.; Slip-on sneakers by Airwalk for Payless.
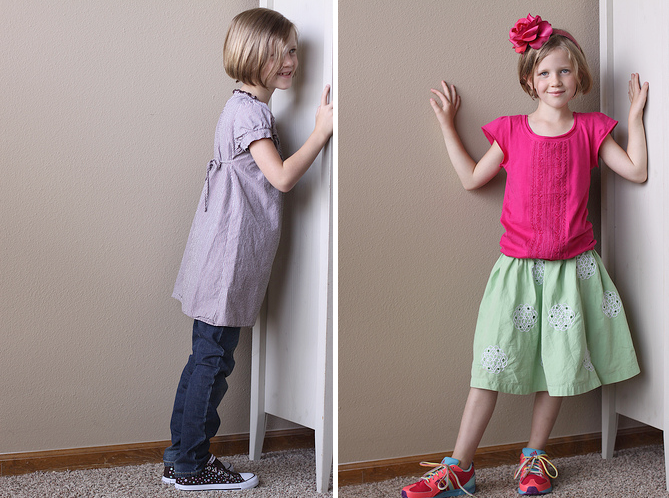 Tie-back dress by Mossimo for Target. Skinny jeans by H&M.; Embroidered top by Lulu and Scooter. Embroidered skirt by Children’s Place.
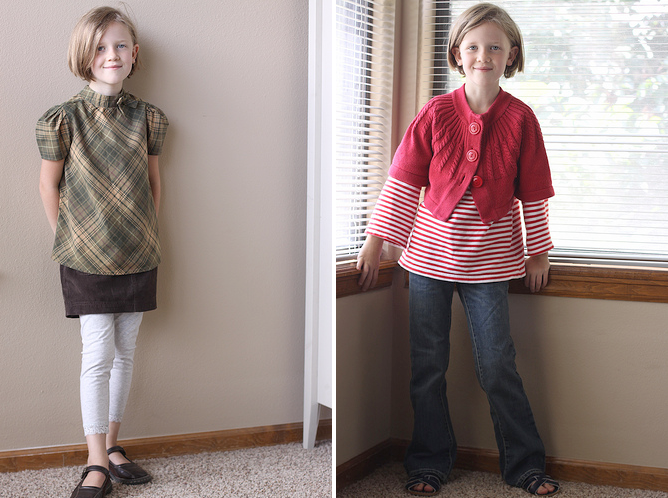 Plaid top by Gymboree. Red cardigan by Target. Jeans by GapKids.
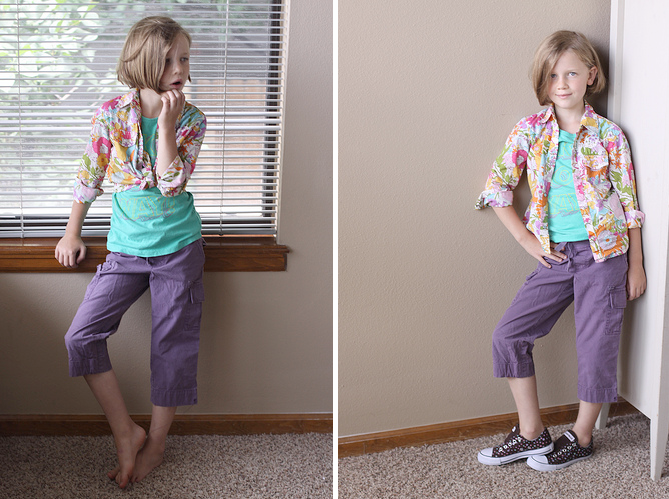 Floral top by Peek Aren’t You Curious. Screened tee by Old Navy. Purple cropped cargo pants by Peek.
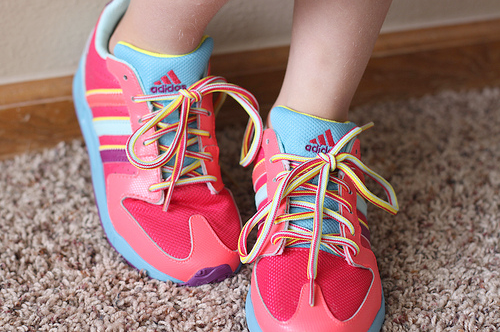 Possibly the greatest pair of kid sneakers ever made! We found ours at Zappos.
 Anniversaries


It’s our fourteenth wedding anniversary today. It feels good. Really good.
As I mentioned last week, to celebrate, Ben Blair and I climbed a 14er. 14,270 feet in elevation to be exact. I was warned how hard it would be, but I guess I didn’t really believe it, because the difficulty kept surprising me. The higher you get, the harder it is to breath. Headaches begin. Nausea visits. Dizzyness warns. During the last thousand feet of elevation, I had to fight my instinct to lie down and take a little nap on the freezing cold mountain.


Ben Blair, who is in much better shape than I, coached me gently to the top. The hike from beginning to end took us 3 hours and 15 minutes. I can’t remember ever pushing my heart that hard for that long. I found when it was really difficult, if I would just focus on progressing a few feet in front of me, I was fine. And when I needed to stop and rest and let my heart rate try to reach some sort of normal, I was greeted by tremendous views every where I looked.
As luck would have it, at the top, views were completely obstructed by thick fog. But it didn’t matter a bit. The high was still a high. And happily, my iphone had perfect reception (possibly the one spot on earth with good AT&T; coverage) and I could tweet that we had made the summit. Tweet until my fingers were threatening frostbite and we headed back down on rubbery legs.

On our hike (when I still had breath enough to carry on a conversation) Ben Blair and I talked about some of the milestones of our marriage so far. Fourteen years ago we hadn’t even graduated from college. (I laugh when I remember how young we married.) Some of the highlights in no particular order: We graduated from college. We bought a house, then gutted it and refinished it. We moved to Greece. We moved to New York. We moved to Colorado. We went through several job hunts and landed great jobs. Ben Blair finished a masters and doctorate degree. We started several businesses. We closed several businesses. We sold our house. We built a ginormous table. We had 5 children.
It is a wonderful thing to take part in a happy marriage. My relationship with Ben Blair is the very best thing in my life. Period.
On Sunday night, I was wandering through the blogosphere and was reminded of another anniversary — a miraculous one. Sunday was the one-year mark of Stephanie Nielson’s plane crash. To celebrate, Nie and Christian also climbed a mountain — a tougher climb than I could ever hope to attempt. Because they are total rock stars.

I was thinking about last year. About the auctions and fundraising. About seeing the blogging world come together in a mind-blowing way. And I had myself a little daydream. At the BlogHer conference each July, there is a Community Keynote. At the keynote, a group of bloggers gleaned by Eden Kennedy, each reads one of their significant blog posts. It is, without hesitation, the best part of the conference. How wonderful would it be to see Stephanie and her wonderful sister Courtney (who chronicled Stephanie’s journey when Nie couldn’t do it for herself) speak at the next BlogHer Community Keynote?
The conference is far away from their home. And of course, Stepanie can’t fly to New York. In my little daydream, a sponsor provided a retro styled Airstream Camper (wouldn’t that be perfect for Stephanie’s super-hip style?), and the whole family made their way leisurely across the country. Stopping at vintage diners along the way. Shopping for souvenirs. With Stephanie’s fans coming out to meet her, cheer her on, and thank her for living a inspiring life.
Of course, it was only a daydream. I have no idea if Stephanie and Courtney would even be interested. I don’t even know if Nie’s treatment regimen would allow it. (And really, as big as the BlogHer conference is, I know there are still thousands of bloggers out there who aren’t really aware of it — I believe Cjane and Nie fall in that category.) But I think the blogging community would love to hear from them in that sort of setting. To hear in person what it was like to wake up and find out you’d missed a few months of your life. To look in the mirror and see a face you don’t recognize. To find out thousands of people you’ve never met have rallied on your behalf and are hanging on your every word.
Dear Stephanie, congratulations on reaching your significant and magnificent goal. You did it! You climbed the mountain. I tear up just thinking how hard you worked to get there. I think you’re amazing.
What to Wear to 6th Grade


Button down by Peek. Tee by Old Navy. Jeans by H&M;. Red sneakers by Adidas.
At your request, here is 11-year-old Ralph showing off his back-to-school wardrobe. Today is his first day of middle school (gulp). We’ve spent the last 24 hours practicing the right-left-skip-the-number-right-padlock-unlocking-method so he won’t get frustrated when he encounters his locker combination. Oh man! I hope he loves school this year.
I’ve included source links where applicable. As with Maude, much of the wardrobe pictured here was already in Ralph’s closet. But boy clothes are pretty easy — I’m betting you can find similar items to the ones shown here at a dozen different stores.
You can see more of Ralph’s photo shoot here. (Also. I’ll post Olive’s B2S wardrobe in the next couple of days.)

Button down by Mossimo for Target. Ringer tee by Old Navy. Jeans by GapKids. Backpack by Ekco. Tie-dye tee by Maude Blair. Cargo shorts by Mossimo for Target. Black Sneakers by Adidas.

Printed polo by Wes & Willy from Juvie. Plaid shorts by Gymboree. Superman tee by Old Navy. Brown herringbone trousers by GapKids.

Tee by Old Navy. Track jacket by Peek Aren’t You Curious. Screened tee by Peek. Khakis by GapKids.

Green polo by Lacoste. Denim cargo shorts by Mossimo for Target. Batman tee by Old Navy. Jeans by H&M.;
What to Wear to 5th Grade
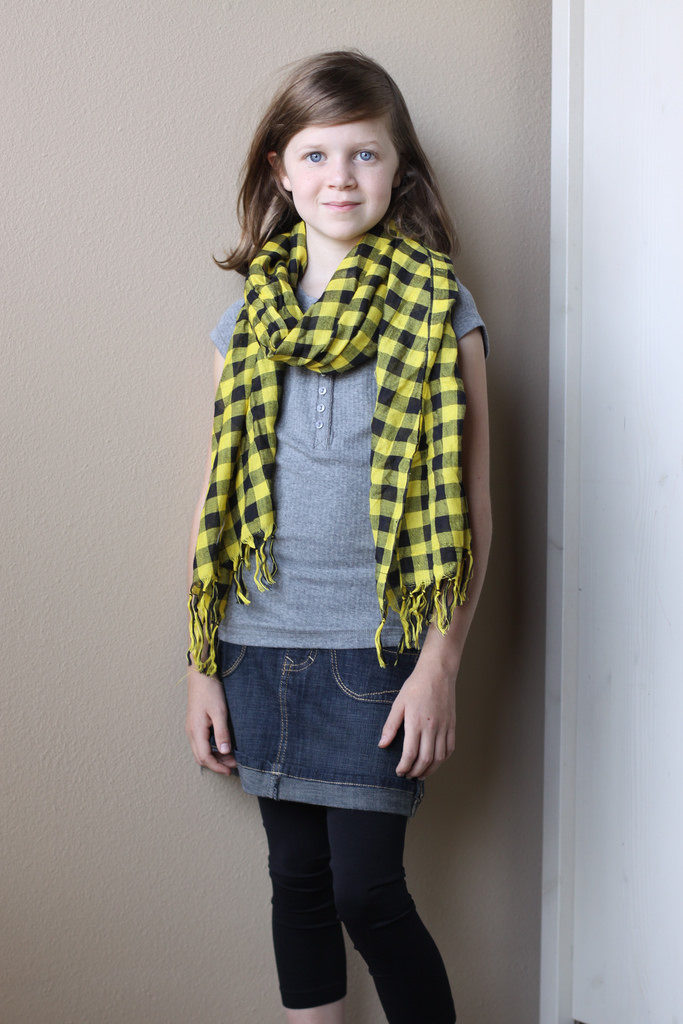
 Gray henley and leggings by Poof. Denim mini by Hydraulic. Plaid scarf by Passport Accessories.
It’s been so much fun putting together a back-to-school wardrobe for 10-year-old Maude this year. She’s had more opinions and ideas about what she wants to wear than ever before. Today she had the idea to put together some of her outfits and model them for the camera. Doesn’t she look amazing? I love how flexible everything is — there are 9 outfits here and she could come up with another dozen combos from this stuff.
For those wondering if we broke the bank, we spent about $100 on new clothes (I had the best luck at TJMaxx) and $50 on new shoes. Everything else was already in her closet. You can find more images from our living room photoshoot here.
Gray henley and leggings by Poof. Denim mini by Hydraulic. Plaid scarf by Passport Accessories.
It’s been so much fun putting together a back-to-school wardrobe for 10-year-old Maude this year. She’s had more opinions and ideas about what she wants to wear than ever before. Today she had the idea to put together some of her outfits and model them for the camera. Doesn’t she look amazing? I love how flexible everything is — there are 9 outfits here and she could come up with another dozen combos from this stuff.
For those wondering if we broke the bank, we spent about $100 on new clothes (I had the best luck at TJMaxx) and $50 on new shoes. Everything else was already in her closet. You can find more images from our living room photoshoot here.
 Plaid top by Chaps. Skirt by Peek. (Francie Pants underneath the skirt.) Cardigan by If It Were Me. Stripe tee and cargo pants by Old Navy.
 Hoodie sweater by Pink Republic. Yellow tee and polka-dot leggings by Old Navy. Plaid dress by She’s The One. Skinny jeans – Sqin by H&M;.
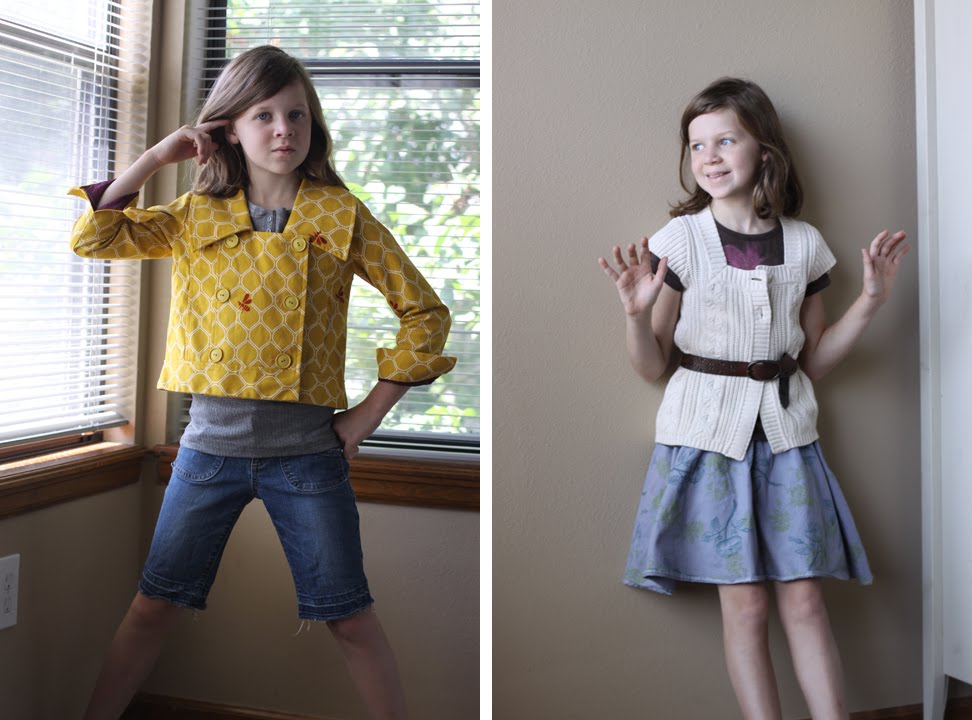 Yellow jacket by Ismodern. Jean shorts by Old Navy.
 Feather printed top by Kiddo. Cropped pants by Jean Bourget at Juvie. Houndstooth capris by Gymboree.
 Mock turtleneck by Target. Shrug by Seven Smooches.
FYI: I’ve listed sources (and links where I can), but as I mentioned above, at least 50% of the clothes pictured were already in her closet — so they probably won’t be available in stores any longer.
Maude is shown barefoot because we’re still waiting for her shoes to arrive. This year she’ll have 3 pairs to choose from. These Converse from Zappos and these black sporty shoes from Payless. Plus, she has a pair of cute brown and turquoise Asics that are still in good shape — we just need to replace the laces. The only thing left to buy: a backpack.
Mock turtleneck by Target. Shrug by Seven Smooches.
FYI: I’ve listed sources (and links where I can), but as I mentioned above, at least 50% of the clothes pictured were already in her closet — so they probably won’t be available in stores any longer.
Maude is shown barefoot because we’re still waiting for her shoes to arrive. This year she’ll have 3 pairs to choose from. These Converse from Zappos and these black sporty shoes from Payless. Plus, she has a pair of cute brown and turquoise Asics that are still in good shape — we just need to replace the laces. The only thing left to buy: a backpack. 8 to 5 Sandwich

 You ask. I answer. Here are directions to the famous 8 to 5 Sandwich. And a little background.
Ben Blair and I moved to Greece just weeks after I discovered I was pregnant with my oldest child. I was working as an art director at Ogilvy & Mather and everyday we’d order out for lunch. One of the nearby restaurants was called 8 to 5 — because they were only open during business hours and catered to the working peeps in the area.
I ordered their signature sandwich, also called the 8 to 5, on my first day of work. It was delicious. Maybe even heavenly. And it was one of the first meals that seemed to settle my morning sick digestive system. I ordered this same sandwich every day I worked at Ogilvy & Mather. Literally every day. It got me through that first pregnancy and has been a favorite sandwich ever since.
8 to 5 Sandwich
Ingredients:
French Baguette
Avocado
Cream Cheese
Lettuce
Bacon
Directions:
-Take a section of baguette (about 6-8 inches long) and slice it length wise.
-Mash the avocado and spread one piece of the sliced baguette with it.
-Spread the other slice of baguette with cream cheese.
-Add bacon and lettuce between the slices of bread.
-Enjoy a little bit of heaven.
One note. In Greece, they would mix the mashed avocado with some mayonnaise. It was yummy and salty and creamy. But for whatever reason, I’ve skipped this step for years.
You ask. I answer. Here are directions to the famous 8 to 5 Sandwich. And a little background.
Ben Blair and I moved to Greece just weeks after I discovered I was pregnant with my oldest child. I was working as an art director at Ogilvy & Mather and everyday we’d order out for lunch. One of the nearby restaurants was called 8 to 5 — because they were only open during business hours and catered to the working peeps in the area.
I ordered their signature sandwich, also called the 8 to 5, on my first day of work. It was delicious. Maybe even heavenly. And it was one of the first meals that seemed to settle my morning sick digestive system. I ordered this same sandwich every day I worked at Ogilvy & Mather. Literally every day. It got me through that first pregnancy and has been a favorite sandwich ever since.
8 to 5 Sandwich
Ingredients:
French Baguette
Avocado
Cream Cheese
Lettuce
Bacon
Directions:
-Take a section of baguette (about 6-8 inches long) and slice it length wise.
-Mash the avocado and spread one piece of the sliced baguette with it.
-Spread the other slice of baguette with cream cheese.
-Add bacon and lettuce between the slices of bread.
-Enjoy a little bit of heaven.
One note. In Greece, they would mix the mashed avocado with some mayonnaise. It was yummy and salty and creamy. But for whatever reason, I’ve skipped this step for years.
Do You See What I See?

The cherries are starting to ripen.
Both Ben Blair and I grew up with cherry trees in our yard. And we both have parallel memories of cherry pit spitting contests. Cherries feel like summer. What are your summer foods?
Rocking Chair Project

So this house we’re renting comes with a pretty fantastic yard. There are mature fruit trees — cherry, apple and peach. Two strawberry patches and a raspberry bramble. An herb garden. Lots of good cutting flowers. A large garden spot (large for suburbia anyway) which we’ve planted with tomatoes, peppers, summer squash, melons, pumpkins, salad greens and beans. Plus a good sized patio/deck with an awning.
We left our outdoor furniture behind in New York and have yet to replace it. In lieu of the traditional table and benches, I’d like to fill our patio with an assortment of rocking chairs instead. I’m thinking 7 mis-matched rockers in bright colors. I’ve set a budget limit of $50 per chair and now I’m hunting them down.
On Saturday I found a great turquoise rocker in metal for $75 that I hope to barter down this week. And a squatty, bright yellow one in front of a costume store. It wasn’t for sale, but if I show up with cash, maybe they’ll change their minds?
I’m willing to add a coat of paint to a non-descript rocker, or embellish with colorful cushions, but I do want to challenge myself to keep to the $50 per chair budget. If you’ve seen any rad rockers around, please let me know.
Also: if you live in the Denver metro area and know of a trustworthy upholsterer, I’d love a recommendation. Please. Pretty please?
image from kitby
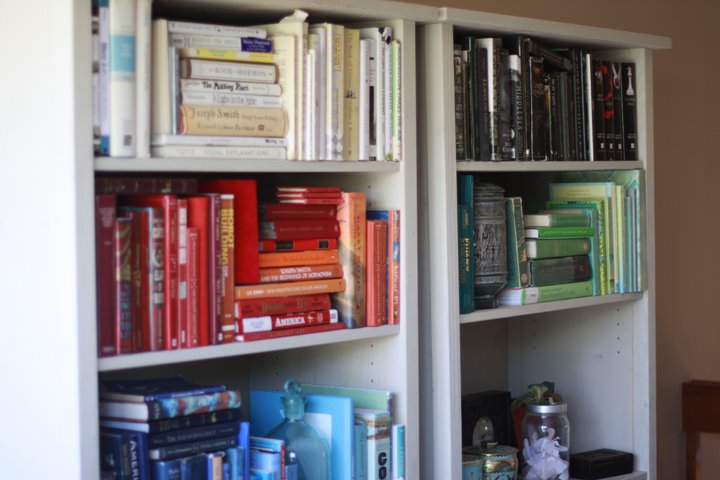
Books by Color


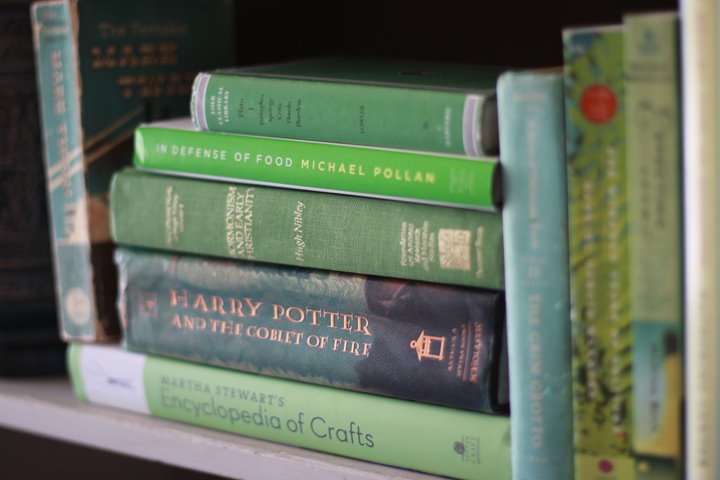
Last night, we organized the book shelves in the living room by color — they’ve been so drab every time I walked by, I’m hoping this will be the fix. You like?
Other than that, it feels like a funny day. I wonder what’s up? We returned an air mattress at Target. Then bought a new lamp shade. And some light bulbs. I went grocery shopping. We made cinnamon rolls (the super easy Rhodes version).
Now all I want to do is watch movies until it’s time for bed.
Feel free to join me. Happy weekend!
How To Build A Giant Table
 Okay friends. Here it is. My attempt at instructions or at least an explanation of how to build the giant table. With lots of photos. And more notes than you probably want. If you’re nervous to try it, remember that all I had to go from is some sketches I’d made on a legal pad and the picture of the table from Downtown Chic. So you’re already way ahead of me. FYI: the finished table measures 33″ high x 53″ wide x 107″ long.
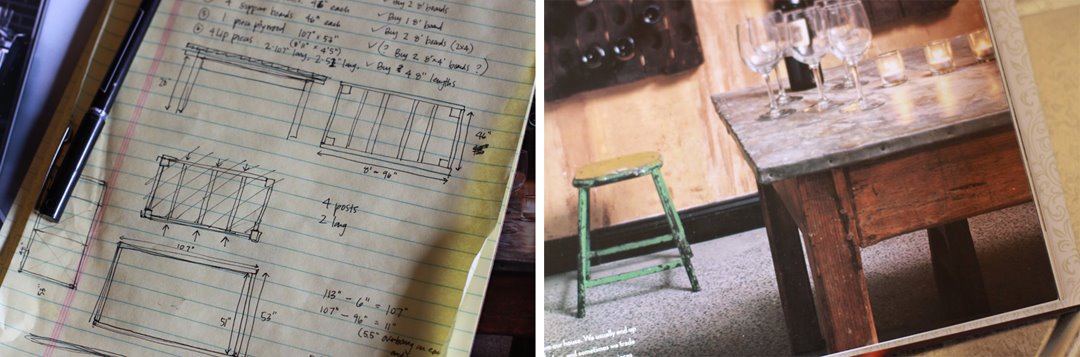 First, we spent an afternoon assembling materials. We used:
2 two x eight boards, 8 feet long each
2 two x eight boards, 46 inches long each
2 pieces of 1/2 inch plywood, 48 inches x 53 inches
1 piece of 1/2 inch plywood, 11 inches x 53 inches
6 two x four boards, 46 inches long each
4 two x two boards, 8 feet long each, cut to assorted lengths
4 four x four fence posts, 32 inches long each
A full sheet (60″ x 114″) of metal from Denver Heating & Air Conditioning. Before we left, they used their industrial metal folding machines to make a 1/2 inch lip around each edge so that we didn’t cut ourselves while handling the metal.
First, we spent an afternoon assembling materials. We used:
2 two x eight boards, 8 feet long each
2 two x eight boards, 46 inches long each
2 pieces of 1/2 inch plywood, 48 inches x 53 inches
1 piece of 1/2 inch plywood, 11 inches x 53 inches
6 two x four boards, 46 inches long each
4 two x two boards, 8 feet long each, cut to assorted lengths
4 four x four fence posts, 32 inches long each
A full sheet (60″ x 114″) of metal from Denver Heating & Air Conditioning. Before we left, they used their industrial metal folding machines to make a 1/2 inch lip around each edge so that we didn’t cut ourselves while handling the metal.
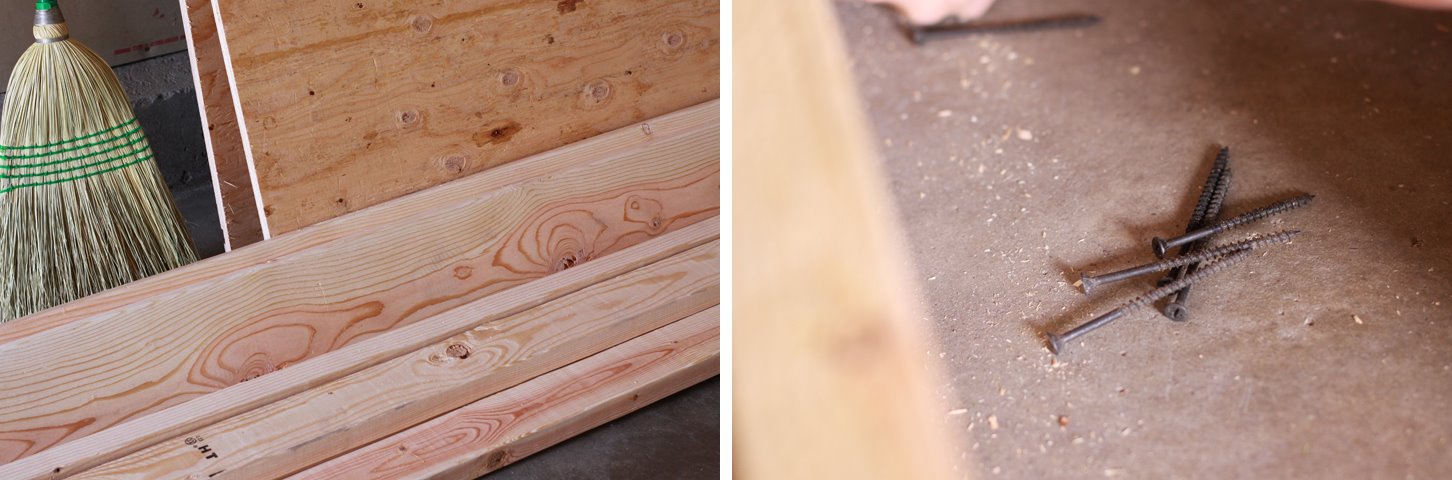 Costs:
-The lumber was just under $80 at Home Depot.
-The sheet metal was just over $50.
-My nephew already had some long screws (about 4 inches) and a box of black nails.
-We eventually decided we would want to attach the legs with bolts, so that we could easily remove the legs. Sixteen heavy-duty bolts and washers, etc, were about $50 at the hardware store.
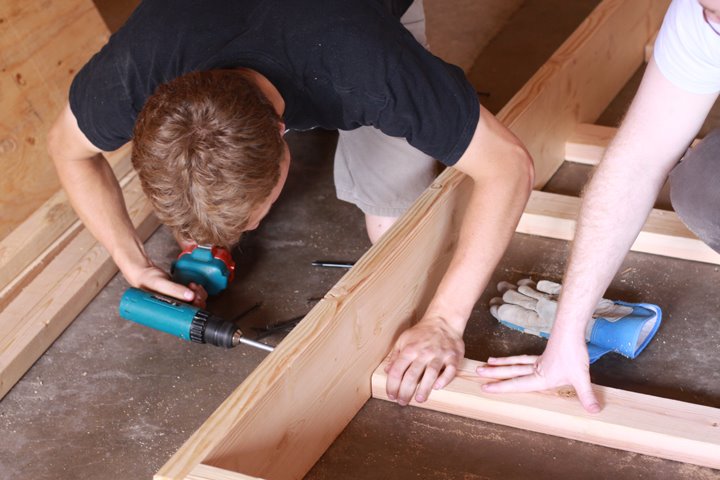
Once we had the materials assembled, we built the table top base. (And I should note, whenever I say “we” I mostly mean my nephew Josh.)
Costs:
-The lumber was just under $80 at Home Depot.
-The sheet metal was just over $50.
-My nephew already had some long screws (about 4 inches) and a box of black nails.
-We eventually decided we would want to attach the legs with bolts, so that we could easily remove the legs. Sixteen heavy-duty bolts and washers, etc, were about $50 at the hardware store.
Once we had the materials assembled, we built the table top base. (And I should note, whenever I say “we” I mostly mean my nephew Josh.)
 We formed a rectangle using all four of the eight x two boards. The short pieces went inside the long pieces. We secured this box together at all 4 corners with 4 inch screws.
 Once the outer rectangle was formed, we laid the six 46″ two x fours across the bottom. We attached those with screws from the outside. Then we flipped it over.
 Next, it was time to attach the top surface of the table — the wood we would eventually attach the metal to. We couldn’t buy a single piece of plywood that was big enough, so we used 3 pieces. Two large pieces and one small one in the middle.
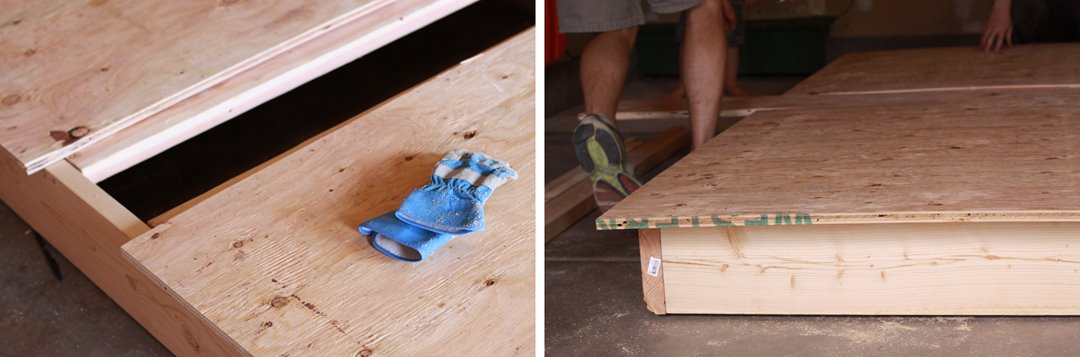 We attached the 3 plywood pieces to the table top base by screwing into the two x four boards through the plywood. Once attached, they formed a rectangle that measured 53 inches x 107 inches.
 When the plywood sheets were securely attached, it was time to add a lip around the edge — something to wrap the sheet metal around. We used lengths of two x two board, held them in place with clamps, then screwed in through the plywood to attach them.

 And tada! Phase one was complete. During phase two we added the metal top. During phase three we added legs. Here’s phase two:
We laid the piece of metal on the ground, top side facing down. Then placed the upside-down table top base on top of the metal.
And tada! Phase one was complete. During phase two we added the metal top. During phase three we added legs. Here’s phase two:
We laid the piece of metal on the ground, top side facing down. Then placed the upside-down table top base on top of the metal.
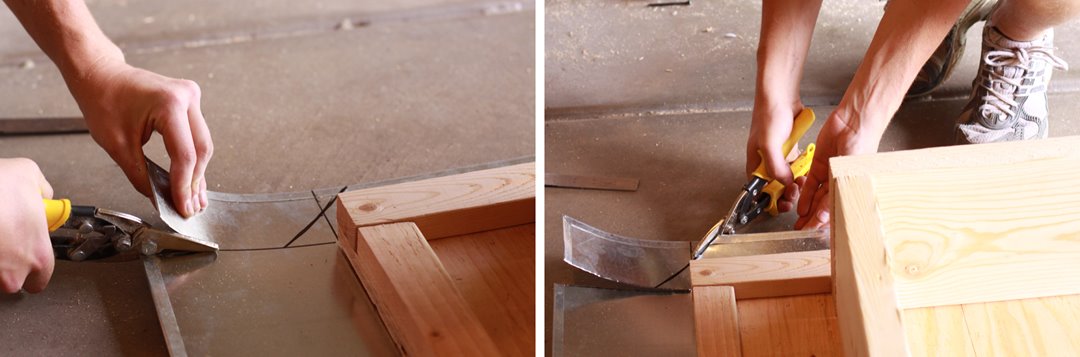 We marked and trimmed the corners of sheet metal. You can enlarge the images to see our technique. Then we hammered and hammered and hammered the metal until it would keep it’s shape wrapping around the table base. We used nails to secure the metal to the bottom of the table top lip.
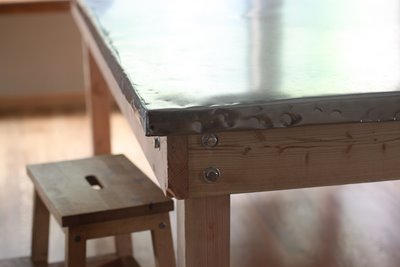
 With the table top complete, we moved it into the room where it would eventually live. (It’s incredibly heavy. Seriously.) And then we attached the legs.
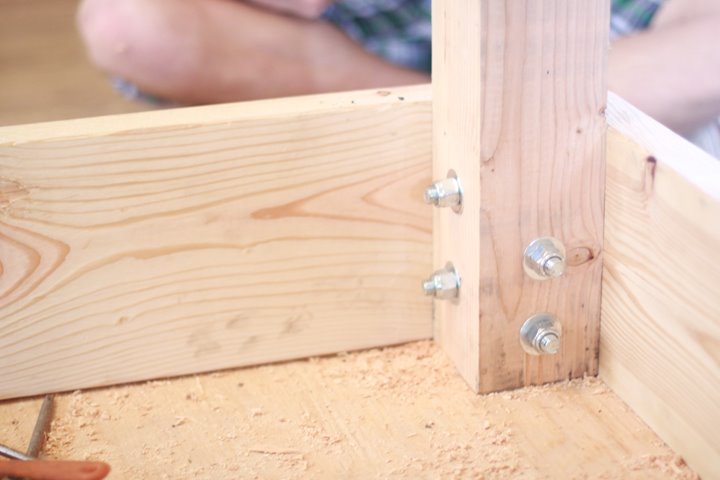
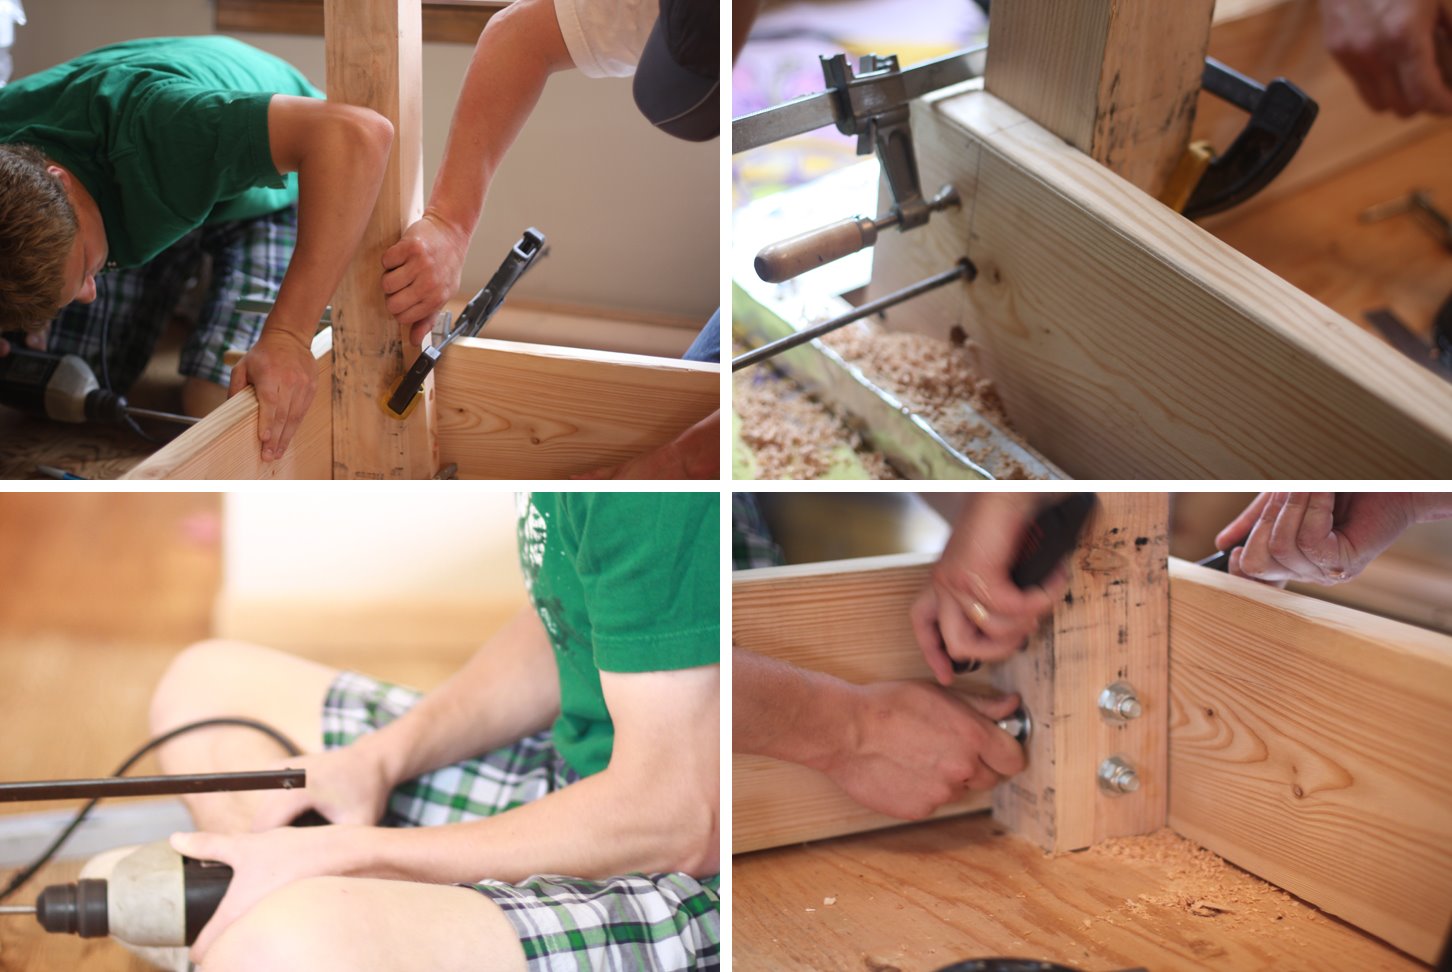 The fence posts were nestled inside each corner and secured with clamps. Then we drilled four holes through the table base sides and completely through the fence posts. Two holes on each side. For each leg, four bolts went through four holes and were secured with nuts and washers. If/when we ever have to move the table through a doorway, it will be easy to remove the legs.
 And that’s it. We turned the table on its feet and it was ready to use.
Except. A few days later, we realized some air pockets had formed between the metal and the plywood beneath. So we did a pretty major fix. Josh’s whole family came to help out. We took out every single nail and removed the metal top. We squirted three bottles of Gorilla Glue onto the backside of the metal, spread the glue evenly and placed the top back on the table.
And that’s it. We turned the table on its feet and it was ready to use.
Except. A few days later, we realized some air pockets had formed between the metal and the plywood beneath. So we did a pretty major fix. Josh’s whole family came to help out. We took out every single nail and removed the metal top. We squirted three bottles of Gorilla Glue onto the backside of the metal, spread the glue evenly and placed the top back on the table.
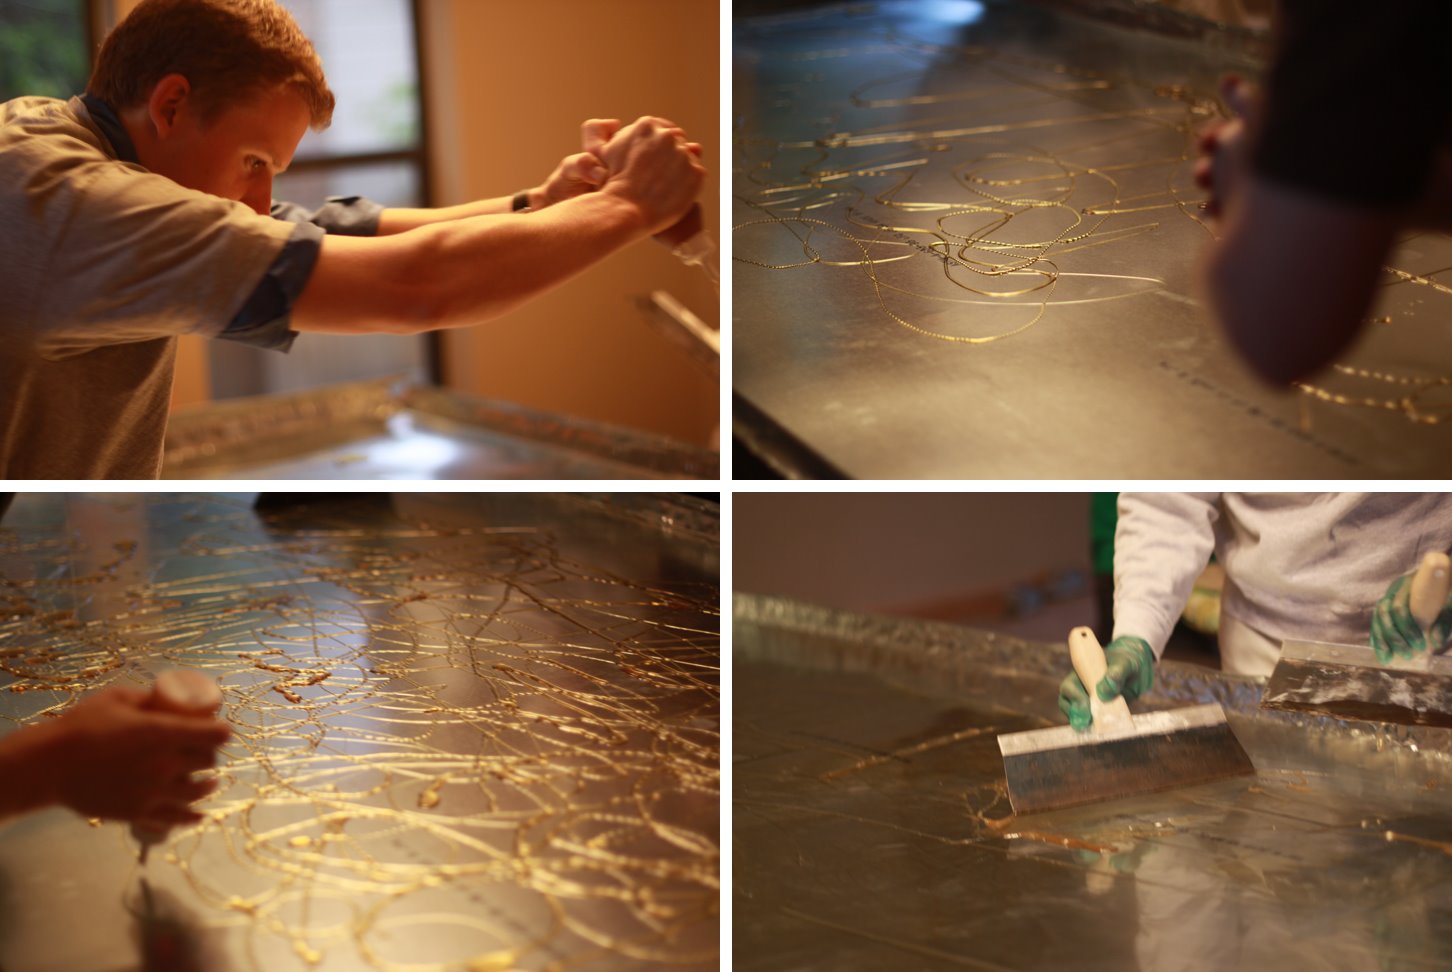
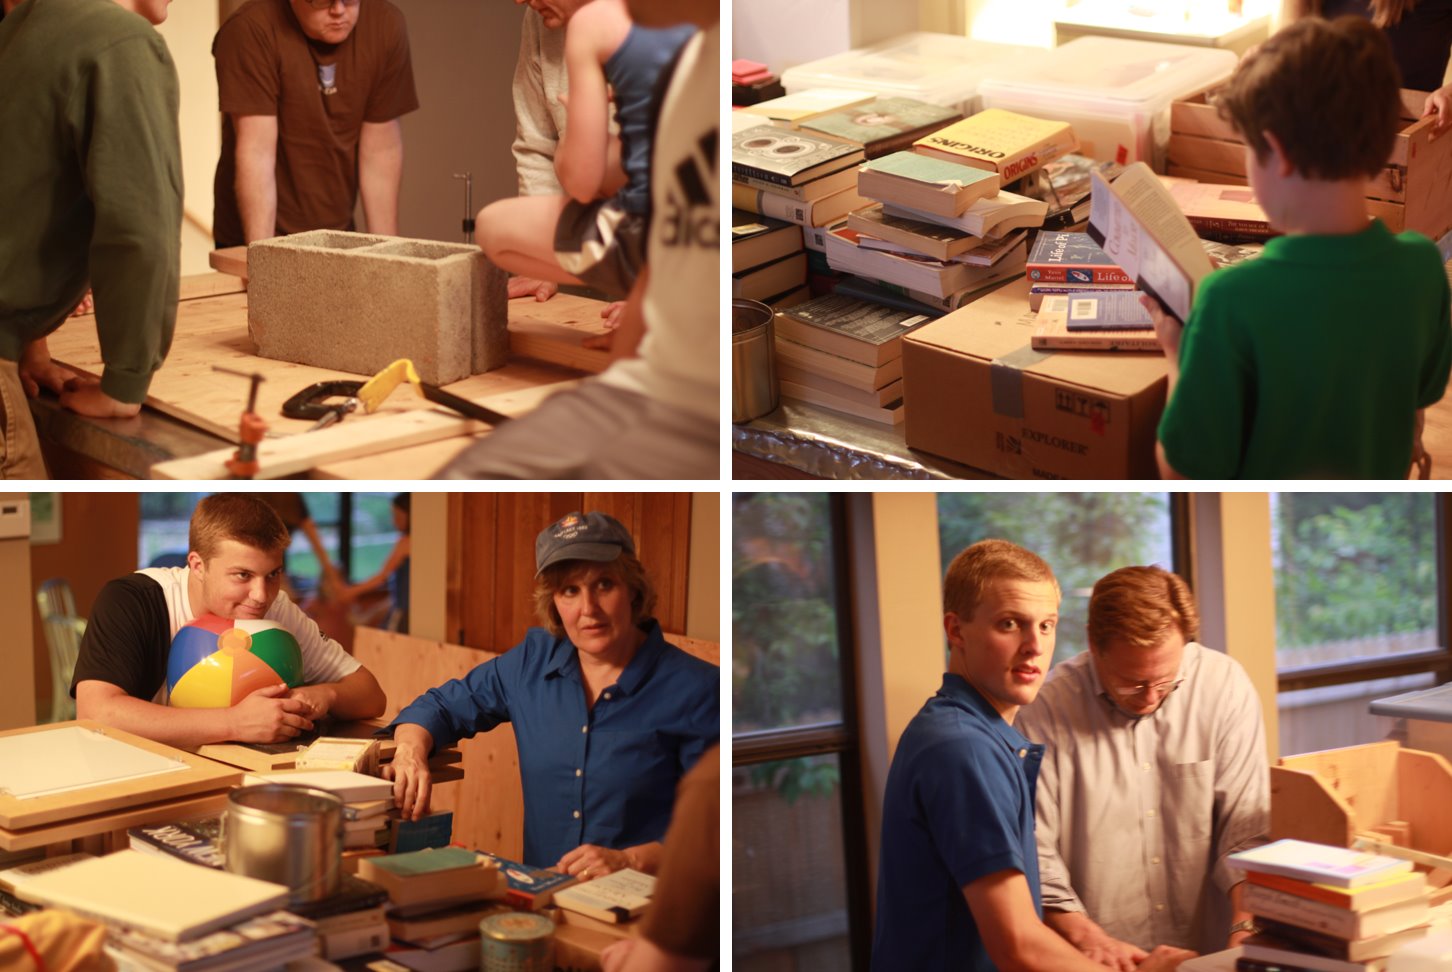
 We weighted the metal top down with every heavy thing in the house we could find. A couple of cinder blocks. Books. Boxes of files and papers. (Luckily, Ben Blair is a PhD and has oodles of boxes of paper and books.) We let the glue dry overnight, then removed all the weight and re-nailed the metal under the lip. Obviously, if we were building again, we would have done the glue part before we hammered and nailed the metal the first time.
 Other Notes:
1) Our table is at a non-regular height. 30″ is standard table height. 36″ is standard counter height. Our table is 33″ and works best with a 20″ workstool. If you wanted a higher table, you could just use longer pieces of fence post. You could make the table shorter, but you might not be able to sit around it comfortably because the two x eight boards extend down quite far — making it hard to tuck knees under if you were sitting on a standard height chair. If you want a standard 30″ table, you would be wise to use two x six boards instead of two x eight boards.
2) Since we didn’t really know what we were doing, I intentionally picked a table style that would be rough and allow for building mistakes. Let this give you courage if you attempt a table as well. The more scratches, rough spots and gouges the better.
And that’s it. Amazing! We still haven’t aged the table and are considering our options. I’ll definitely report back when I decide what to do. If you end up making a table too, please let me know. I’d love to hear how it turns out.
Josh, the main builder on this project (and the handsome guy in the blue polo shirt here) started a two-year proselyting mission yesterday. I know it’s only been a day, but my whole family already misses him like crazy. Thank you, Josh!
Other Notes:
1) Our table is at a non-regular height. 30″ is standard table height. 36″ is standard counter height. Our table is 33″ and works best with a 20″ workstool. If you wanted a higher table, you could just use longer pieces of fence post. You could make the table shorter, but you might not be able to sit around it comfortably because the two x eight boards extend down quite far — making it hard to tuck knees under if you were sitting on a standard height chair. If you want a standard 30″ table, you would be wise to use two x six boards instead of two x eight boards.
2) Since we didn’t really know what we were doing, I intentionally picked a table style that would be rough and allow for building mistakes. Let this give you courage if you attempt a table as well. The more scratches, rough spots and gouges the better.
And that’s it. Amazing! We still haven’t aged the table and are considering our options. I’ll definitely report back when I decide what to do. If you end up making a table too, please let me know. I’d love to hear how it turns out.
Josh, the main builder on this project (and the handsome guy in the blue polo shirt here) started a two-year proselyting mission yesterday. I know it’s only been a day, but my whole family already misses him like crazy. Thank you, Josh!
Table Project Update

More sneak peeks of the table project!
Isn’t it amazing? It’s enormous. And weighs 300 pounds or so. I love it so much! I know I owe more details and sources — a full post with more pics is coming. Now. Do I leave it as is? Or try to age it to look like this one?

How To Paint a Piano
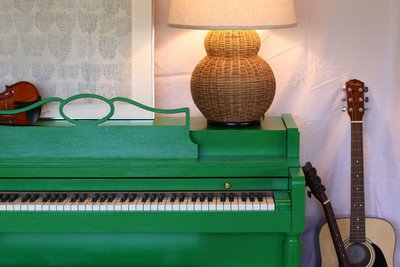
 If you’ve been thinking about painting your piano, then run, don’t walk, to your nearest paint shop and get yourself a quart of high-gloss enamel. You don’t have to paint it green, or any particularly bright color. But if you feel like your piano needs a fresh start, this is the cheapest, fastest way to go.
I had been wanting to do this project for 9 years and kept getting intimidated by it. But there was no need for fear. It was actually very straightforward and is one of the most satisfying projects I’ve finished in ages. Here are my notes, in case you’re considering a paint job.
If you’ve been thinking about painting your piano, then run, don’t walk, to your nearest paint shop and get yourself a quart of high-gloss enamel. You don’t have to paint it green, or any particularly bright color. But if you feel like your piano needs a fresh start, this is the cheapest, fastest way to go.
I had been wanting to do this project for 9 years and kept getting intimidated by it. But there was no need for fear. It was actually very straightforward and is one of the most satisfying projects I’ve finished in ages. Here are my notes, in case you’re considering a paint job.

Choose a Piano That’s Not Worth Restoring
The best candidate for something like this is a piano that’s not worth restoring. Ours was perfect. It was the piano I grew up with and it was pretty beat up when my parents originally picked it up for a bargain $300. By the time I inherited it, it was even more war-torn and the first thing I did was get 3 bids on having it refinished and restored. All three refinishers told me it would be about $2000 to restore the inside and $2000 to restore the outside and that the inside was just old, and even if it was restored it wouldn’t be as good as new. All 3 recommended sending this one to the junk yard and buying new. But new was out of our budget. And so was a $4000 restoration. I got some other opinions, and it was decided that the piano was good enough for lessons for the kids (the kids were babies at the time), and that we could get a more serious piano when and if our kids became serious piano students. So we just kept the piano as it was and I dreamt of at least giving it a shiny coat of paint. I kept the dream alive for 9 years. Some years I thought a glossy black would be lovely. But then I felt like black would seem like I was trying to make the instrument more formal than it really was. Later I thought maybe a white coat that we could sand down and make sort of rustic would be nice. Then for about the last 3 years I decided turquoise would be the right thing to do, but I never made it happen. When we were moving, the piano was so depressing I almost left it behind. But Ben Blair said we should bring it to Colorado. Saturday morning I was craving a challenge so I decided to finally tackle the piano paint job. When I got to the paint store I had a vision: go big or go home. I decided on Grass Green then and there. I bought one quart of hi-gloss enamel, one quart of primer, tinted to match the paint, and a paint brush. Grand total: $40. By Saturday afternoon I had primed it and painted 2 coats of paint. At that point, I decided the green was a little too yellow, so I took the remaining paint back to the paint store and asked them to green it up a bit. Saturday evening, I added one more coat and then came back to the project on Monday. Monday I did two more coats. Tuesday I did some touch ups. And tada! It’s finished. Unexpected thing: I can already see this will be the signature piece in our home. I had never thought about a signature piece for our home, but because I went with a bold color, now we have one. Every person that comes in the house is drawn to it. Everyone wants to touch the keys. It’s been played more in the last two days than it has been in years. Ben Blair wants to host a recital and call it Variations on the Green Piano. Other unexpected thing: a piano is big. Physically and visually. It’s not just a small accent piece. Once you have a green piano, you basically have to design the room around it instead of just work it into the existing space. Which means I need to talk to the landlord about painting the walls… Seeing our newly painted piano makes me super happy. Green wouldn’t be right for every home, but it’s perfect for ours. I feel like I just bought this piano 10 more years of life. Next up: time to get it tuned.Updated To answer some of your questions:
1) The color is Benjamin Moore Yellow Green (but in my mind it looks more like grass green). 2) I didn’t use oil-based paint. 3) According to the paint store: yes, you should sand off any existing hi-gloss finish before you prime. 4) I don’t have any “before” pictures to share. I did have some. But they are gone. Because I am an idiot and mistakenly erased them. 5) Yes, I painted the bench as well. When I have the room more put together, I’ll share a photo tour. 6) I did not disassemble the piano, but an expert or less-lazy person would have. I painted with the keyboard closed. Once the paint was dry, I opened the keyboard and painted around it with a smaller brush. Happy painting! P.S. — More green piano photos. Plus, at what age should your child start piano lessons?New Sofas

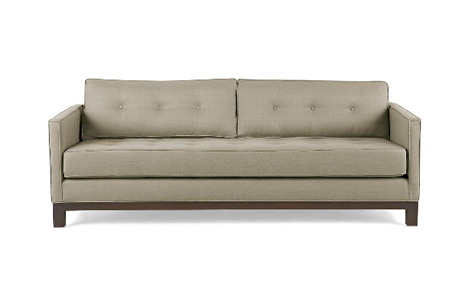
We left our tired, well-used sofas on the street as we packed up our house in New York. Which means we now have very little to sit on and are in couch shopping mode. Here are four I’m considering:
1) The Florence Knoll Sofa in fabric by NJModern pictured at top.
2) The Bucktown Sofa by Chiasso.

3) The Bantam Sofa by DWR.

4) The Abby Sofa by Chiasso.
These are all between $1100 and $1800 — about what I expect to pay for a good quality sofa in not-extravagant fabric. For a total bargain, there’s also this simple silhouette:

The Buse Sofa from JC Penney. More of an over-stuffed feel than I’m looking for, but you can’t beat the price: on sale for $499.
Thoughts?
We’re Officially Locals Now

Morning all! It’s a brand new week. Our house is now wired up. I’ve got a new Guest Mom to introduce to you today. And I’ll be announcing winners of last Friday’s Giveaways in a bit. Life is good!
While I’m writing today’s posts, here are some pics of our maiden voyage to the library. Library cards were acquired by all.


Most fun thing about our new library: see that phone Oscar has to his ear? When you pick it up, someone on the other end is there to read you a story.
Which reminds me, we have decided to try something new: no cable/DVR. I am a bit of a DVR addict and want to declare from the beginning that I may not last a month without its joys. We’re not giving up TV altogether — we just want to experiment with the downloadable options out there. Maybe Apple TV. Maybe Roku/Netflix. We’ll see.
While we figure things out, the library has suddenly regained it’s prior glory in my life. I’ve got all sorts of reading time on my hands now that I can’t depend on American Idol to keep me entertained. So I’m need of book recommendations. If you’ve read anything wonderful lately, please leave a comment. I’d love a nice long list to plow through.