More Homemade Christmas 2008
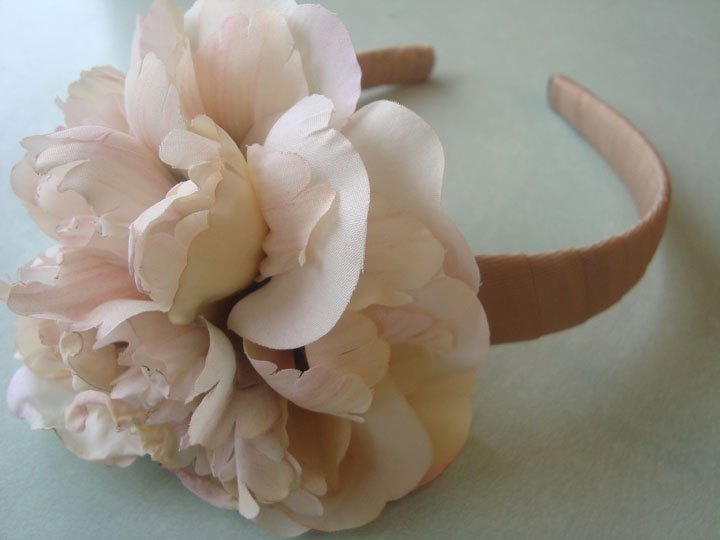
Olive has been working on gifts for her siblings over the weekend. She’s especially happy with the headbands she made for Maude and Betty. We think the creamy-colored one will coordinate perfectly with the tutu Ralph made. I’m super happy with them too. And already have plans to borrow them.

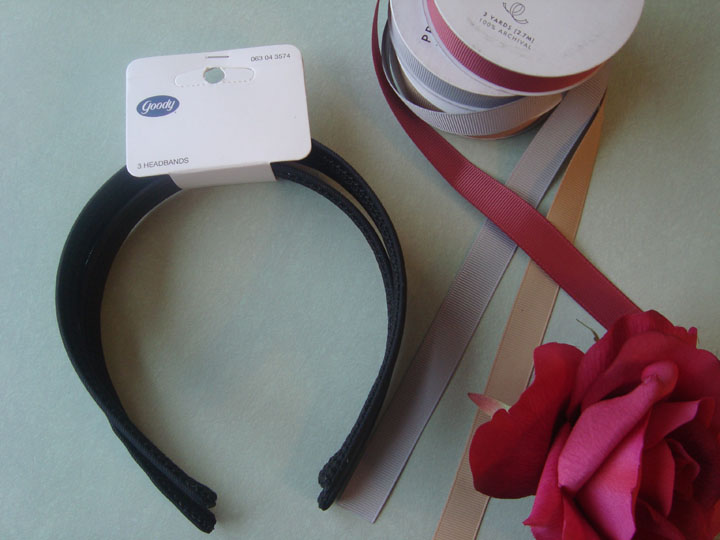
Materials: we bought a 3-pack of black headbands at Target for about $3. We bought fake flowers, for $3 to $4 per stem, and coordinating ribbon for $1 per roll from Michaels. Each headband will use between 1 and 2 yards of ribbon. Total materials for 3 headbands was less than $20. Just for comparison, a similar headband, like this darling one at CrewCuts is $16.50.

To make: wrap the head band in ribbon using a hot glue gun to attach. We had the best luck keeping the ribbon smooth by starting it at each end of the headband and meeting where the flower would be placed. Once the headband is completely covered in ribbon, it’s time to add the flower.

Pull the flower off of it’s stem, and trim the remaining plastic so that the bottom of the flower is flat. In front of a mirror, put on the headband and move the flower around until you’re happy with placement. Mark where your want to place the flower with a pencil (the pencil mark will be covered by the flower). Attach the flower with hot glue. Done.
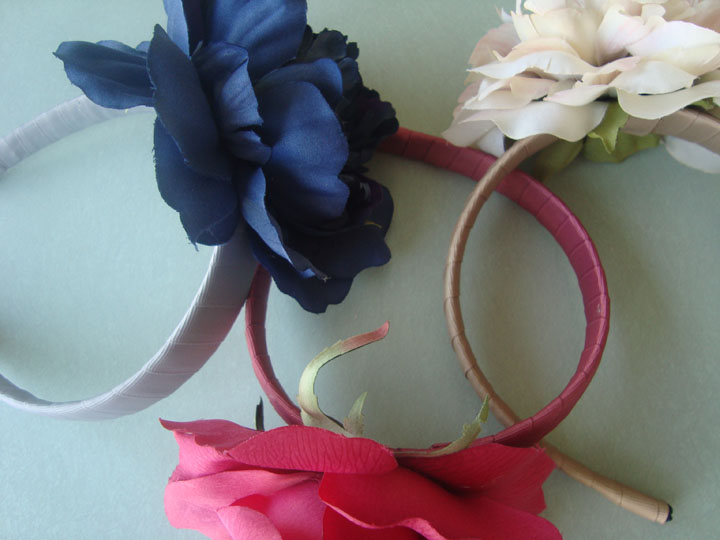
This is an incredibly fast project. And the headbands turned out beautifully. The fake flowers we bought each came with a large bloom and a small bloom. We didn’t want the small blooms to go to waste, so as an afterthought, we glued them to small barrettes. Cute.

For Ralph, Olive made chocolate-chip-cookies-in-a-jar. For Oscar, Olive is going to do something cool with pencils — I’ll try to post pics soon. To see more gifts my kids made, you can go here.
Homemade Sibling Gifts 2008

This is the third year that my kids are making gifts for each other. It’s turned into one of our best family traditions — requiring more thinking and time than is ideal, but my kids LOVE it. As I’ve mentioned in years past, I prefer the gifts to be usable and practical.
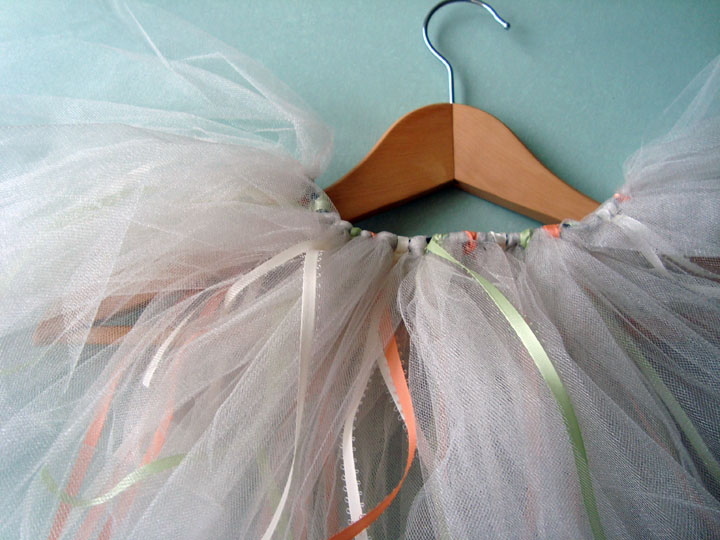
For 2 year old Betty, who has lately become obsessed with all things ballerina, Ralph made a tutu. My friend Jill gave me this idea and it is such a great project (thank you Jill)! It’s virtually no-sew.
Cut elastic to waist size and stitch together — that’s the only needle and thread required. Then cut lengths of tulle from a 6-inch-wide tulle ribbon roll. Fold the tulle piece in half and then thread the ends through itself around the elastic. And that’s it. You just keep repeating till the elastic is covered.

We used an entire roll of champagne colored shimmer tulle (25 yards). It was on sale for $3 at Michaels and provided 33 lengths (about 2 feet long each) to tie to the waist band. We also used 3 rolls of ribbon in peach, cream and sage green. They were .50 cents, also from Michaels. They provided 11 lengths each and were attached between the tulle pieces for accents. We already had elastic, so the whole cost for the tutu was $4.50. And it turned out beautifully. I think Betty is going to be beside herself with joy when she opens this.
Another note about this great project. You can make the tutu any length you like, by using longer or shorter pieces of tulle. So this same idea could work for an older girl as well. Also. If I’d had another roll of the tulle, I would have used it and made the tutu twice as full. (I’ve posted more specific directions and photos here.)

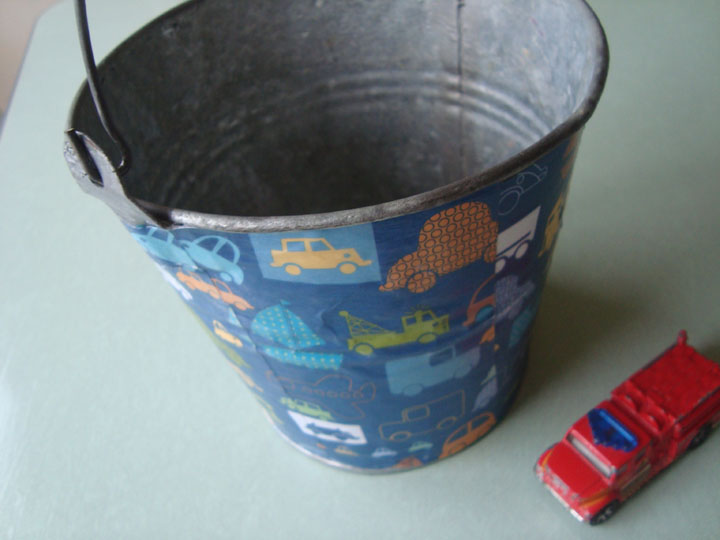
For Oscar, Ralph decoupaged a bucket to corral his matchbox cars. We used a bucket we already had, plus modge podge and sponge brushes in our art supply stock. So the only cost on this one was .69 cents for a piece of car-themed scrapbook paper. I heart decoupaging. It breathes new life into all sorts of things.
A super simple project. We first cut wide strips of the paper the same height as the bucket. We put a layer of modge podge on the bucket, added the paper strips, and coated the tops with more modge podge. We did 3 top layers of modge podge, waiting between each for the last coat to mostly dry.
I have it on good authority that Santa is putting a pack of cars into Oscar’s stocking, so he’ll be excited to put this bucket to use immediately.
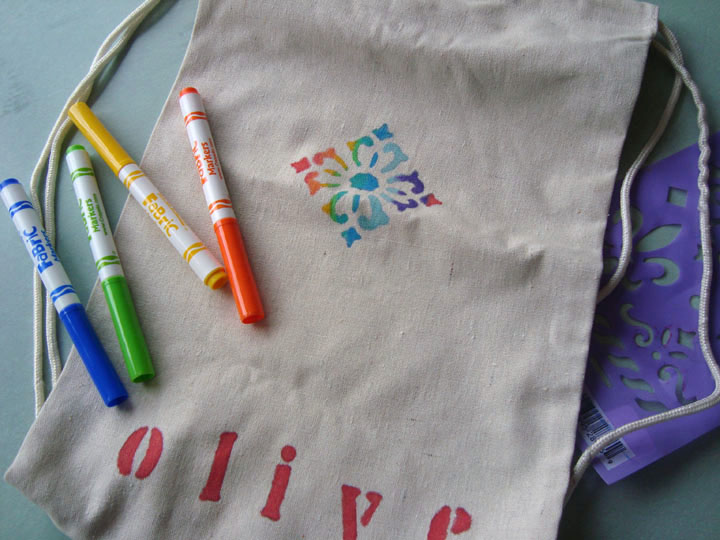

Ralph used fabric markers and stencils to customize knapsacks for Maude and Olive. They’ll use the knapsacks to carry their shoes/clothes to dance class and gymnastics class. Very straightforward. Just place the template on the fabric, color in with fabric markers, and set with a hot iron. We had all the supplies for this project, so it was a freebie. Ralph was the most happy about and proud of this particular gift.
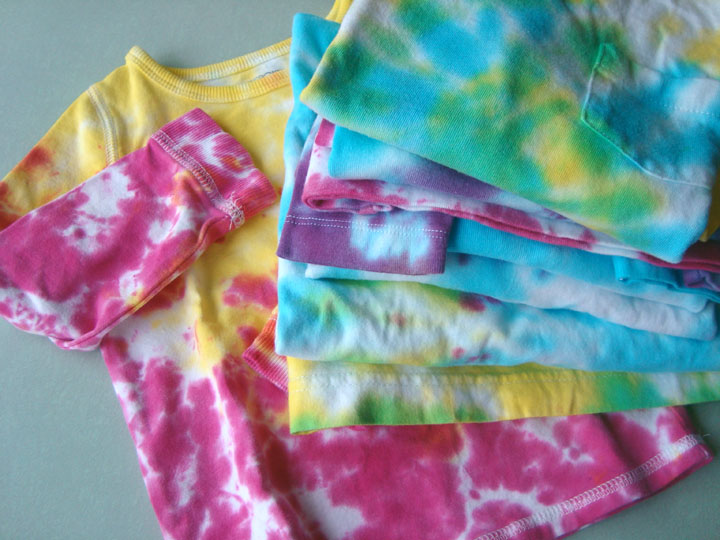
For her sibling gifts, Maude made tie-dye t-shirts. A project that doesn’t take much time and provides really satisfying results. We adapted instructions from here and here with t-shirts found for about $5 each at Old Navy and Target.
Tie-dying is addictive. If we hadn’t run out of dye, I think we would have started coloring boxers and undershirts next. Maude is so pleased with how the shirts turned out she can hardly stand to keep them a secret.
Olive will put together her gifts this weekend. We’re not sure exactly what she’s making, but some of the ideas on the list are: ribbon belts, embellished headbands, baseball caps with vintage scout patches found on ebay, decoupaged wood blocks, and homemade hair conditioner. She also likes the idea of taking a photo portrait of each sibling and then framing it to display on their nightstand.
You can see more of what we made this year here. You can see what we made in past years here and here and here and here. What do you like to do for sibling gifts?
Ask Design Mom: Stocking Display
Ask Design Mom Question:
Dear Designmom, I was wondering if you had any fun ideas of where and how to hang up stockings. I have no fireplace or cute mantel. (sigh.) Do you have any suggestions? — Allison
Design Mom Answer:
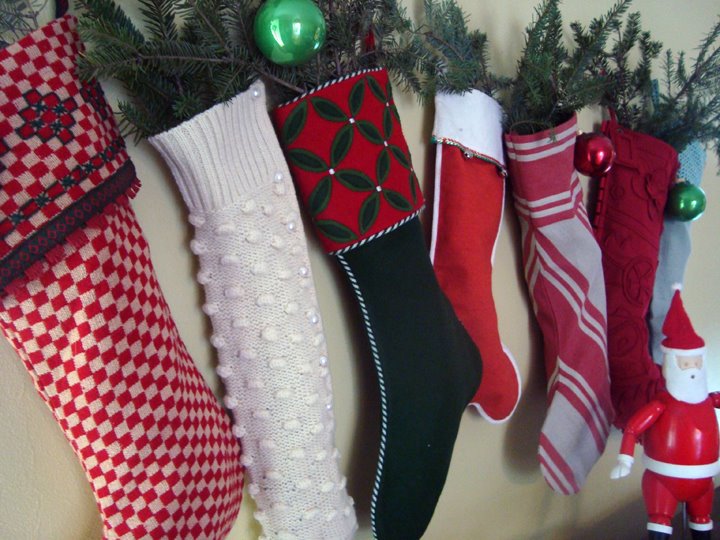
I feel your pain, Allison. I too have a fireplace-less home. In fact, over the last decade, I’ve lived in a series of 3 fireplace-less homes, and I’ve solved the where-to-hang-the-stockings-question a few different ways.
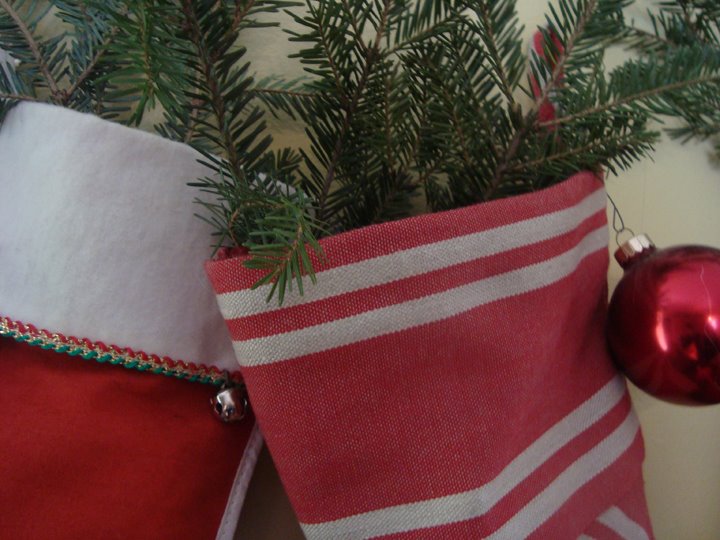
1) Right now, our stocking are hung in a row over the piano — using very small nails. They look great! And if you don’t have a piano, this would work just as well over an entry table.
2) In years past, I’ve used the banister on the stairs for a stocking display. If you have an open stair case, this is a wonderful solution. Just use pretty ribbon to tie the stockings along the length of the hand rail. Bonus: it’s easy to the the spacing nice and even by using every other opening in the banister.
3) My friend uses the side of a tall bookcase to hang her stockings in a vertical row and it looks fantastic.
4) I think Christmas Stockings hung from the footboard of a bed are just about the most charming things ever.
5) Last idea: when I was about 5 years old, my family was living in a small apartment while we built a home. I remember watching my mom hang our stockings from the ceiling. And thought is was wonderful.
What about you Design Mom Readers? Where do you hang your stockings?

Advice Please

I’ve been looking for a new heavy coat and found this beautiful red one at TJ Maxx the other day. I’m loving the shape, loving the details, and loving that it was a bargain for an overcoat at $60. Plus, it’s from Esprit which made me happy — I don’t think I’ve worn anything from the Esprit line since junior high. : )
Only problem, it’s a size too big (and they didn’t have a smaller size). Other only problem, will I like it less after Christmas when I’ve had my fill of red?
Do I keep it? Or return it? Feeling so indecisive…
Celebrity Mom
Big news! Huggies has officially named me, and some of my favorite peeps, a “celebrity mom.” It feels good. But honestly, I always thought “celebrity” involved more limos/Escalades. In my case, it means Huggies posted a video of me being interviewed by Ralph. Hot! You can view the video under the Celeb Mom Spotlight tab at Generation Huggies.
Bonus. At The Motherhood you can also see the video Huggies chose NOT to use. It features Maude interviewing me — plus Betty crawling all over me — plus a glimpse of Oscar’s bare bottom. And it’s filmed by Ralph.
[youtube=http://www.youtube.com/watch?v=IYcwGNQxoSQ]
I feel like this “not picked” video is pretty representative of what goes down at my house on any given evening. Watch for this highlight: I ask Oscar where his pants are. He looks down and says, “I don’t see them.” Fabulous.
Hey. Also. Tomorrow — that’s Thursday, November 20th — is your very last chance to submit your own video to Huggies. You should totally do it. It’s free. It’s fun. And you could win fame and fortune — you know how I’m all about celebrity.
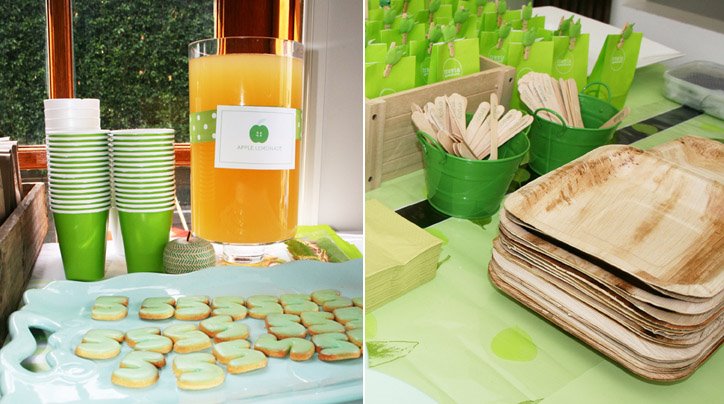
Apple Party
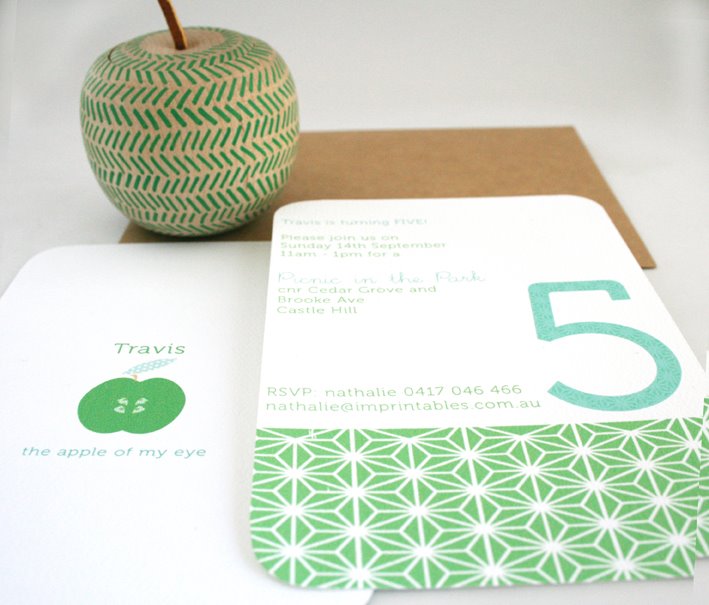

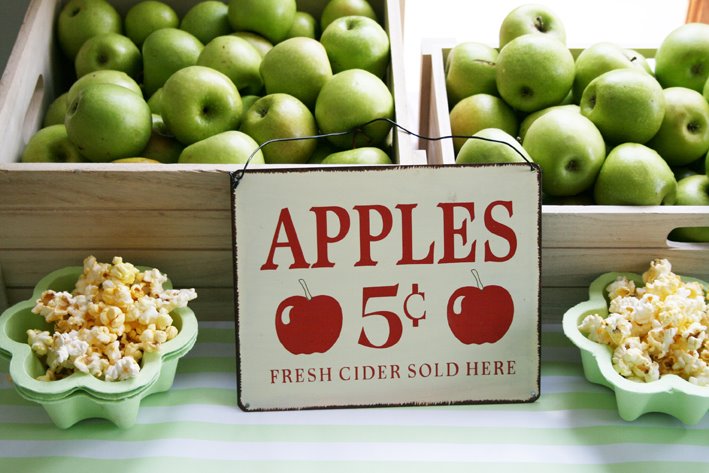
Nathalie, from the Australian paper company Imprintables, sent me photos from the super-charming apple-themed party she had for her son, Travis. So cute! And I love that’s it’s totally unisex. And totally adaptable to pretty much any fruit.
Refreshments were child-sized apples, apple lemonade and of course, apple pie with ice-cream. Games were traditional — bobbing for apples, sack races and tug-of-war.
Curious about Apple Lemonade? Me too. So Nathalie graciously shared her simple recipe:
1 bottle of apple juice
1 bottle of pear juice
1 2L bottle of lemonade
Combine; watch the children and mums alike devour this tasty concoction
Sounds delish!
Election Day

I voted.
Then. To commemorate the event, I called in a voice recording at The Motherhood telling all about my experience at the polls. And then I embedded the message here on Design Mom (click the triangle “play” button to hear what I said):
You can call in and record your voting experience too — right from your cell phone. Go here to try it out. And find simple instructions here. It’s so great to hear everyone’s voices.
Happy Election Day!
PS — is the patriotic pin-up girl (found here) too sexy? You know how hard I try to keep it G-rated around here. . .
Day Off
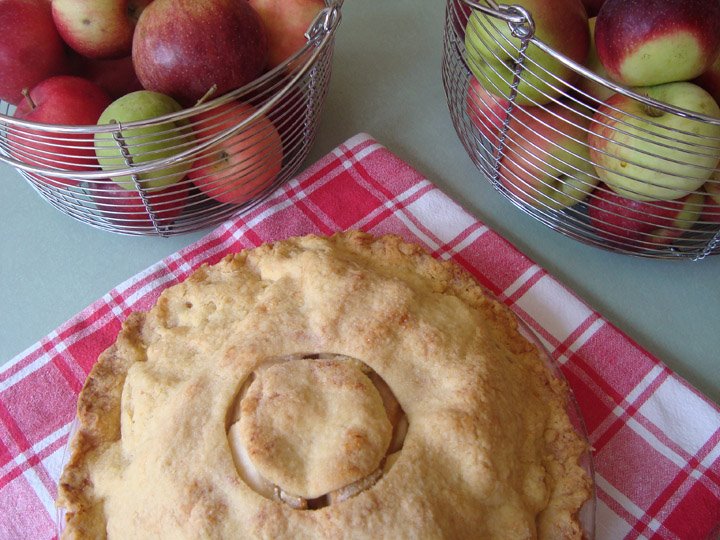
Two apple pies baked before noon. From apples we picked ourselves.
It’s hard to improve on that sort of day. Did the kids ransack the house during the making/baking process? Yes. Am I still in my pajamas? You bet. Is my foot covered in powdered sugar? Oddly, yes. But I have a whole pie to eat and a whole pie to give away. So who really cares about the rest?
Also, I just tried this circle thing instead of my usual slits in the crust — I’ll stare at it for awhile longer, but I think I love it. If I was ever going to have a pie signature, I’m pretty sure this would be it.
One more thing. In case you’re wondering, while the first pie is baking, there is just enough time to make a second pie, clean the kitchen, and make fresh whipped cream — and if the kids help, you can even get the family room whipped into shape. So you might as well make two. I’m just saying.
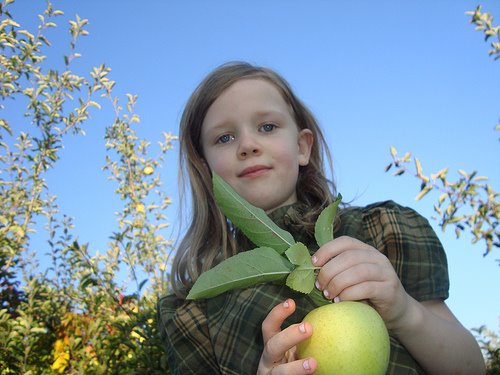
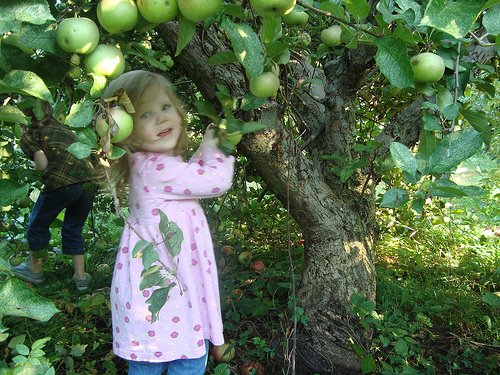
Apple Picking 2008
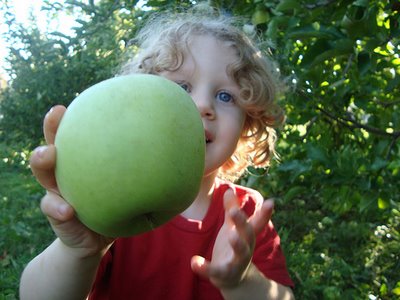
 The kids had school off yesterday. We spent the morning working on Halloween costumes and we spent the evening apple picking at Stuart’s Farm.
Stuart’s Farm is exactly what I want in an apple-picking adventure. No bounce house. No hayride. No carnival. No paid parking. Just a beautiful, walkable orchard (with great apples) and a small shop where you can buy local jams and gourds and mums.
We are notoriously bad about forgetting our camera when we go on outings, but we didn’t forget yesterday. So I posted a million photos of our adventure on flickr. To share with the Grandmas. And any curious blog readers.
The kids had school off yesterday. We spent the morning working on Halloween costumes and we spent the evening apple picking at Stuart’s Farm.
Stuart’s Farm is exactly what I want in an apple-picking adventure. No bounce house. No hayride. No carnival. No paid parking. Just a beautiful, walkable orchard (with great apples) and a small shop where you can buy local jams and gourds and mums.
We are notoriously bad about forgetting our camera when we go on outings, but we didn’t forget yesterday. So I posted a million photos of our adventure on flickr. To share with the Grandmas. And any curious blog readers.


Family Equation
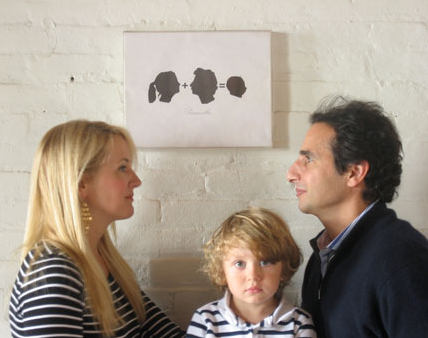
Joanna Goddard, an excellent writer who keeps a lovely blog called A Cup of Jo, is now writing a daily relationship blog for Glamour Magazine called Smitten (great name!). One of her posts today featured this smart family portrait idea featuring the (clearly clever and talented) Pasanella Family: her profile + his profile = child’s profile. Love it!
24-25-26
Here’s a peek at the calendar at our house:
August 24, 2008
My parents’ 40th wedding anniversary. (Not really celebrated, because my father passed away a decade ago, but still acknowledged with a smile.)
August 25, 2008
Olive’s 7th Birthday (We’re having a family party tonight. I’ll share pics later.)
Brother-in-law Jim’s Birthday
Niece Lindsey’s 12th Birthday
Nephew Colin’s 4th Birthday
Roger’s Birthday (Roger is my mother’s wonderful husband.)
Erin McEvoy’s Birthday (Roger’s daughter)
Alan McEvoy’s Birthday (Roger’s son)
That’s a lot of birthdays. And they’re followed up by one more:
August 26, 2008
Ralph’s 11th Birthday
As you can imagine, there is a lot of wrapping, decorating, well-wish-phone-calling, shopping and baking going on at our house. But. In the midst of all those tasks and busy-ness, I want to make sure to commemorate the most exciting, coolest, most important thing that’s happening today:
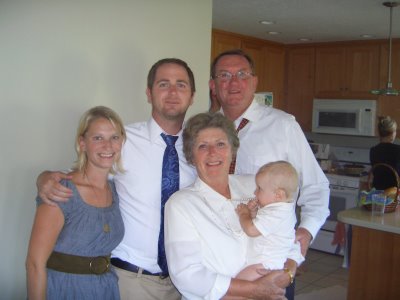
Donna and Roger, with Jared, Liz & Hank
My Mom and Roger are leaving on a mission! They report to the Missionary Training Center today. And they’ll be flying to Russia on Saturday. Ykaterinburg, Russia to be exact. Where the annual temperature reaches 70 degrees at the high (brrrr!). To help me get a handle on the geography, this bit of trivia helped: the dividing line of the the European and Asian continents goes right through the city of Ykaterinburg.
I’m so proud of them for doing this challenging, adventurous and worthy thing. And I’ll miss them both. And I hope they’ll bring me home one of these.
Lucky Number 13

It’s our 13th wedding anniversary today.
What luck that Ben Blair gets more charming every year. If I’d understood how fun it would be to be married to him, I would have shortened our 2 month engagement. Here’s to number thirteen — bound to be our luckiest year yet!

I know it’s blurry, but don’t you think it captures my adoration?
Unexpected PR
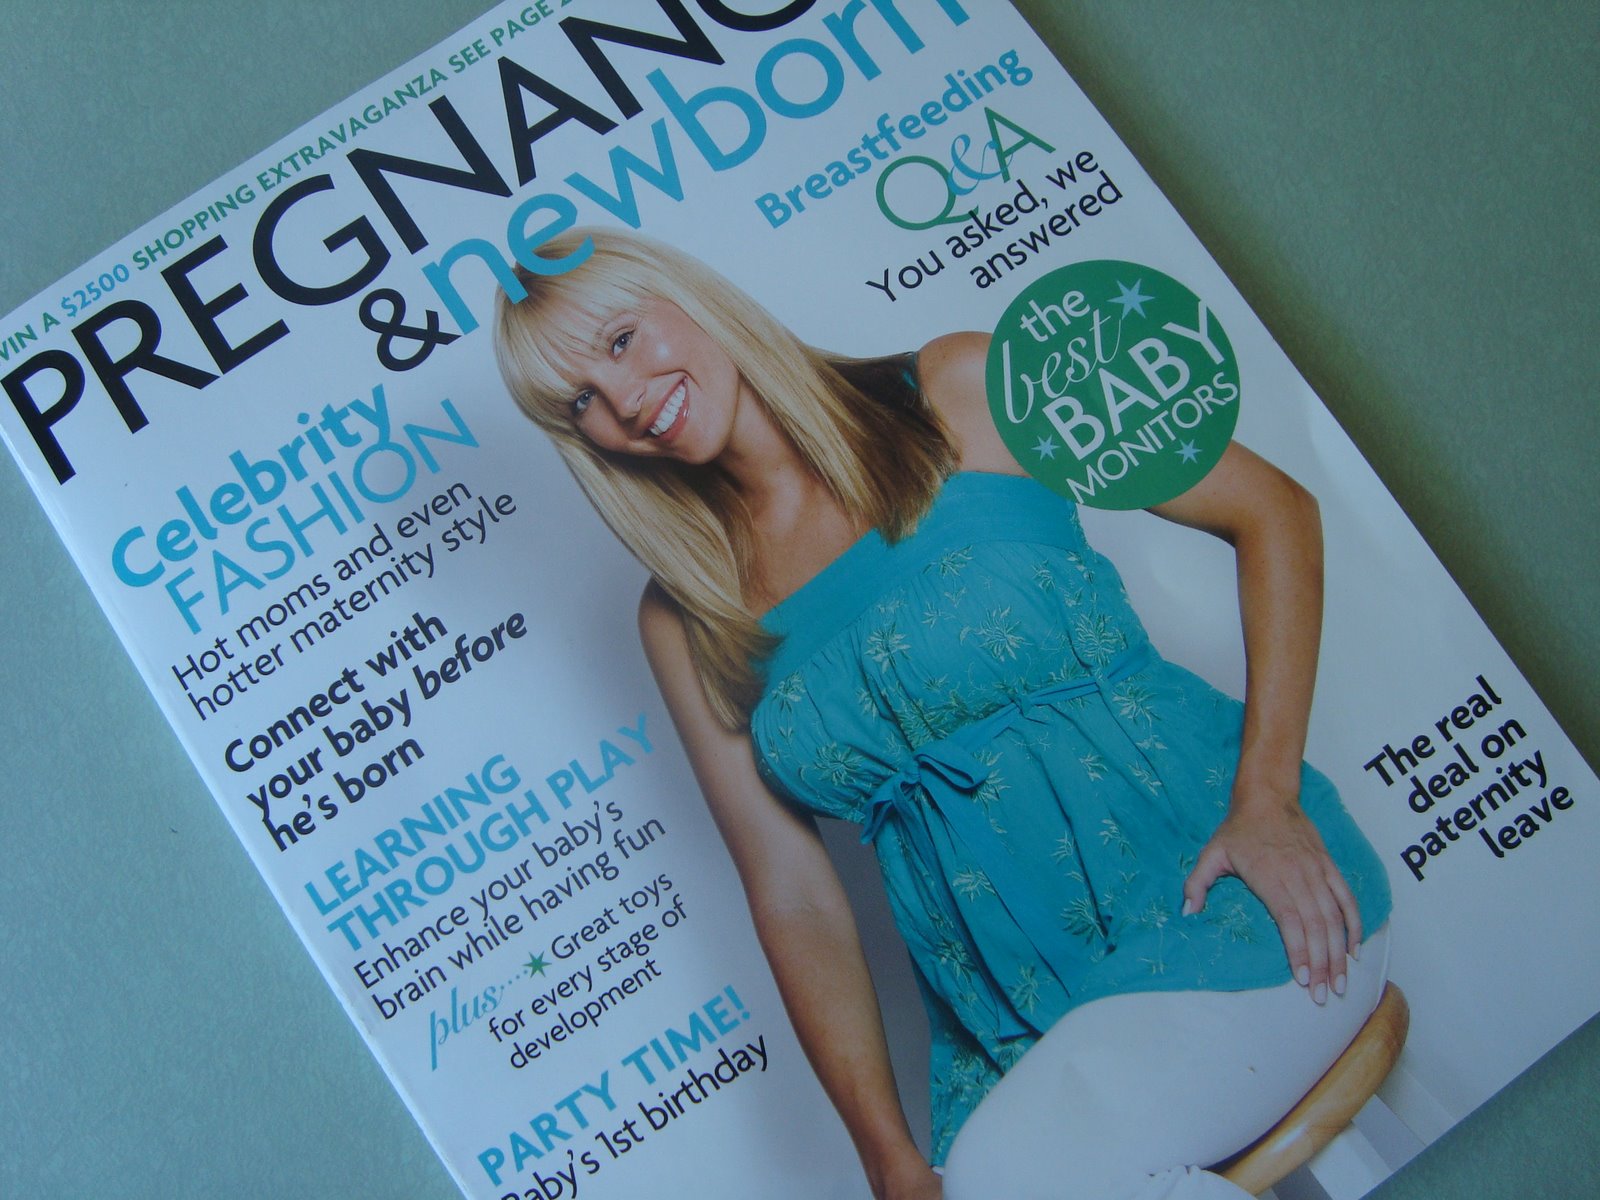

Look what I just found out: On page 55 of the beautiful August issue of Pregnancy and Newborn, there is an article on the best Mommy Blogs — and they called out Design Mom as one of their favorites. I’m absolutely tickled pink. In their words:
“At Design Mom, blogger/designer/art director/mother of five(!) writes about her favorite ways of obtaining child-friendly and functional design while maintaining stylish and serene style. Be inspired by her posts about handcrafted furniture, cool toys, creative art projects and more.”

And. I was in very good company — my friends at I’m Not Obsessed and Mom Finds were their celebrity gossip and fashion picks. The best part about this press: I had no idea I was even on their radar. What a nice surprise!
Maude’s Cloud Photos


Unexpected flight entertainment: Maude kept busy with the camera phone shooting the gorgeous pink tinged clouds out the window. There’s something grainy and otherworldly that’s lovely about them.

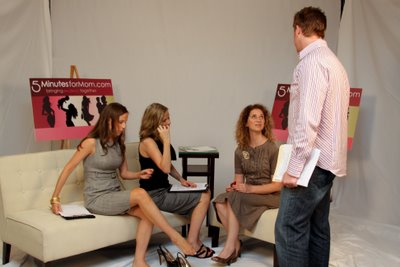
Second 5MFM Interview
http://www.vimeo.com/moogaloop.swf?clip_id=1433078&server=www.vimeo.com&show_title=1&show_byline=1&show_portrait=0&color=&fullscreen=1
Hey. Part 2 of my Five Minutes For Mom interview is up. It’s all about my Kirtsy Partnership. And you can find more delightful FMFM interviews here — featuring lovely ladies from blogs like Scribbit, Rocks in My Dryer, and Adventures in Baby Wearing.
And here’s a behind-the-scenes shot of the interview for those who are curious about such things (like I am):

Rudi & Daisy
Last year, the BlogHer conference was in Chicago. I don’t know a soul in Chicago. This year, BlogHer was in San Francisco. And I have all sorts of friends and relations in San Francisco. Which is wonderful. And which means I spent about half my conference time visiting family.
On Friday afternoon, my dear Aunt Robin K, my cousin Scott and his darling girlfriend, all stopped by the St. Francis — the hotel hosting the conference. We chatted in the ballroom and ate free conference candy bars.
On Saturday, Jordan and I spent a lovely morning at Grandma Rudi’s house in Menlo Park. She is all about whatever is in the news, so basically she just wanted to check out CNN on my iphone. And talk about Obama.
From Grandma Rudi’s, we headed to Grandma Daisy’s house in San Carlos. Daisy still lives in the house where my father grew up, and I love to be there. Daisy is regal and her favorite color is purple. Happily, it was kind of a bonus visit — my super-cool uncle Mark and Aunt Robin S were also there. A great visit. Too short.
It’s fine by me if BlogHer is held in San Francisco forever more. I don’t see my California family nearly often enough.
Side note: on the way to see the Grandmas, Jordan and I swung by the Ferry Building so we could pick up some Recchiuti chocolates to give them. Mmmmmm. You should probably go get some right now (try the Fleur de Sel caramels). Plus, I kind of want to move in to the Ferry Building. It is a happy place.
On Friday afternoon, my dear Aunt Robin K, my cousin Scott and his darling girlfriend, all stopped by the St. Francis — the hotel hosting the conference. We chatted in the ballroom and ate free conference candy bars.
On Saturday, Jordan and I spent a lovely morning at Grandma Rudi’s house in Menlo Park. She is all about whatever is in the news, so basically she just wanted to check out CNN on my iphone. And talk about Obama.

From Grandma Rudi’s, we headed to Grandma Daisy’s house in San Carlos. Daisy still lives in the house where my father grew up, and I love to be there. Daisy is regal and her favorite color is purple. Happily, it was kind of a bonus visit — my super-cool uncle Mark and Aunt Robin S were also there. A great visit. Too short.
It’s fine by me if BlogHer is held in San Francisco forever more. I don’t see my California family nearly often enough.
Side note: on the way to see the Grandmas, Jordan and I swung by the Ferry Building so we could pick up some Recchiuti chocolates to give them. Mmmmmm. You should probably go get some right now (try the Fleur de Sel caramels). Plus, I kind of want to move in to the Ferry Building. It is a happy place.
Strengthening Sibling Relationships: An Easy Idea for Summer Vacation
 A few years ago, as summer was approaching, I was concerned with some of the one-on-one relationships my children had with each other. I’m a mother of four and my biggest concern was that my oldest (8 going on 9 at the time) and my five-year-old had NO friendship. They often bickered and fought.
So I came up with a plan based on the well-known thought “you love those you serve” and created a schedule for my children to serve each other. It worked so well we have done it every summer since.
A few years ago, as summer was approaching, I was concerned with some of the one-on-one relationships my children had with each other. I’m a mother of four and my biggest concern was that my oldest (8 going on 9 at the time) and my five-year-old had NO friendship. They often bickered and fought.
So I came up with a plan based on the well-known thought “you love those you serve” and created a schedule for my children to serve each other. It worked so well we have done it every summer since.
Create a Simple Schedule for Siblings to “Serve” Each Other Through Fun Activities
This is how it works: every child is paired with every sibling every morning. The combos over the years have included activities like: -11-year-old daughter and 10-year-old-daughter write and produce a play (including script, costumes and sets). -10-year-old daughter and 5-year-old-daughter make up dances together. -5-year-old-son reads an easy reader to 7-year-old daughter. -7-year-old daughter and 5-year-old-son play jump rope, hopscotch, basketball or soccer. -5-year-old son and 4-year-old-daughter color a picture together.As Your Kids Grow, The Activities Can Become More Advanced
As my kids have grown we have continued the tradition and the activities mature as my children do. This is what we did last summer: -13-year-old daughter and 12-year-old-daughter prepared dinner each morning (including a weekly menu and shopping list). They did all the prep work they could in the morning, together, then one of them did the actual cooking each evening. -13-year-old daughter and 10-year-old-son played board games each day. -13-year-old daughter read Alice and Wonderland and The Chronicles of Narnia to my 9-year-old-daughter. -12-year-old daughter and 10-year-old-son practiced timetable flash cards. -12-year-old daughter taught 9-year-old-daughter piano basics. -9-year-old-daughter practiced her reading with my 10-year-old son. The kids love this part of the day — and thankfully, they love each other. I will continue to do this as long as I can. I feel like this is one of the best things I’ve done for my children.Credits: By Sara Urquhart, photo by Katrina Davis for Design Mom.
Is My Child Too Young to Start Piano Lessons?

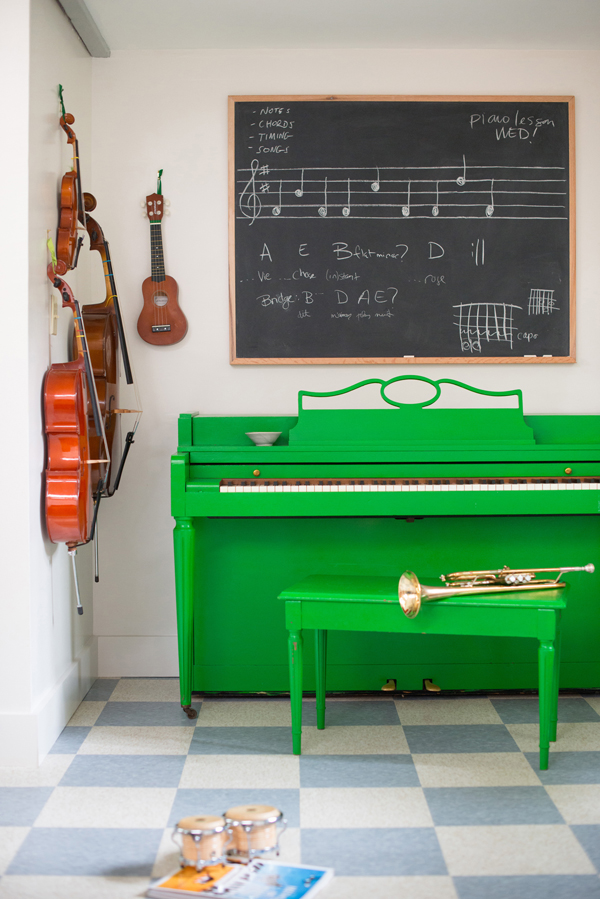 One of the big topics of discussion among parenting groups in my neighborhood is music lessons. What’s the best age for starting piano? Violin? Guitar? When I wanted to know, I went straight to my sister-in-law, Erin. Percussion teaching was her major in college, and she’s currently a piano teacher. (Did you know piano is considered a percussion instrument? It’s in the same family as drums!) Here’s what Erin says:
As a piano teacher, the question I am most asked is: “When should my child start piano lessons?” Keep in mind that my goal for my students is that music will be an enriching part of their lives, a creative outlet, a useful skill and playing the piano may serve as a bridge to other kinds of musical education and instruction. I do not approach this from a competitive viewpoint.
One of the big topics of discussion among parenting groups in my neighborhood is music lessons. What’s the best age for starting piano? Violin? Guitar? When I wanted to know, I went straight to my sister-in-law, Erin. Percussion teaching was her major in college, and she’s currently a piano teacher. (Did you know piano is considered a percussion instrument? It’s in the same family as drums!) Here’s what Erin says:
As a piano teacher, the question I am most asked is: “When should my child start piano lessons?” Keep in mind that my goal for my students is that music will be an enriching part of their lives, a creative outlet, a useful skill and playing the piano may serve as a bridge to other kinds of musical education and instruction. I do not approach this from a competitive viewpoint.
Question 1: Has your child learned to read?
After a child starts to read is an excellent time for them to start playing the piano, around age 6-8. The mechanics of reading come in handy when learning to read music and it’s helpful if they can read practice instructions. By this point they are also learning how to be responsible for their own homework and gaining greater independence in completing tasks. But there isn’t necessarily a “magic” age. I have students that started to play the piano at age 10 and 12 and they progress more quickly than the younger student and have the strength and dexterity to play more complex music from the beginning. I also have students that started much younger who do beautifully partly because of the time their parents spent helping them practice:Question 2: Do you have time to help your child practice?
The younger the child, the more time you will need to spend helping them practice. If they can’t read you will need to sit down with them everyday. If they can read you may just need to help them for a few minutes at the beginning of practice the first few days after lessons. Of course, this is also dependent on personality. My daughter started at age 5. I had more time to spend with her and once I got her started, she was able to do some practicing on her own. My son is turning 7 soon and I tried to start lessons with him. He wants me with him every time he practices, but I don’t have the time right now, so we’ll wait until he’s a little older and begin again. He also wasn’t very excited about playing the piano, which brings us to question three:Question 3: Does your child talk about playing the piano or try to play the piano?
If they are excited about it, they are more likely to be self-motivated to practice and the better they practice, the more successful they will be and the more they will enjoy playing the piano. If you can answer “yes” to two of the above questions, consider starting piano lessons with your child. —- Thank you, Erin! I really appreciate definitive advice like that so I’m not forced to guess. What about you, Dear Readers? Have you found success starting your kids with piano lessons at a certain age? What’s your advice? P.S. — Painting a piano. And my favorite ukulele for kids.Credits: Photo by Kristen Loken for Design Mom
Instead of Allowance, Try this “Family Bank” Idea

 Wondering if you should be paying your kids an allowance? Not sure what works and what doesn’t? You’re not alone. Talking to kids about money can feel complicated — especially when your own grownup finances aren’t where you wish they were.
My sister Sara has 4 kids a few years older than mine and she’s come up with a financial training system that seems to be working for her family. I asked her to share the details. This is what Sara says:
Wondering if you should be paying your kids an allowance? Not sure what works and what doesn’t? You’re not alone. Talking to kids about money can feel complicated — especially when your own grownup finances aren’t where you wish they were.
My sister Sara has 4 kids a few years older than mine and she’s come up with a financial training system that seems to be working for her family. I asked her to share the details. This is what Sara says:
Incoming funds are a chance for kids to learn budgeting.
Twice a month our Family Bank opens for business. Each child is given a generous amount of money and a sucker from the Bank (me) and then learns to budget the money. Each child takes any money earned on their own since the last Family Bank day, plus the new money received, and splits it into five categories: 10% Tithing 10% Long Term Savings (LTS) 10% Charitable Contributions 50 % Short Term Savings (STS) 20% SpendingCategories help kids learn the difference between long-term and short-term saving.
-Tithing goes directly to our Church. -LTS is set aside for some future purchase, like college or a house. -Charitable Contributions goes to something meaningful like rebuilding someone’s house or a tsunami relief fund or to the teacher at school with cancer. -STS is something more immediate: a video game, a new bike or a baseball glove. Something they want and have to save for, but can be earned in weeks or months not years. -Spending is stuff that disappears: a movie, a candy bar or a balloon. We started this plan years ago, and we have stopped paying the older kids who have started babysitting and earning money outside of the home. Happily, the budgeting seems to have stayed in place.Use this Family Bank activity as an opportunity for all kinds of money discussions.
This has also been a good platform for other money discussions like “Good Debt vs. Bad Debt” or “how and where to use credit cards” or even “getting a higher yield on your long term savings.” Our ten-year-old just asked his dad to explain Certificates of Deposit to him and asked if that is where he should keep his LTS. Which hopefully means the conversations are working. From what I can tell, it doesn’t seem to matter much what your plan is for teaching your kids about money, as long as there is a plan. —- Thank you, Sara. I really appreciate the clear advice. I love hearing about the discussion that have come from this Family Bank system. Now it’s your turn, Dear Readers. What are your favorite methods for teaching your kids to be money-wise? P.S. — A homemade budgeting game for teens, and how to turn $100 into $1,000,000.Ask Design Mom: Tips for Being Artsy/Craftsy with Your Kids
Question:
I want to be more tactile with my kids, meaning I want to be literally more hands-on with them in the day as well as figuratively, I want them to spend more time creating with their hands and feeling the joy of a project conceived and completed. I’m ready to bump it up a notch, and you have ideas and materials that never cross my mind. Your young daughter knits? Your little boy paints onto shirts? Sign me up! I know you’re crazy busy, but if you get a chance, I’d welcome advice. — Amanda
Answer:
Hi Amanda. What a great question. Thanks for submitting it. Last Saturday I taught a small class about this very topic. I’m going to include my handout notes here because I think they will answer your question fairly well.
Design Mom’s Tips for Doing Crafts or Art Projects with Your Kids
1) Admit to yourself it’s going to be messy. If that stresses you out, cover surfaces with newsprint or butcher paper to catch bits of paper and glitter and drops of glue. Use materials (adhesive, markers, etc.) that are washable. Then relax. If you get paint on your hands, it’s okay. If your child gets marker on her shirt, it will wash. When you’re finished, roll up the newsprint and discard the mess easily.
2) Don’t present one firm example of how the craft should turn out. Either don’t present an example at all, or present several options, so your child knows he can use his imagination. If he glues the eyes where the ears should be, good for him — think of it as an opportunity to introduce cubism (wink). Their idea is more important than how they execute it.
3) Look for crafts that are age appropriate and play to your child’s strengths. If the craft is complicated, break it into steps and figure out which ones your child can do. For a Harry Potter Celebration we made wands out of paper, hot glue and paint. My 6 year old could choose the paper, tape the rolled paper, plug in the glue gun, and paint it with craft paint. I did the hot-glueing, the rolling of the paper that required more dexterity than her little hands could muster and handled the metallic highlights we added with permanent marker. My older kids could do more. My younger kids were napping — this wasn’t a craft appropriate for 2 and under.
4) If you really enjoy crafting yourself, set aside a portion of the craft that is just for you to make. I find when I don’t do this, I hover and am tempted to control what my kids are making. If I know there are some craft materials reserved for me then it’s easier to allow the kids to do their thing. (For example, every year at Easter, I set aside a dozen eggs that are just for me to decorate.)
5) If you’re crafting on the kitchen table and the craft isn’t finished, but it’s time to use the table for dinner, it can be frustrating to clean it all up and start again later. If you don’t have a dedicated craft space, plan your craft to be done in an allotted time.
6) You don’t have to keep it forever. Crafts are often 3-D and can quickly accumulate and take up lots of space. Not everything your child makes is a masterpiece. Say goodbye to some old crafts when new crafts come into your life — before you start resenting crafts in general. Much of the value of crafts is in the making.
7) Remember Tim Gunn and “Make it Work.” It’s not worth running to the store to get the perfect paper/trim/detail. The enthusiasm for the project will evaporate if you have to break for errands. Use materials you have at home.
8) Not every child likes glue and glitter and cutting paper. Don’t force it.
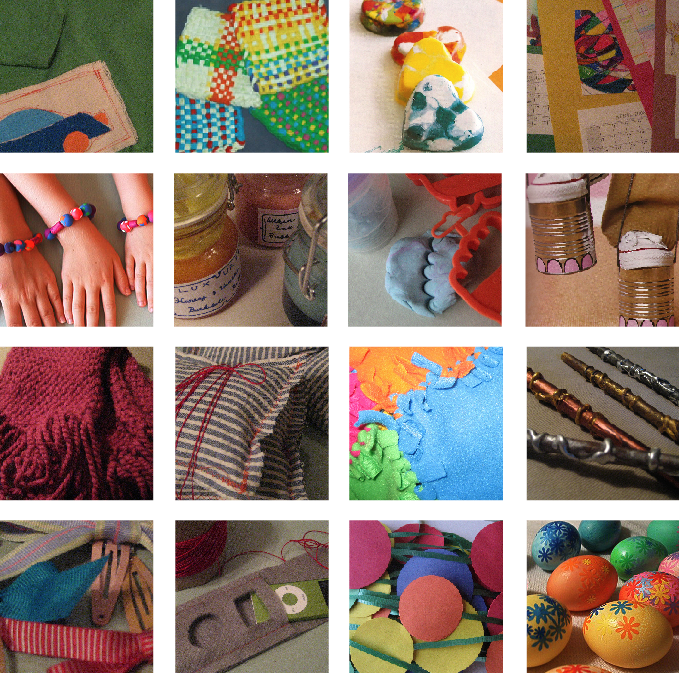
If you’re looking for specific ideas, following is a list of crafts my kids have done in the last year or so and loved (including links to my sources or instructions). If you’ve been reading for awhile, you’ll recognize these from earlier posts.
Note: I especially love crafts that are practical. That can be used or worn or played with. If you’re looking for decorative crafts, this list won’t be helpful.
Also, the ages are just meant as a loose guide — if it says 4+, it means there are lots of steps in the project that a typical 4-year-old could do. It doesn’t mean you should leave your 4-year-old alone with a glue gun and sewing machine and sharp pair of scissors while you run to the grocery store.
painted shirt, age 4+
potholders, age 6+
recycled crayons, all ages
artwork calendar, all ages
sculpey beads, age 4+
bubblebath, age 4+
jello or kool-aid playdough, all ages
romper stompers, age 4+
round loom hats & scarves, age 7/8+
bean bags, age 4+
knot a quilt*, age 6+
magic wands, age 5+
barrettes, age 4+
ipod cover, age 7/8+
garlands, age 4+
decoupage eggs, all ages
*I don’t think I’ve posted on Knot-A-Quilt before but it’s a kit filled with fringed squares that your child can tie together to make a blanket. Great concept and a good quiet project — my daughter loved making it. But. The fabric it comes with is not the best. I’ve been experimenting with alternative fabrics that are better looking and higher-quality to see if we can make our own squares. I’ll let you know how it goes. . .