Round & Round Party

Taken in (See more photos here)
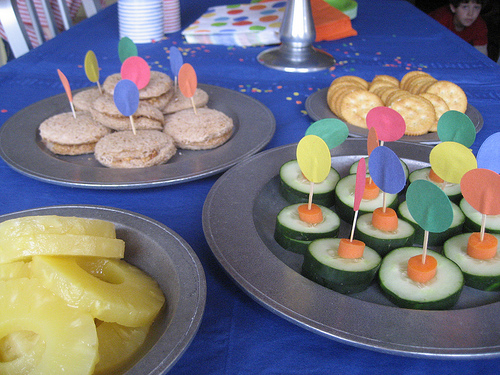
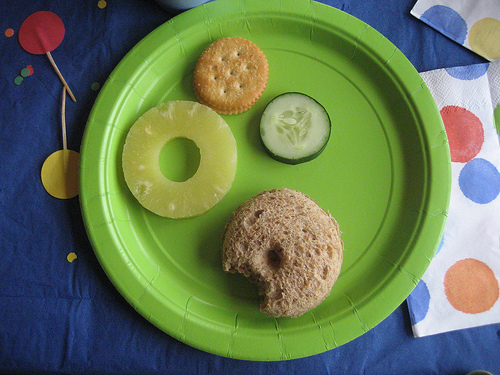
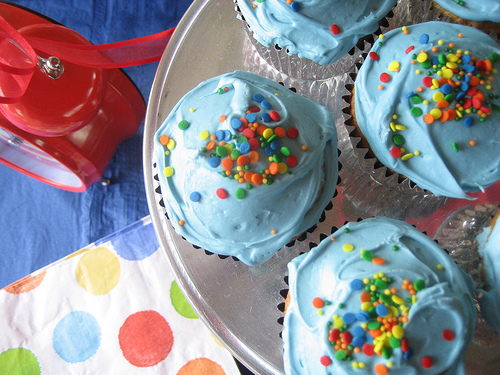
The round menu was geared toward 3-year old appetites: round pb&j;, cucumber & carrot rounds, circle crackers and pineapple rings.

Taken in (See more photos here)
Oscar is Three

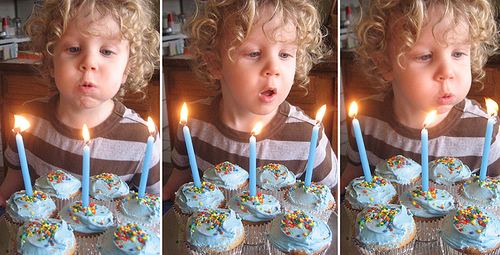
 Oscar turned 3 years old last Wednesday. He is so charming it’s all I can do not to eat him up. He says “bawindow” instead of window, as in “Let’s look out the bawindow.” He calls any body of water an “ocean of the sea,” as in “Hey, there’s the ocean of the sea!” when we come upon the Hudson River. Ben found this list of “Toddler Rules” and we think they fit Oscar perfectly. Especially these three:
If it does not open, it must be screamed at.
If Mommy’s hands are full, I must be carried.
If it is pointed, it must be run with at top speed.
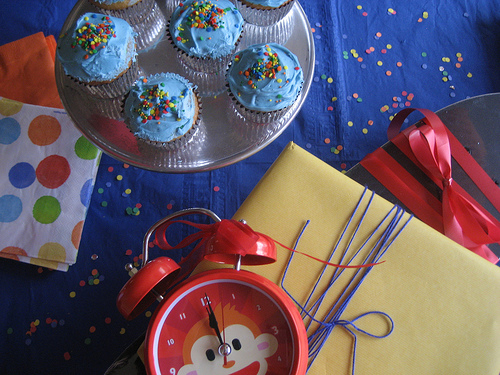
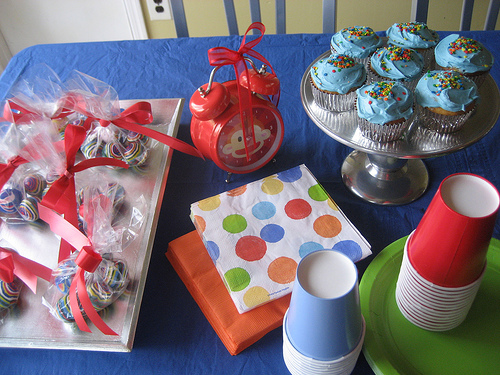
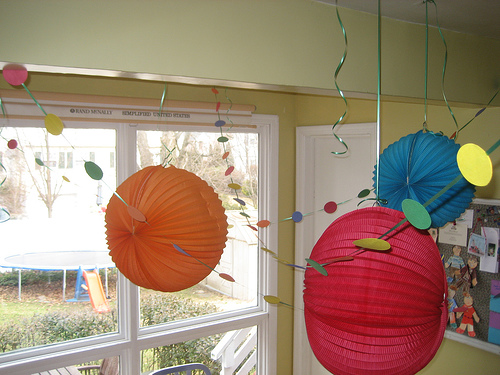
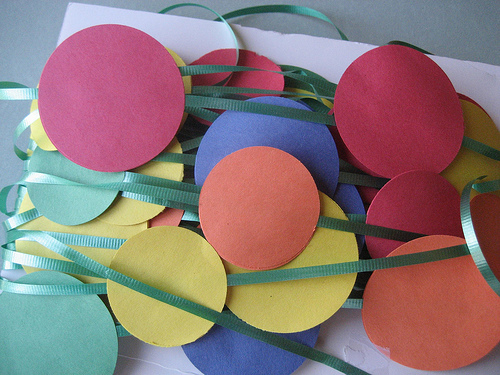
We are having a Round & Round party for him this Saturday. All about circles, polka dots, wheels, and balls. With music by JT and Dead or Alive and Ratt. I’ll share details next week.
Oscar turned 3 years old last Wednesday. He is so charming it’s all I can do not to eat him up. He says “bawindow” instead of window, as in “Let’s look out the bawindow.” He calls any body of water an “ocean of the sea,” as in “Hey, there’s the ocean of the sea!” when we come upon the Hudson River. Ben found this list of “Toddler Rules” and we think they fit Oscar perfectly. Especially these three:
If it does not open, it must be screamed at.
If Mommy’s hands are full, I must be carried.
If it is pointed, it must be run with at top speed.
We are having a Round & Round party for him this Saturday. All about circles, polka dots, wheels, and balls. With music by JT and Dead or Alive and Ratt. I’ll share details next week. Donna Jean Pack
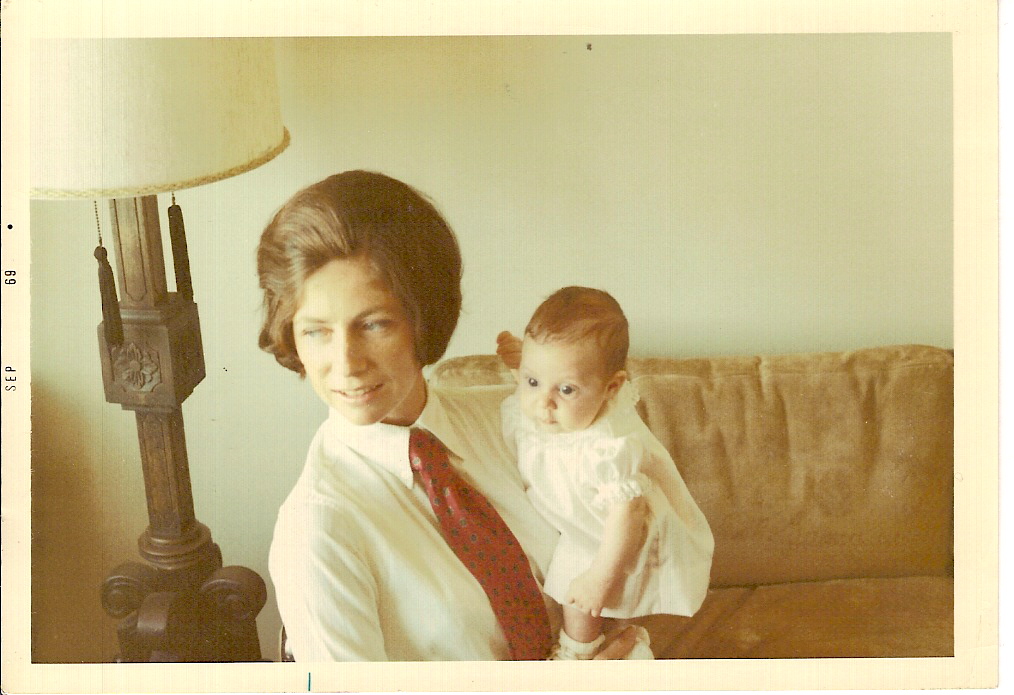 My sister Rachel recently posted a photo of my Mom as a young mother. Isn’t she stylin? The necktie. The awesome lamp. And I totally remember the suede couch. It was gorgeous — super simple, with clean lines. Man. I have good genes.
Mom, which baby are you holding?
My sister Rachel recently posted a photo of my Mom as a young mother. Isn’t she stylin? The necktie. The awesome lamp. And I totally remember the suede couch. It was gorgeous — super simple, with clean lines. Man. I have good genes.
Mom, which baby are you holding? The Best Christmas Pageant Ever

This year, my sister Sara’s family sent gifts to my family (like many big families, we only send gifts to one sibling each year). It’s such an amazing gift and such a smart idea that I have to share. Knowing how much my kids love to put on the Nativity pageant on Christmas Eve, she scoured her local thrift shops and came up with perfect costumes for all the main parts.
These costumes have all the right details. Great jewelry for the wisemen. Special containers for the gold, frankincense and myrrh. The shepherd has a super cool belt. The angel has a beaded halo. Sara embellished and altered her bargain finds as needed.
It is such a wonderful gift idea — and it’s not too late if you know the perfect recipient for this sort of thing. You could even start with Mary & Joseph and the Angel this year. Then add the Wisemen and Shepherd another year.
The packages arrived this weekend — marked Open Upon Receipt. And my kids have been in and out of the costumes ever since. They’ve been working on an “improved” script for the special production and there has been lots of debate about who will be which parts. Luckily, we’ll be sharing Christmas Eve with two other families this year, so we have plenty of people to choose from.
The costumes came stacked and folded with cards identifying the character and any applicable notes on the back (like: wear bracelet on the upper arm). Here they are in all their glory:


And here they are on the models (with the shepherd featured above):


Thank you, Sara! And thanks to Steve, Zella, Ruth, Ike and Lucy — who I’m certain contributed in many ways. We love the costumes. They’re just right.
Christmas Card Photo

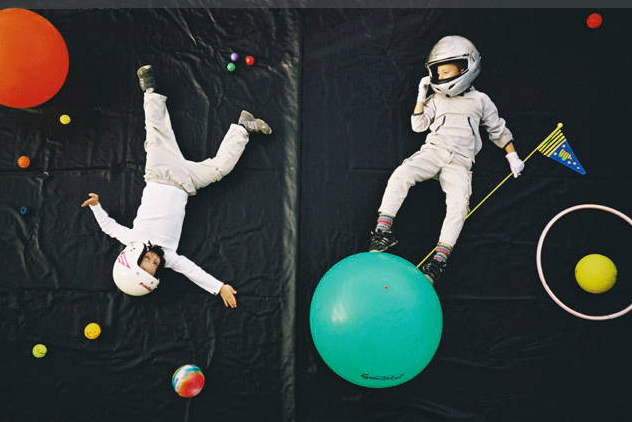
Remember these awesome photos by Jan Von Holleben I linked to a couple of weeks ago? Well. I also shared them with my kids. Up on seeing them, their brains almost exploded with the possibilities. They immediately started suggesting scenarios and similar photos. So Ben and I figured we could use Jan’s brilliant technique and create an image for our Christmas cards — satisfying our kids and checking our cards off the holiday list in one fell swoop.
We’re not sure if this is the final shot yet, but I share this with you now in case any one out there wants to try something similar in time for Christmas. Very fun. Very satisfying. And it gets better with each try. Here is the progression of our attempts and a few tips we learned along the way.
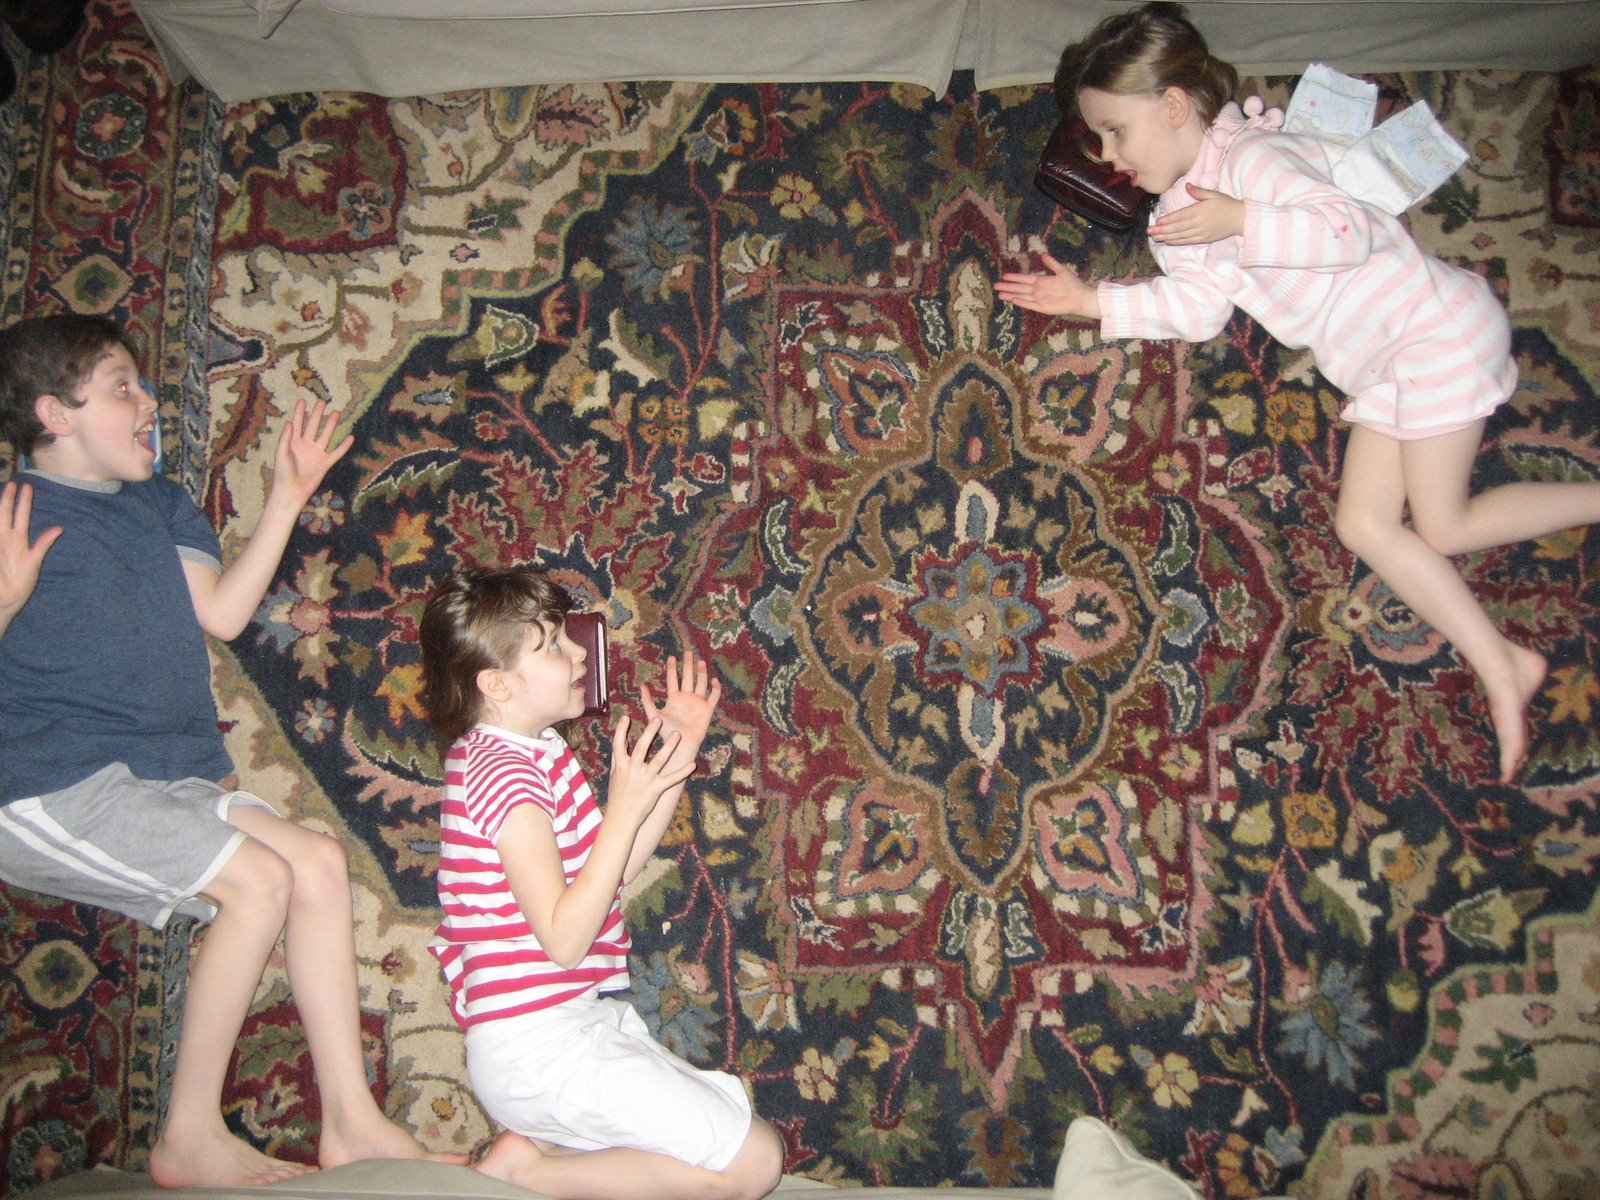
1) The content. We wanted to take advantage of the flying aspect, so we decided the angel speaking to the shepherds would be perfect. We call the image: Unto You a Child is Born! We also immediately decided the babies wouldn’t get to be in this particular image. Neither one can hold still for even 2 seconds.
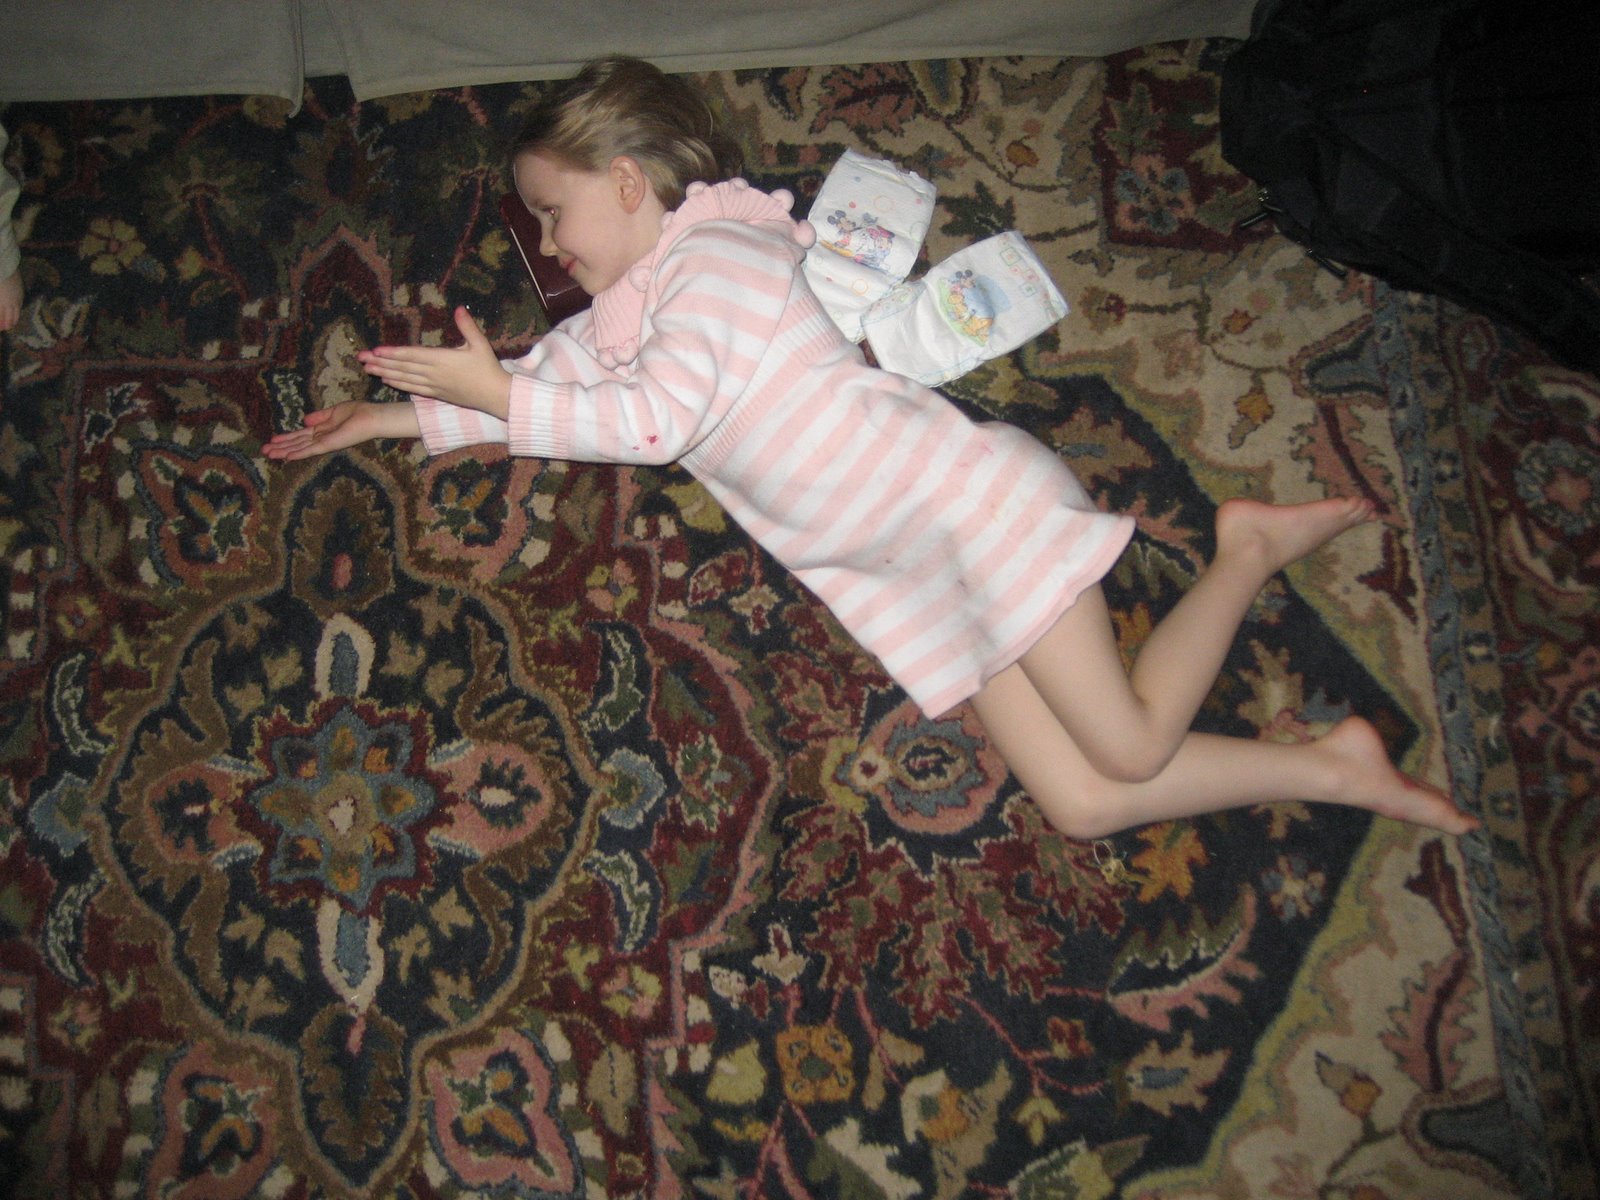
2) We practiced without a real backdrop, standing on the couch and staging the kids on the area rug, just to see if we could get the hang of it before we committed to more work.

3) Next we attempted the photo with the backdrop. Initially we tried to use the black pavement of our driveway for the night sky, and the grass that meets the driveway as the ground. But it was just too cold the day we shot the photo, so we moved it inside.
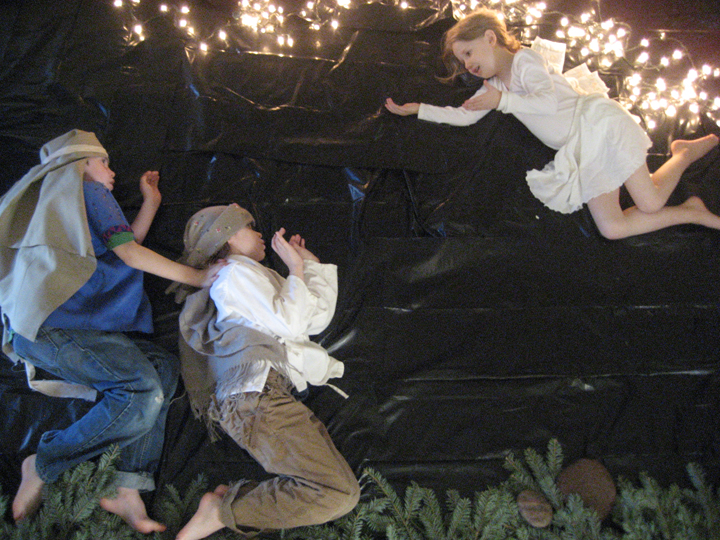
4) We shot indoors in the afternoon and there was still plenty of light. We used rolls of black garbage sacks for the backdrop. (The garbage sacks were kind of hard to work with. I think the driveway would have been easier.) We stood on a ladder to take the shots. One thing I really liked about Jan’s pictures is his use of every day objects as props. We tried to do the same, using diapers for the angel wings and keeping the costumes simple.
5) We love our little Canon Elph. But it’s not a real, real camera. So we could only get the photo so clear. At which point, we called for a favor from Guest Mom Sara’s husband, Travis Stratford. He came with his awesome camera and awesome camera skilz and we shot again. This time at night. Can you believe how much clearer his shot is? Awesome.
6) We are trying to decide if this is the final shot or if we should make one more attempt. Things we would change at Travis’s smart suggestion: make Ralph’s clothes more contrast-y against the black. And mess with the light sources so that angel Olive looks like she’s illuminating everything else.
7) A few last notes. The kneeling and standing were harder to pull off than the flying. The whole project would have been easier if we’d changed the title to “Angels We Have Heard on High” or something like that and had all the kids flying. And if we’d kept shoes on our shepherds that would also have helped. The shoes help keep their feet straight.
If you attempt one, I hope you’ll share. We can start a flickr group of Jan Von Holleben knock offs.
Big Day for Ben Blair
It’s true. It’s a very big day for Ben Blair.
Tonight, from 5:00 to 7:00, he’ll defend his doctoral dissertation. (It deals with the tensions between teachers and schools — in case you’re curious.) I’ve read it. All 230 pages. And it’s super smart and very well written. Full of interesting words and terms like: Dialectic. Institution. Discourse. Trajectory. Cultural Form. Mythos. Logos. Bracing. Phronesis. Bureaucracy. Objectifying Consciousness. Rationale. Deliberate. Conception. But mostly “dialectic.” I think it says dialectic 1 million times.
He also refers to loads of interesting thinkers and philosophers. People like MacIntyre, Dewey, Rousseau, Van Manen, Plato and on and on. The whole thing is very impressive and academic, as it should be. He’s worked incredibly hard on this for an incredibly long time. In fact, we originally moved to New York, over 6 years ago, so he could accomplish this very thing.
And unlike his fellow students — or even professors, in most cases — he’s done this worthy thing while also adding three kids to the family of four we had when he started. While taking turns as primary bread winner and stay-at-home dad as needed. While teaching 3 of his kids to ride a bike and snow ski. While being an exceptional father. An exceptional husband.
He even sends me cool links to share with Design Mom readers. Just today he sent a link to these too-great-for-words photos by Jan Von Holleben.
Ben Blair is a good man. No doubt he will do an amazing job tonight (but feel free to wish him luck anyway). And then he’ll have a PhD from Columbia University. And then I’ll call him Dr. Ben Blair.
Tonight, after his defense, he is meeting me at Grand Central Station and we are heading to a hotel for the weekend. A well-deserved weekend without any kiddies. So I won’t be here tomorrow. But I’ll be back Monday (well rested!) with big news about my week of Holiday Giveaways.
Hooray for Ben Blair!
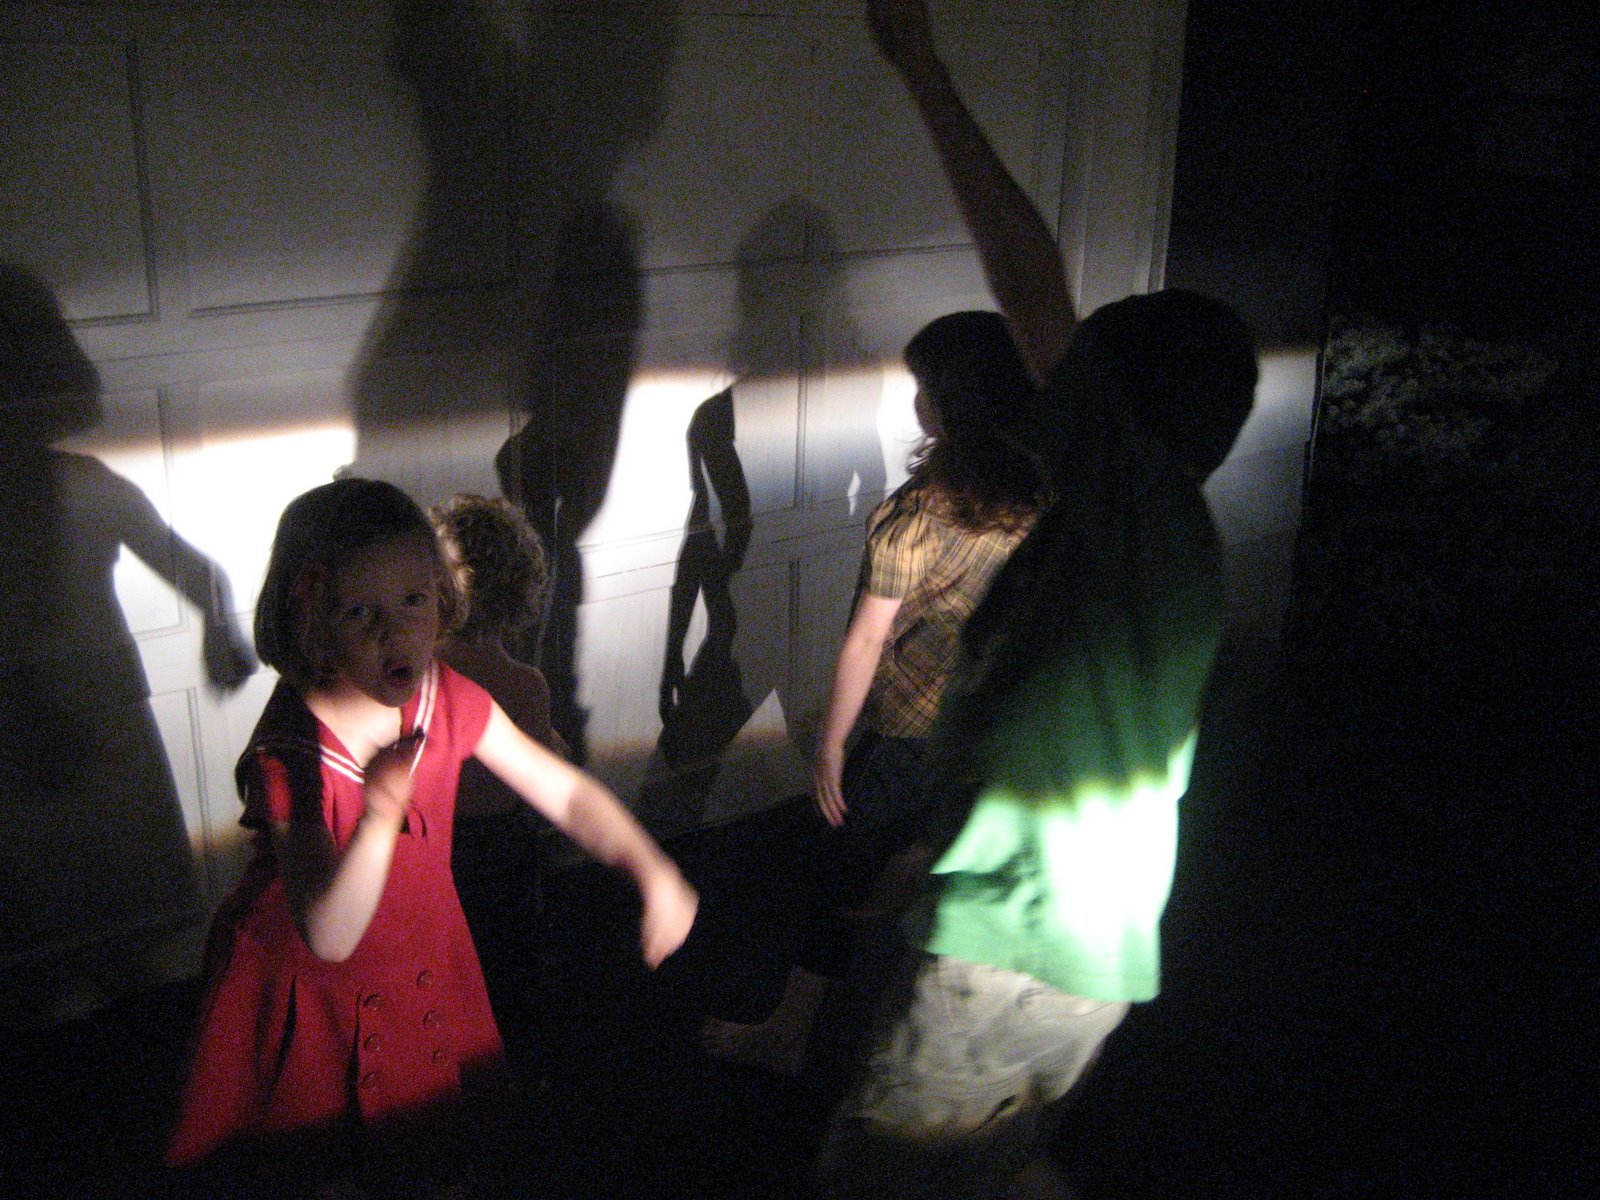
Headlight Dancing
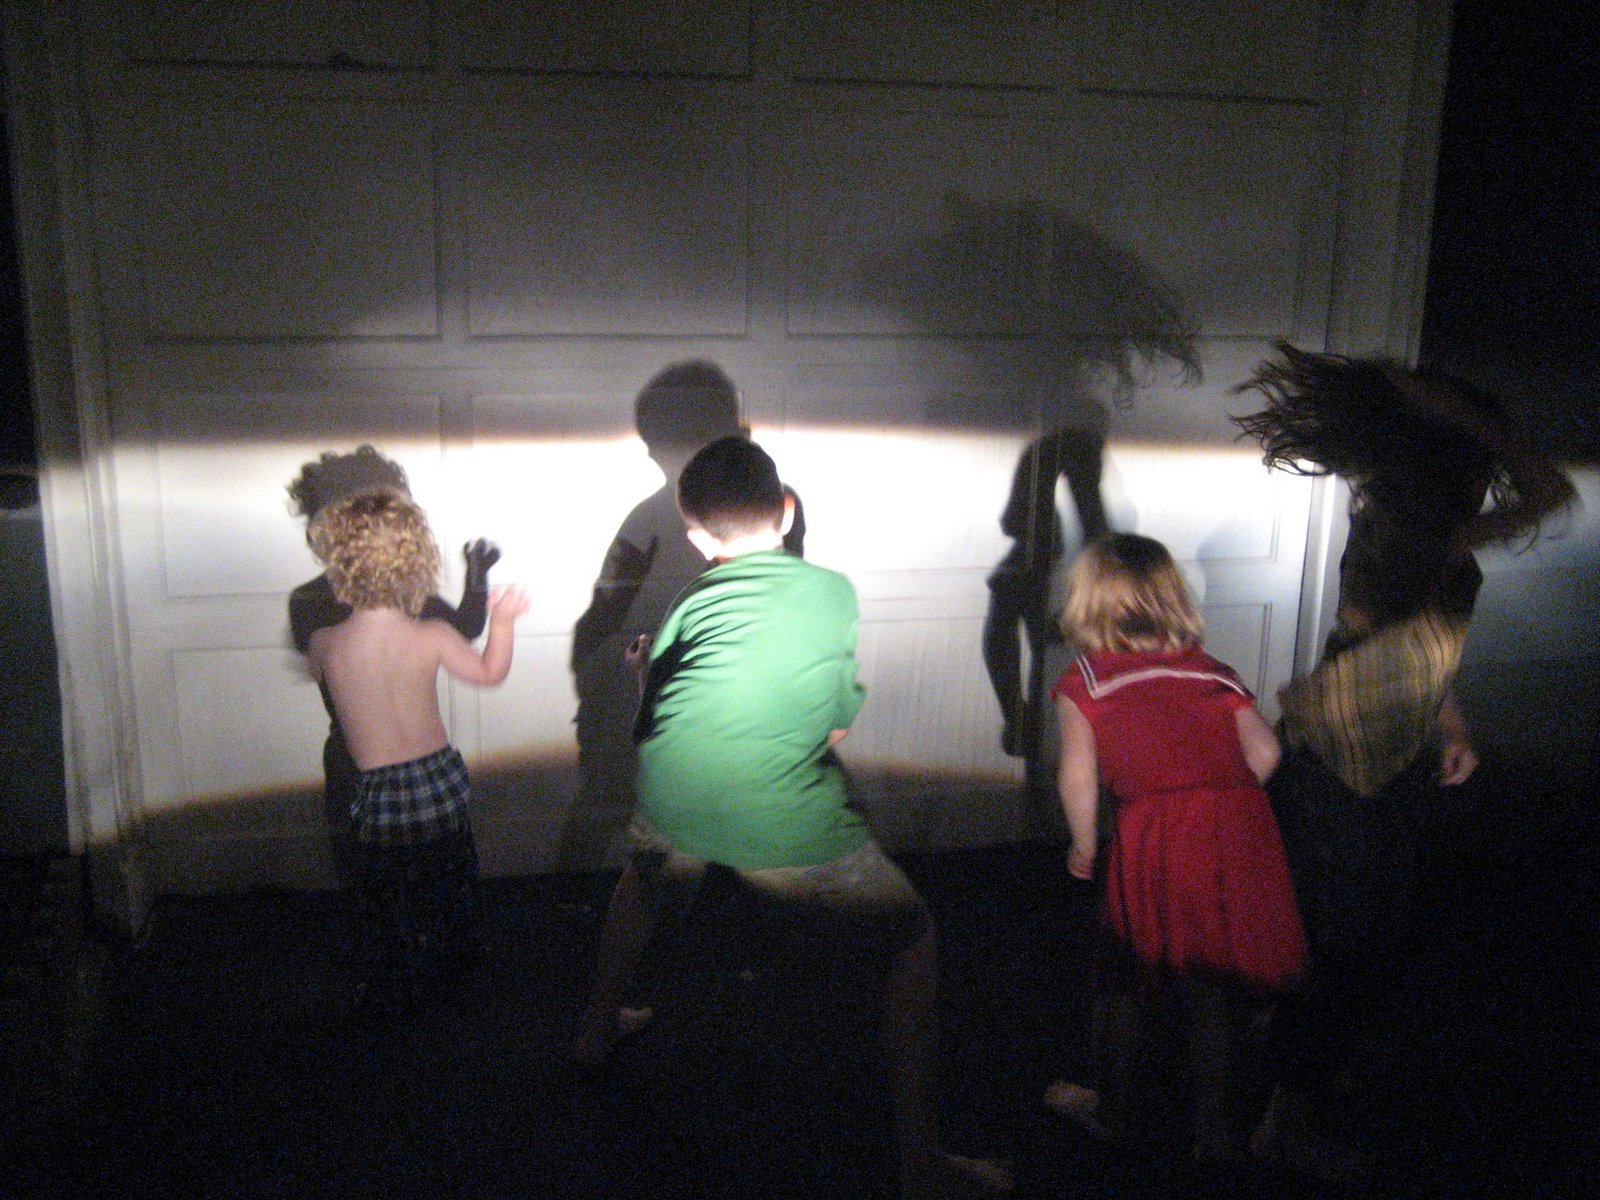
We had some friends over for dinner the other night — delightful company — with three beautiful children. And as they were leaving my kids came outside to wave goodbye. We had to rearrange the cars in the driveway so they could pull out, and (who knew?) it sparked the best finale to a good day we’ve ever had.
When my husband pulled our car back into the driveway, the headlights were focused on the garage door, lighting it up and we could hear the car stereo blasting something with a good beat — I’m thinking it was JT. The music was rocking enough that the kids were feeling it and started dancing in front of the headlights and watching their shadows on the garage door. We did this for a good half hour. The baby, sleeping soundly in her bed, missed the whole thing.
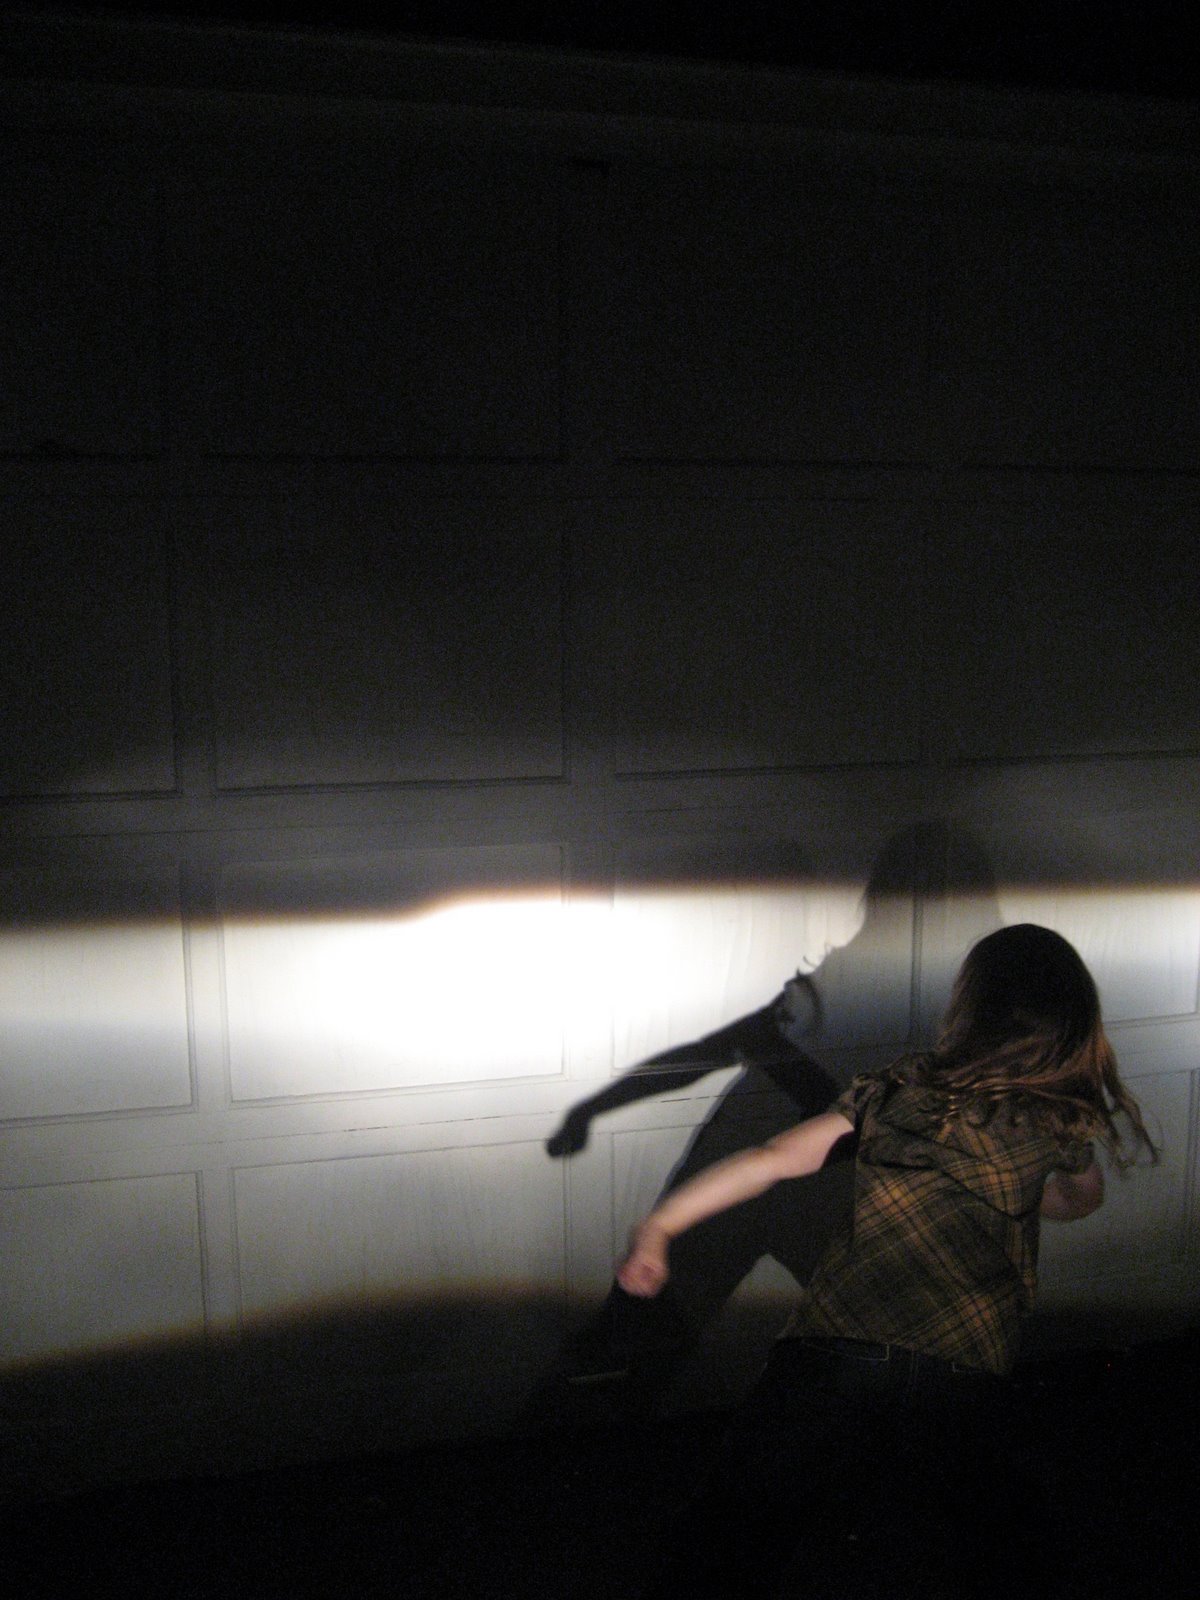


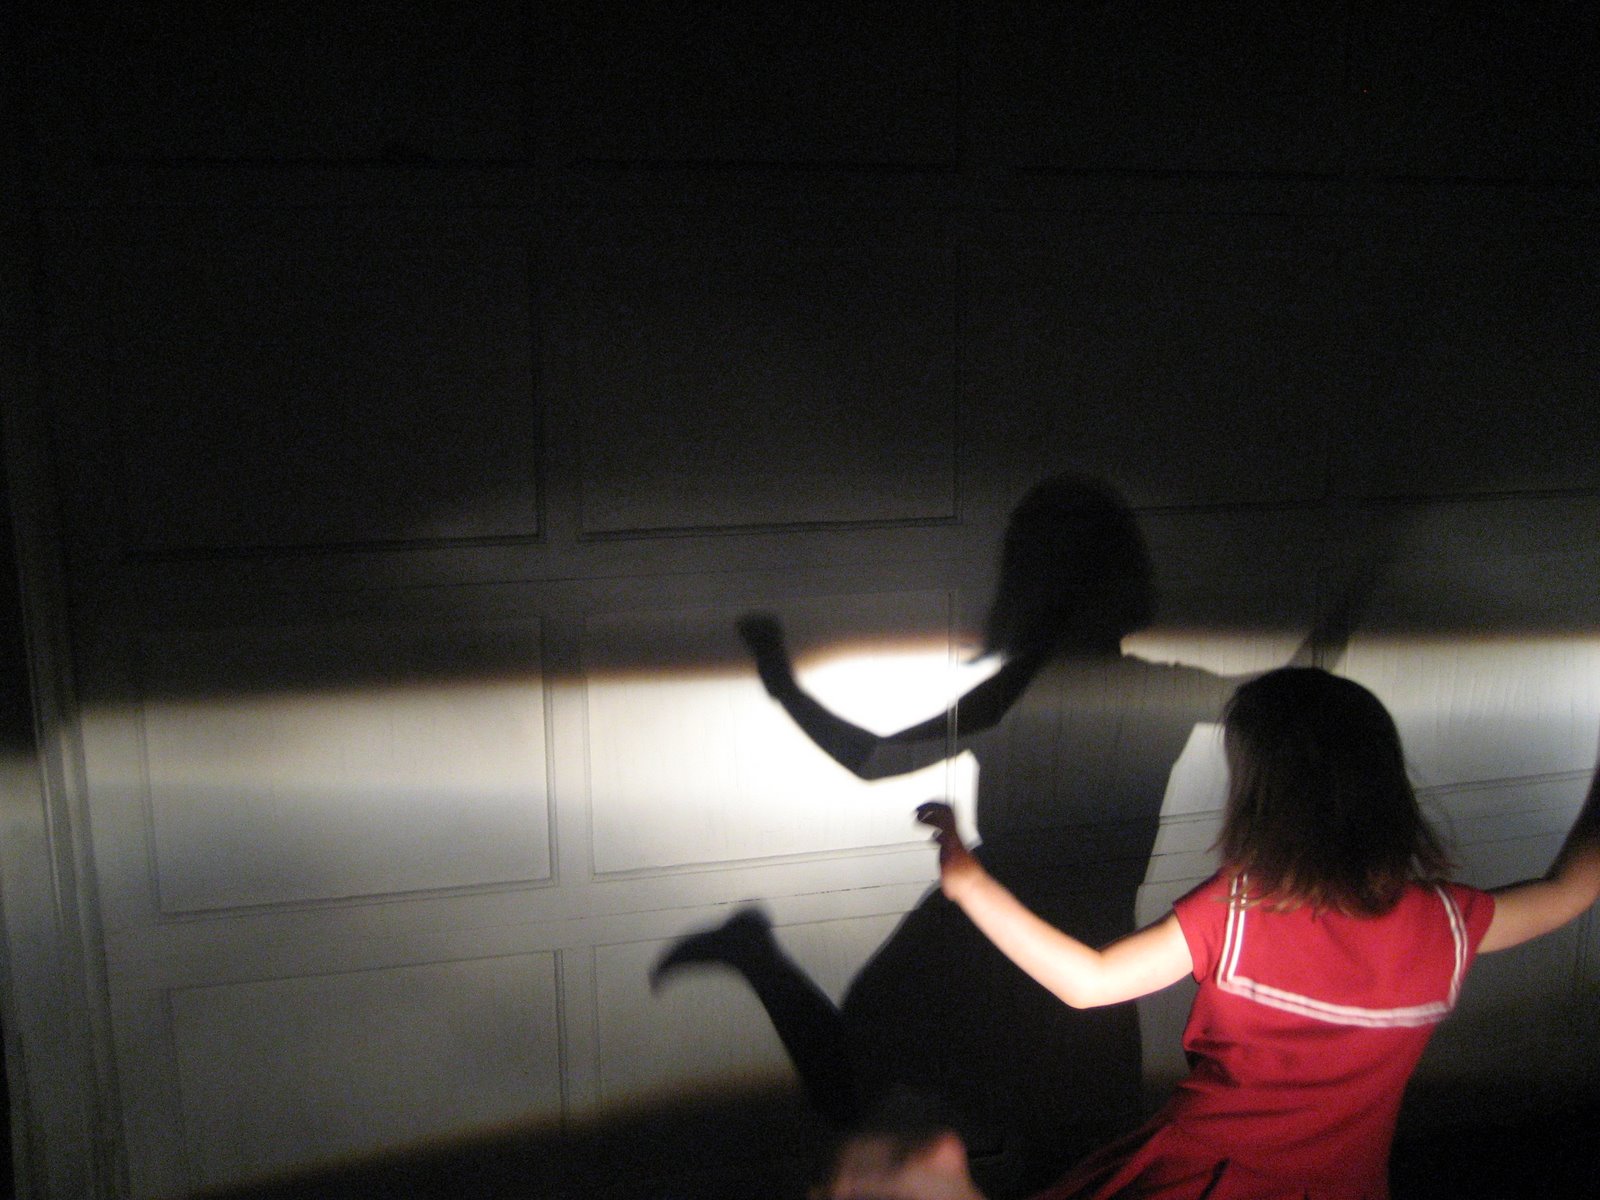
When everyone had their fill of dancing, we came inside, and Maude, the eight year old, (and the child with the best dance moves, by the way), climbed into her pajamas summing up what we were all feeling, “I loved that, Mom. That was my favorite night. It’s great to be in this family.”
Letterboxing
Last week I mentioned an end-of-summer adventure I was going to try with my kids: letterboxing. I’ve received a bunch of questions about letterboxing, so here is my rudimentary explanation of what it is:
People all over the world put together boxes containing a blank book, a pen, a rubber stamp and an ink pad. They hide the water-proof box in public place (like a park) and then post clues on how to find it on the internet. Letterboxers look up the clues and search out the book, stamping their own books with the stamp they find and making a mark with their own stamp in the letterbox’s book. I hear there are over 20,000 boxes hidden in North America alone. (You can find lots more information at letterboxing.org. This article was especially helpful.)
I was supposed to go with three friends — local letterboxing experts. But I was slow to get the kids up and going that day and we missed our chance to meet them. (Next time girls! Really.) So that my kids wouldn’t collapse from disappointment, we ended up letterboxing on our own. And we’re hooked!!
We packed a letterboxing kit before we left:
stamps
ink pads
blank book
pen
a canvas bag to carry our kit
Luckily, I had all of this on hand. If letterboxing had required a trip to the store that day, I’m afraid it wouldn’t have happened. Apparently, many letterboxers prefer to make their own stamp — just the kind of project I love — but was glad I had these pretty insect ones on hand for our first try.
We found the box after following all the clues — which happened to lead us on an in-depth walk around one of our favorite parks. We stamped our book, and made some notes and added a green leaf and a red leaf to our book as reminders that our adventure was at the end of summer and start of fall. We put a snail stamp into the letterbox’s book (because we were so slow to find it) and our thumbprints as well.
We especially loved realizing there was a letterbox hidden in a place we already knew and loved. And further realizing there were probably letterboxes at many of our favorite haunts. For our family, I can imagine this being a perfect Sunday afternoon hobby.
Yard Games: Bocce Vs. Petanque. Which One Do You Prefer?

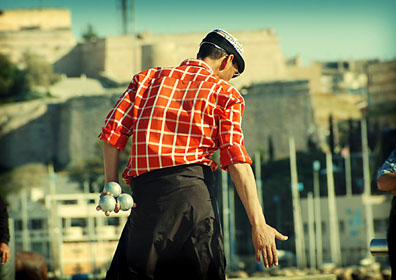 During our Memorial Day bar-be-que, some of the guests gathered in a corner of the yard for a game of bocce. I love this game. Actually, I really know very little about this game, but I think the equipment is probably the most beautiful of any sport, and therefore I’m a big fan.
I was first introduced to the game under the name petanque by my brother-in-law Mark Sabey. He walked into the yard with a worn bucket full of heavy, etched, metal spheres and I quickly made a mental note that a petanque set needed to go on my wishlist asap.
During our Memorial Day bar-be-que, some of the guests gathered in a corner of the yard for a game of bocce. I love this game. Actually, I really know very little about this game, but I think the equipment is probably the most beautiful of any sport, and therefore I’m a big fan.
I was first introduced to the game under the name petanque by my brother-in-law Mark Sabey. He walked into the yard with a worn bucket full of heavy, etched, metal spheres and I quickly made a mental note that a petanque set needed to go on my wishlist asap.

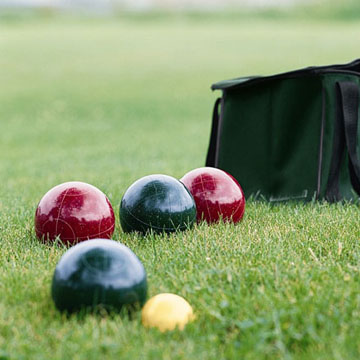 After the initial introduction, I started seeing bocce sets all over the place and eventually figured out they were the same thing. Or sort of the same thing. From what I understand, bocce is the Italian name for the game, and petanque is the French name. Bocce balls are traditionally red and green and much bigger than the petanque balls, which are metallic silver. (If there are other big differences and I’m making a big sport faux-pas here, my apologies.)
This is a perfect yard game. Great for all ages, and really easy to involve the kids. You kind of meander around the yard as you play which is lovely. You can find sets pretty much anywhere — here’s a good-looking bocce set, and a handsome petanque set.
What I really want is an aged, metal petanque set like the one that captured my heart initially. I guess that means we need to get playing!
P.S. — The most charming video of petanque in action in Normandy, France.
—-
Photo source: Petanque player is from Someday Somewhere.
After the initial introduction, I started seeing bocce sets all over the place and eventually figured out they were the same thing. Or sort of the same thing. From what I understand, bocce is the Italian name for the game, and petanque is the French name. Bocce balls are traditionally red and green and much bigger than the petanque balls, which are metallic silver. (If there are other big differences and I’m making a big sport faux-pas here, my apologies.)
This is a perfect yard game. Great for all ages, and really easy to involve the kids. You kind of meander around the yard as you play which is lovely. You can find sets pretty much anywhere — here’s a good-looking bocce set, and a handsome petanque set.
What I really want is an aged, metal petanque set like the one that captured my heart initially. I guess that means we need to get playing!
P.S. — The most charming video of petanque in action in Normandy, France.
—-
Photo source: Petanque player is from Someday Somewhere. Graduation Gifts Ideas

 I received two graduation related questions — one for males, one for females — that I’ll try to answer in the same post.
Question #1:
My sister (who I’m very close to) is graduating from high school next week. I’m a little late to thinking about it, but I wondered if you had any ideas for not too expensive gifts that would be nice and meaningful as she steps into another phase of her life. I was going to make her something that celebrated our relationship, but time is running out, so I’ll have to find something that is meaningful that I can purchase and mail. Thanks! — Laura
Question #2:
I guess my question is this: I’m looking for a graduation present for my husband who is graduating from medical school. I think presents for guys are hard in general, but congratulatory presents always seem to stump me. You want them to be something nice that he can remember he got for graduation, but he’s not especially sentimental. We’re moving soon, so I don’t want something I have to work on or put time into creating, I just want to buy something nice that he can keep, not ridiculously expensive, but I’m willing to spend money if it’s worth it. Got any ideas? Thanks a ton! — Jen
Design Mom Answer:
Graduation gifts! So fun! Thank you for the questions, Jen and Laura. The comments are full of brilliant ideas. I have only 2 things to add:
First, for my high school graduation I was given a 1/2 gallon of my favorite ice cream (Snelgrove’s Canadian Vanilla) and I didn’t have to share a single bite with my siblings — which was luxurious. My point? Even a simple gift, if thoughtful, is memorable.
Second, I was just introduced to a book called Get A Hobby. It’s very well put together and well designed with a basic introduction, history and sources on 101 hobbies. Plus you can take a personality quiz to see which hobbies would be a good fit.
I received two graduation related questions — one for males, one for females — that I’ll try to answer in the same post.
Question #1:
My sister (who I’m very close to) is graduating from high school next week. I’m a little late to thinking about it, but I wondered if you had any ideas for not too expensive gifts that would be nice and meaningful as she steps into another phase of her life. I was going to make her something that celebrated our relationship, but time is running out, so I’ll have to find something that is meaningful that I can purchase and mail. Thanks! — Laura
Question #2:
I guess my question is this: I’m looking for a graduation present for my husband who is graduating from medical school. I think presents for guys are hard in general, but congratulatory presents always seem to stump me. You want them to be something nice that he can remember he got for graduation, but he’s not especially sentimental. We’re moving soon, so I don’t want something I have to work on or put time into creating, I just want to buy something nice that he can keep, not ridiculously expensive, but I’m willing to spend money if it’s worth it. Got any ideas? Thanks a ton! — Jen
Design Mom Answer:
Graduation gifts! So fun! Thank you for the questions, Jen and Laura. The comments are full of brilliant ideas. I have only 2 things to add:
First, for my high school graduation I was given a 1/2 gallon of my favorite ice cream (Snelgrove’s Canadian Vanilla) and I didn’t have to share a single bite with my siblings — which was luxurious. My point? Even a simple gift, if thoughtful, is memorable.
Second, I was just introduced to a book called Get A Hobby. It’s very well put together and well designed with a basic introduction, history and sources on 101 hobbies. Plus you can take a personality quiz to see which hobbies would be a good fit.
 There’s something about graduating, going to the next phase, being a little unsure of what’s coming, that brings to mind possibilities. Like, “I’ve finished what I committed to. Now. If I could do anything, how would I spend my time?” that seems like the perfect moment to introduce a hobby. Perhaps this book, plus the materials to start a new hobby could make an excellent gift.
 What It’s Like to Parent Two Deaf Children
 Hailey Meyer Liechty is a parent of 5 kids — and the two youngest are deaf and have cochlear implants. I asked her to share her thoughts on parenting deaf children. Here’s what Hailey says:
Let’s start with the DMV. I went there dreading the ordeal. The photos. The test. The waiting. None of that happened. I didn’t need the test, the lines were reasonable and the woman who took the photo was very nice, cracked a joke or two, smiled and commented on my first photo. She showed it to me and then asked if I wanted to take it again. She loved my scarf. My mom gave it to me. I love all the colors — and it sparkles too!
She took my picture 3 times and let me choose the best. I like the picture. I really like pulling out my ID.
She asked me questions on the Drivers License application. Address correct? Yes. Age? Yes. Donor? Yes. Is it correct that you want to donate $2.00 to the blind? Yes.
At this point I became a bit more friendly, taking her cue, and said, “I wonder why they don’t have a donation spot for the deaf? Why the blind and not the deaf?” I wondered out loud.
Her response was, “Yeah, I don’t know. Especially since it is much, much, much, much, much, much, much worse to be deaf than blind.”
I paused, then said, “Well, I think it is only much worse. You can keep a few of the much-es.”
She went on to explain the social barriers of deafness. She was kind. Finally I said something like, “Two of my children are deaf and it can be a drag, a big repetitive drag, but it is not the worst thing and I don’t think it is worse than being blind. My children can do anything — play, read, use the computer, run, draw, cook. With fantastic modern technology they can listen and with therapy speak very very well, and eventually drive.”
Hailey Meyer Liechty is a parent of 5 kids — and the two youngest are deaf and have cochlear implants. I asked her to share her thoughts on parenting deaf children. Here’s what Hailey says:
Let’s start with the DMV. I went there dreading the ordeal. The photos. The test. The waiting. None of that happened. I didn’t need the test, the lines were reasonable and the woman who took the photo was very nice, cracked a joke or two, smiled and commented on my first photo. She showed it to me and then asked if I wanted to take it again. She loved my scarf. My mom gave it to me. I love all the colors — and it sparkles too!
She took my picture 3 times and let me choose the best. I like the picture. I really like pulling out my ID.
She asked me questions on the Drivers License application. Address correct? Yes. Age? Yes. Donor? Yes. Is it correct that you want to donate $2.00 to the blind? Yes.
At this point I became a bit more friendly, taking her cue, and said, “I wonder why they don’t have a donation spot for the deaf? Why the blind and not the deaf?” I wondered out loud.
Her response was, “Yeah, I don’t know. Especially since it is much, much, much, much, much, much, much worse to be deaf than blind.”
I paused, then said, “Well, I think it is only much worse. You can keep a few of the much-es.”
She went on to explain the social barriers of deafness. She was kind. Finally I said something like, “Two of my children are deaf and it can be a drag, a big repetitive drag, but it is not the worst thing and I don’t think it is worse than being blind. My children can do anything — play, read, use the computer, run, draw, cook. With fantastic modern technology they can listen and with therapy speak very very well, and eventually drive.”
 She gave this friendly apology/explanation for what she had said, and for me having 2 deaf children. She then asked a few more DMV questions, collected my money and I went on my way.
This story perhaps is unusual because it is about a kind and generous DMV worker, but it is so typical of my daily experiences.
I meet many friendly people, others who stare, or let their children stare, at my children until I explain to them they my children are deaf and have COCHLEAR IMPLANTS. The cochlear implant helps them hear. Other people, not professional speech therapists, act as though they know more than I do; as in a relative telling me my son has “bunched Rs,” he doesn’t. Many people like to share their opinion about deafness and how beautiful sign language is. Why don’t we sign more? I explain that a child can really only learn to talk in the first 6 years of life, the earlier the better. After that spoken language will always be like speaking a foreign language. My children will probably learn sign language at some point and that is fine with us.
People like to share assumptions about a deaf person’s abilities, comparisons to other disabilities and stories of family members. I hear dire stories of unethical audiologists selling over priced hearing aids and self-interested insurance companies denying coverage to children, and adults, for anything related to deafness. (We personally have dealt with medical insurance issues a lot.)
Whether it is deafness, cochlear implants, how cochlear implants work, why and how my children need them, genetics and our family history, or schools my children attend (Nathan, age 6, is the top of his mainstream class), it can be tiresome. I really don’t mind. I have to explain everything to everyone, all the time.
My favorite, and perhaps the most surprising thing, I need to explain to people is why we want to give our deaf children the gift of spoken language and why, when at home and out and about, I must repeat myself over and over, again and again, with speech and sign. This is not redundant. It is educational, to help my children (hearing or not) perceive the subtle nuances of sound so they can learn to express themselves beautifully and at the same time educate everyone who asks, or looks at them askew.
—-
Thank you for the beautiful, informative write up, Hailey. Tell me Dear Readers, do you have any children in your life who experience deafness or extreme hearing loss? How is your experience similar or different than Hailey’s?
She gave this friendly apology/explanation for what she had said, and for me having 2 deaf children. She then asked a few more DMV questions, collected my money and I went on my way.
This story perhaps is unusual because it is about a kind and generous DMV worker, but it is so typical of my daily experiences.
I meet many friendly people, others who stare, or let their children stare, at my children until I explain to them they my children are deaf and have COCHLEAR IMPLANTS. The cochlear implant helps them hear. Other people, not professional speech therapists, act as though they know more than I do; as in a relative telling me my son has “bunched Rs,” he doesn’t. Many people like to share their opinion about deafness and how beautiful sign language is. Why don’t we sign more? I explain that a child can really only learn to talk in the first 6 years of life, the earlier the better. After that spoken language will always be like speaking a foreign language. My children will probably learn sign language at some point and that is fine with us.
People like to share assumptions about a deaf person’s abilities, comparisons to other disabilities and stories of family members. I hear dire stories of unethical audiologists selling over priced hearing aids and self-interested insurance companies denying coverage to children, and adults, for anything related to deafness. (We personally have dealt with medical insurance issues a lot.)
Whether it is deafness, cochlear implants, how cochlear implants work, why and how my children need them, genetics and our family history, or schools my children attend (Nathan, age 6, is the top of his mainstream class), it can be tiresome. I really don’t mind. I have to explain everything to everyone, all the time.
My favorite, and perhaps the most surprising thing, I need to explain to people is why we want to give our deaf children the gift of spoken language and why, when at home and out and about, I must repeat myself over and over, again and again, with speech and sign. This is not redundant. It is educational, to help my children (hearing or not) perceive the subtle nuances of sound so they can learn to express themselves beautifully and at the same time educate everyone who asks, or looks at them askew.
—-
Thank you for the beautiful, informative write up, Hailey. Tell me Dear Readers, do you have any children in your life who experience deafness or extreme hearing loss? How is your experience similar or different than Hailey’s?
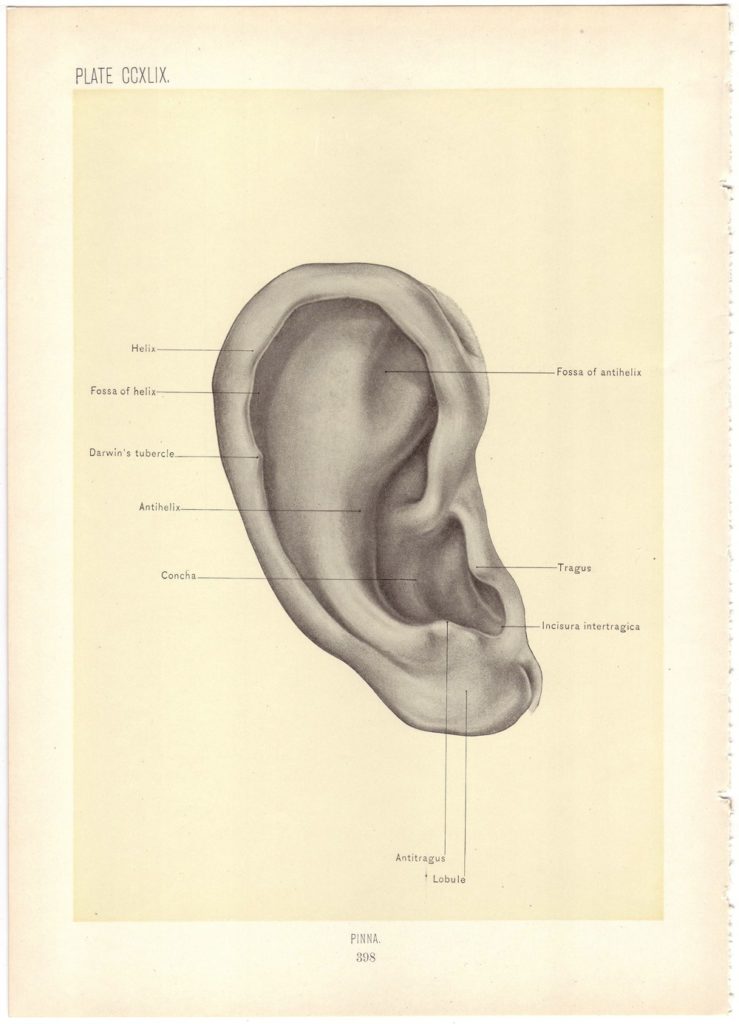
Sources: Antique ear illustration.
Teacher Appreciation Week Ideas
 For those of you with kids in school, you may already know that it’s Teacher Appreciation Week.
If you’re in the mood to make something special for the educators in your life, there’s a really great list of 39 ideas here. A few examples:
– “You are out of this world” tag attached to a Milky Way or Mars candy bar
– “You deserve an extra payday!” tag attached to a Payday candy bar
– “There is no ‘sub’stitute for you!” tag attached to a gift card for the local sub shop
– “You are ‘extra’ special” tag with a pack of Extra Gum
– “Thanks for helping Blake ‘bloom’” tag with a bouquet of flowers
– “We appreciate the ‘mounds’ of work you do!” tag attached to a Mounds candy bar
– “Thanks for giving Blake a hand” tag with hand lotion
“Thanks a ‘latte’!” tag with a gift card from local coffee shop, special coffees or travel mug
That’s 8 from a long list of dozens of Teacher Appreciation Week ideas. Lots of good options! Go see.
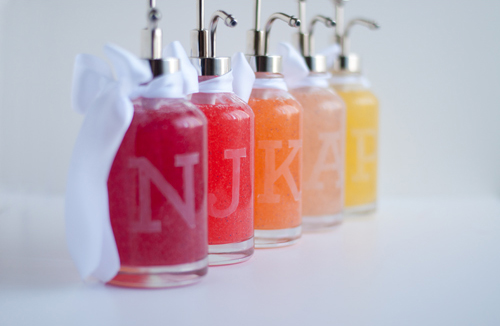
P.S. — These DIY Monogram Soap Bottles also make a cute teacher gift.
For those of you with kids in school, you may already know that it’s Teacher Appreciation Week.
If you’re in the mood to make something special for the educators in your life, there’s a really great list of 39 ideas here. A few examples:
– “You are out of this world” tag attached to a Milky Way or Mars candy bar
– “You deserve an extra payday!” tag attached to a Payday candy bar
– “There is no ‘sub’stitute for you!” tag attached to a gift card for the local sub shop
– “You are ‘extra’ special” tag with a pack of Extra Gum
– “Thanks for helping Blake ‘bloom’” tag with a bouquet of flowers
– “We appreciate the ‘mounds’ of work you do!” tag attached to a Mounds candy bar
– “Thanks for giving Blake a hand” tag with hand lotion
“Thanks a ‘latte’!” tag with a gift card from local coffee shop, special coffees or travel mug
That’s 8 from a long list of dozens of Teacher Appreciation Week ideas. Lots of good options! Go see.
P.S. — These DIY Monogram Soap Bottles also make a cute teacher gift. A First Birthday Celebration for a Fifth Baby

 Amazing. Betty Blair was born a year ago today. I can’t imagine an easier baby. She has been nothing but a delight. These pictures are of Betty feeding herself Cheerios this morning (and trying to share with Daddy, the camera man).
When you’re celebrating your first baby’s first birthday the party is fantastic. A big bash where baby is the star, eating cake and generally charming everyone, and the guests are all adults. And you can put in as much time and energy into the celebration as you’d like .
When you’re celebrating your fifth baby’s first birthday, you almost forget to do anything at all until your older kids remind you. Not that Betty is aware of it yet, but being a fifth baby is not always a picnic.
So Ben and I and the kids want to do something extra-fun for Betty’s birthday. We’re thinking maybe a party based on being the fifth. Held at our home: house number 5. Where we can celebrate all the good things associated with the number 5. Of course, it won’t happen today: cub scouts and a daddy-daughter kickball game are already on the schedule. But it will happen soon.
And for today, these photos and a sweet little birthday cake to share with her brothers and sisters, will be just right.
Happy Birthday Betty Blair!
P.S. — A round and round party.
Amazing. Betty Blair was born a year ago today. I can’t imagine an easier baby. She has been nothing but a delight. These pictures are of Betty feeding herself Cheerios this morning (and trying to share with Daddy, the camera man).
When you’re celebrating your first baby’s first birthday the party is fantastic. A big bash where baby is the star, eating cake and generally charming everyone, and the guests are all adults. And you can put in as much time and energy into the celebration as you’d like .
When you’re celebrating your fifth baby’s first birthday, you almost forget to do anything at all until your older kids remind you. Not that Betty is aware of it yet, but being a fifth baby is not always a picnic.
So Ben and I and the kids want to do something extra-fun for Betty’s birthday. We’re thinking maybe a party based on being the fifth. Held at our home: house number 5. Where we can celebrate all the good things associated with the number 5. Of course, it won’t happen today: cub scouts and a daddy-daughter kickball game are already on the schedule. But it will happen soon.
And for today, these photos and a sweet little birthday cake to share with her brothers and sisters, will be just right.
Happy Birthday Betty Blair!
P.S. — A round and round party. Design Mom Feature in Popular Brazilian Parenting Magazine

 Awhile back I mentioned meeting up with Paula, the Editor-in-Chief for Crescer, the big parenting magazine in Brazil, and how she asked me to write an article for their publication. Well, the issue with my article came out today. (Hooray!)
I can’t believe I have a byline. I can’t wait to get my hands on a hard copy. My kids are going to think they’re famous. Hah! Since I don’t read Portuguese, I’m going to need to look up the essay I sent over and remind myself what I wrote — I hope it was good.
P.S. — Don’t miss our family photo shoot in Central Park.
Awhile back I mentioned meeting up with Paula, the Editor-in-Chief for Crescer, the big parenting magazine in Brazil, and how she asked me to write an article for their publication. Well, the issue with my article came out today. (Hooray!)
I can’t believe I have a byline. I can’t wait to get my hands on a hard copy. My kids are going to think they’re famous. Hah! Since I don’t read Portuguese, I’m going to need to look up the essay I sent over and remind myself what I wrote — I hope it was good.
P.S. — Don’t miss our family photo shoot in Central Park.
Stone Barns
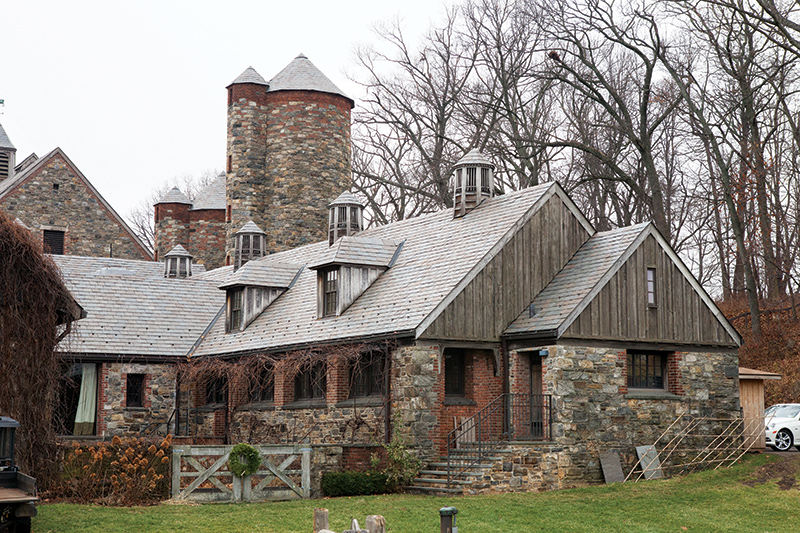 Last weekend, we took the kids and met some friends at Stone Barns in Pocantico Hills — about 30 minutes outside the city. Housed on the stunning grounds of what was once a Rockefeller farm, Stone Barns is a working farm attempting to be as self-sufficient as possible. I’m not exaggerating when I talk about the grounds. They’re spectacular. And there is a generous courtyard where the kids could run free.
After some initial exploring we ate lunch at the Blue Hill Café. Everything they serve is grown on the grounds or purchased from nearby farms. It’s the best lunch I’ve had in ages. We just devoured everything. I haven’t had a backyard garden for years, and I was surprised how good fresh-from-the-farm salad greens taste.
When lunch was finished, we hiked and hiked and hiked and hiked. The kids loved it. We hiked to a lake to search for turtles. We dared Ralph to dunk his head in the very cold water — and he took the dare. We searched out the pigs and gave them water. We saw picturesque views of rolling farmland with cattle grazing. It was one of those outings that was great for the kids and great for the parents. No lines, no hurrying, no shushing.
In addition to roaming free around the farm, you can take gardening classes, cooking classes or guided tours. On my next trip, I’d really like to hit the Weekly Farm Market. And if I can remember to make reservations two months in advance, I’d love to go to dinner with Ben at Blue Hill at Stone Barns.
Last weekend, we took the kids and met some friends at Stone Barns in Pocantico Hills — about 30 minutes outside the city. Housed on the stunning grounds of what was once a Rockefeller farm, Stone Barns is a working farm attempting to be as self-sufficient as possible. I’m not exaggerating when I talk about the grounds. They’re spectacular. And there is a generous courtyard where the kids could run free.
After some initial exploring we ate lunch at the Blue Hill Café. Everything they serve is grown on the grounds or purchased from nearby farms. It’s the best lunch I’ve had in ages. We just devoured everything. I haven’t had a backyard garden for years, and I was surprised how good fresh-from-the-farm salad greens taste.
When lunch was finished, we hiked and hiked and hiked and hiked. The kids loved it. We hiked to a lake to search for turtles. We dared Ralph to dunk his head in the very cold water — and he took the dare. We searched out the pigs and gave them water. We saw picturesque views of rolling farmland with cattle grazing. It was one of those outings that was great for the kids and great for the parents. No lines, no hurrying, no shushing.
In addition to roaming free around the farm, you can take gardening classes, cooking classes or guided tours. On my next trip, I’d really like to hit the Weekly Farm Market. And if I can remember to make reservations two months in advance, I’d love to go to dinner with Ben at Blue Hill at Stone Barns. Ask Design Mom: 1-year-old Birthday Gift
 Design Mom Question:
Dear Design Mom, we are looking for a good gift for our soon-to-be one year old boy’s birthday. Since he is the fourth child, we have many toys that he is content to play with. Same with clothes. We want to give him something that will be fun to open and play with on his birthday — something that is unique and age-appropriate as well. Any suggestions? — Kathryn
Design Mom Answer:
What a great question, Kathryn. Thanks for sending it in. There are so many neato toy stores around these days, that my first instinct was to send you somewhere to shop. But then I gave it some more thought and reminded myself that the wants of a one-year-old are pretty darn simple. I have tried many different first-birthday gifts over the years — for my own kids and for children of friends — but I think the best first birthday gift was received on my oldest child, Ralph’s, first birthday.
My sister-in-law Traci who was already a experienced mother at this point, brought him a shiny, mylar helium balloon on a ribbon, with a small weight attached to keep the balloon from floating away.
I could see within minutes of the balloon’s arrival that Traci was a super-genius-gift-giver. Ralph sat on the grass and used the string to pull the balloon down and then release it for a half an hour — a long-time for a newly one-year-old. The balloon lasted for days and it’s charms never faded for Ralph. When it finally lost its float, I could discard it with no guilt and without having to find a new home for it. Lovely. This kind of gift seems especially appropriate for a house like yours with plenty of toys.
Design Mom Readers, what’s the best first birthday gift you like to give or receive?
Design Mom Question:
Dear Design Mom, we are looking for a good gift for our soon-to-be one year old boy’s birthday. Since he is the fourth child, we have many toys that he is content to play with. Same with clothes. We want to give him something that will be fun to open and play with on his birthday — something that is unique and age-appropriate as well. Any suggestions? — Kathryn
Design Mom Answer:
What a great question, Kathryn. Thanks for sending it in. There are so many neato toy stores around these days, that my first instinct was to send you somewhere to shop. But then I gave it some more thought and reminded myself that the wants of a one-year-old are pretty darn simple. I have tried many different first-birthday gifts over the years — for my own kids and for children of friends — but I think the best first birthday gift was received on my oldest child, Ralph’s, first birthday.
My sister-in-law Traci who was already a experienced mother at this point, brought him a shiny, mylar helium balloon on a ribbon, with a small weight attached to keep the balloon from floating away.
I could see within minutes of the balloon’s arrival that Traci was a super-genius-gift-giver. Ralph sat on the grass and used the string to pull the balloon down and then release it for a half an hour — a long-time for a newly one-year-old. The balloon lasted for days and it’s charms never faded for Ralph. When it finally lost its float, I could discard it with no guilt and without having to find a new home for it. Lovely. This kind of gift seems especially appropriate for a house like yours with plenty of toys.
Design Mom Readers, what’s the best first birthday gift you like to give or receive? DIY Plywood Modern Bench

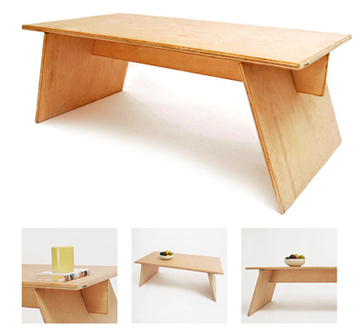 I think this project from Andy Lee is fantastic — full, simple instructions on how to build this well-proportioned coffee table. A sheet of plywood and a table saw and it’s yours.
Imagine it with a coat of fire engine red paint. I think it would make a cute bench in a playroom.
I think this project from Andy Lee is fantastic — full, simple instructions on how to build this well-proportioned coffee table. A sheet of plywood and a table saw and it’s yours.
Imagine it with a coat of fire engine red paint. I think it would make a cute bench in a playroom. Would You Ever Install a Trough Sink?
 The read an article about a family with several young sons, and when renovating their bathroom, the mother had a trough sink built.
I’m not sure why this is so much more appealing to me than a traditional counter with two or three sinks, but it is. I love the idea of seeing a few of my kids brushing their teeth at the same time. And I love that the sink is really big — perfect for teenage girls who are helping their friends experiment with hair color.
Also, I’ve probably mentioned this before, but I’m an advocate of hooks for towels in the bathroom as compared to standard towel rods. You can fit many more towels in the same space, and kids can easily hang the towels themselves. In humid areas, they seem to dry out better this way as well.
The read an article about a family with several young sons, and when renovating their bathroom, the mother had a trough sink built.
I’m not sure why this is so much more appealing to me than a traditional counter with two or three sinks, but it is. I love the idea of seeing a few of my kids brushing their teeth at the same time. And I love that the sink is really big — perfect for teenage girls who are helping their friends experiment with hair color.
Also, I’ve probably mentioned this before, but I’m an advocate of hooks for towels in the bathroom as compared to standard towel rods. You can fit many more towels in the same space, and kids can easily hang the towels themselves. In humid areas, they seem to dry out better this way as well. Happy Birthday Benjamin Blair

 Today is my husband’s birthday. He is 34.
One of the things I love best about Ben Blair is that he only wishes good things for everyone he knows. This seems like it would be a common attribute among most people, but strangely it’s not. In my experience, people often react to good news for their friends as if it’s bad news for themselves. As if a success for you equals failure for me. But not Ben Blair. He totally gets that there is enough happiness and good out there for everybody.
He’s so fun to share good news with because he’s so happy to hear it and so sure that you deserve every bit of happiness you’re receiving. If you were to win a major award, and you told Ben Blair, I swear he’d feel the same amount of happiness as if he’d won the prize himself. He would call friends and family to share the news: Hey! My friend (who you don’t know and may never have heard of) just won a major award! He would walk around all day or all week on cloud nine. He would genuinely be delighted for you and not feel even a smidgen of envy. He’d just be so glad your hard work was being recognized.
That’s just one of the many, many things I love about Ben Blair.
Today is my husband’s birthday. He is 34.
One of the things I love best about Ben Blair is that he only wishes good things for everyone he knows. This seems like it would be a common attribute among most people, but strangely it’s not. In my experience, people often react to good news for their friends as if it’s bad news for themselves. As if a success for you equals failure for me. But not Ben Blair. He totally gets that there is enough happiness and good out there for everybody.
He’s so fun to share good news with because he’s so happy to hear it and so sure that you deserve every bit of happiness you’re receiving. If you were to win a major award, and you told Ben Blair, I swear he’d feel the same amount of happiness as if he’d won the prize himself. He would call friends and family to share the news: Hey! My friend (who you don’t know and may never have heard of) just won a major award! He would walk around all day or all week on cloud nine. He would genuinely be delighted for you and not feel even a smidgen of envy. He’d just be so glad your hard work was being recognized.
That’s just one of the many, many things I love about Ben Blair. Happy Birthday to Maude
Yesterday, Maude turned 8. She was only 2 — and the youngest — when we moved to New York and it is amazing to see her so grown-up and taking the role of second mom to her younger siblings.
Because events that occur early in the month tend to sneak up on me, I’ve scheduled Maude’s birthday party festivities to happen in a couple of weeks. So yesterday we just celebrated as a family.
Birthdays at our house start with breakfast in bed. Maude picked the menu: scrambled eggs, sausage, waffles, strawberries with whip cream and milk. In the evening, we had her favorite dinner and then put candles in strawberry shortcake and opened presents. Maude was delighted with her day — the highlight seemed to be the yoga mat she received. In fact, it is 6:15 am and she is upstairs now offering a kids yoga class to her brothers and sisters.
My husband’s favorite part was the strawberry shortcake. It was yummy. I used my friend Heidi’s idea: make a regular white cake mix, but add a cup of sour cream before your blend it up, then bake small individual cakes in pretty shapes. When the cakes are done, Heidi adds a thin milk/powdered sugar/vanilla/butter glaze. Each guest receives their own little cake and she serves berries and fresh whip cream on the side. The cakes were really pretty.
I’d been wanting to make these little cakes for awhile and finally picked up a cute pan at Target. It’s a pan with 6 cakes in 3 different flower patterns. I couldn’t find a picture or source of mine online, but there are lots of other cute mini-cake pans available.