When I was in 6th grade, I got to take a trip to Hawaii with my dance group (it was called the Super Steppers, in case you’re curious). One of the main things everyone told me I must do in Hawaii is mail home a coconut in its husk. No box. No padding. Just write the address on the coconut with a marker and slap on the stamps. Of course, to my 11-year-old ears, this sounded like the coolest thing a person could possibly do. There’s something so fun and funny about getting a non-standard letter or package in the mail!
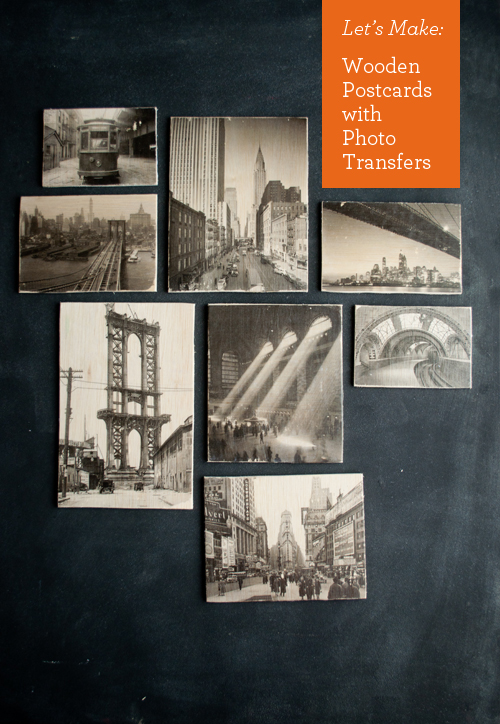
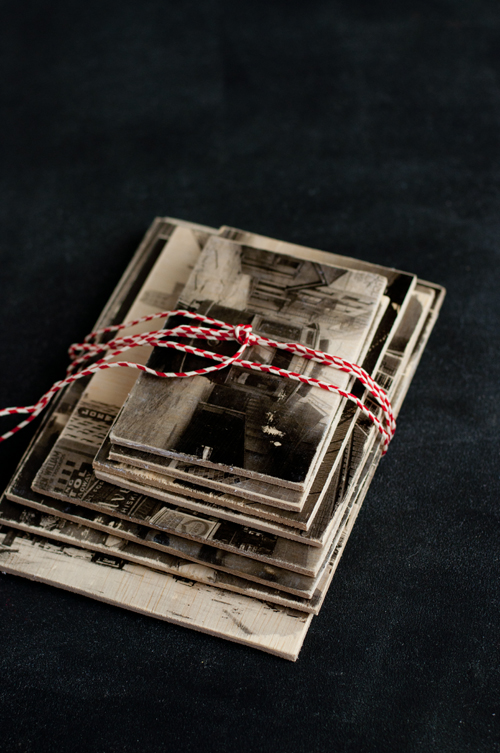
These postcards are admittedly not as extreme as a coconut. But. They are made of wood! And they are awesome to find tucked in between the bills and junk mail! I’m a huge fan of photo transfers — they’re practically magic. And image transfers + wooden postcards sounded like the perfect storm of fun, useable, good-looking projects.
To up the charm even more, these feature historical images from New York City, and I love how they turned out so much!
I should note from the beginning, these handmade wooden post cards are not the same as paper post cards. Due to their width and weight, they are priced similar to a large envelope or a ‘flat’. But they’re worth the extra stamp — their unique, one-of-a-kind quality makes this snail mail more like art work.
It takes some work and patience but the outcome is definitely worth it!
On to the postcard how-to!
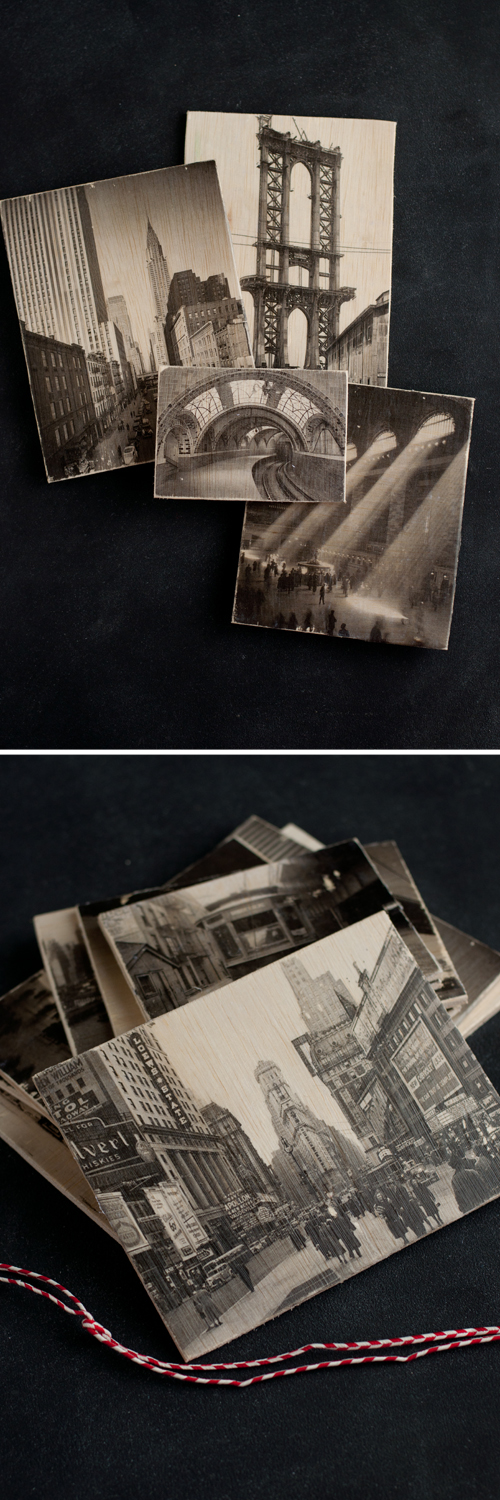

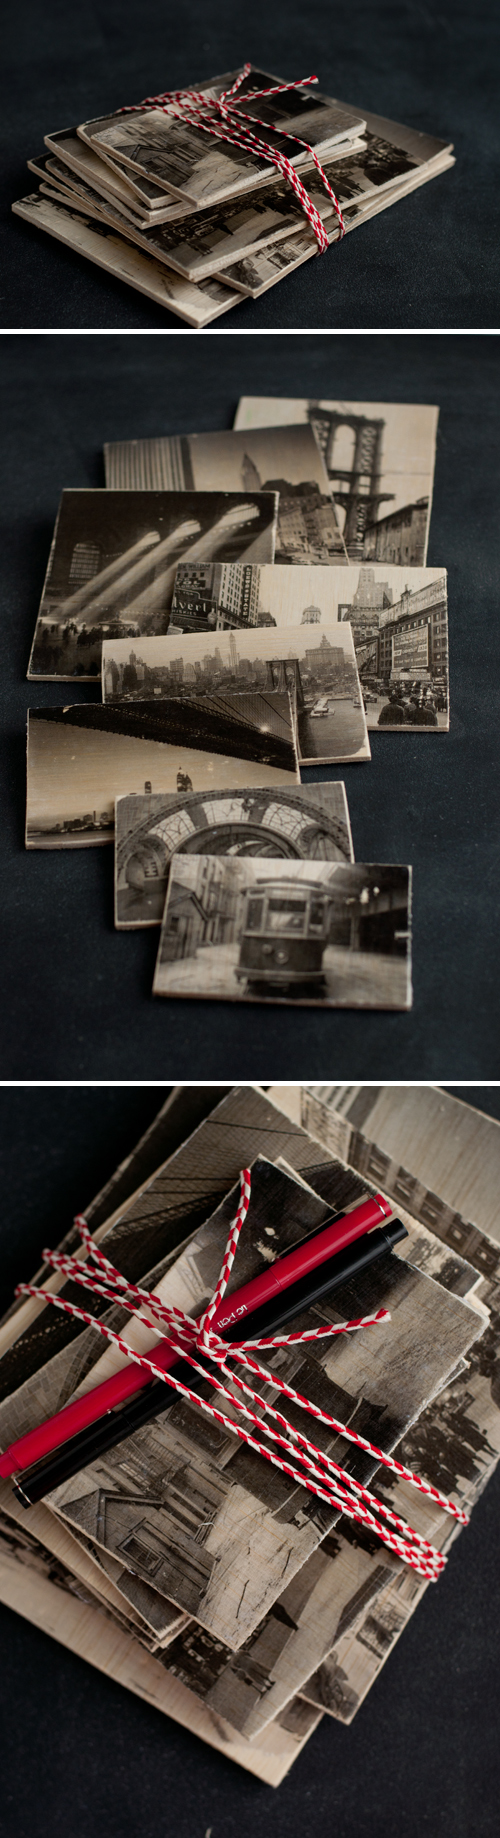
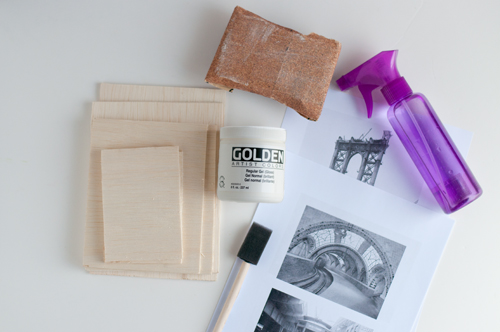
Photo Transfer How-To
– Golden Gel Medium in Regular Gel (gloss or matte)
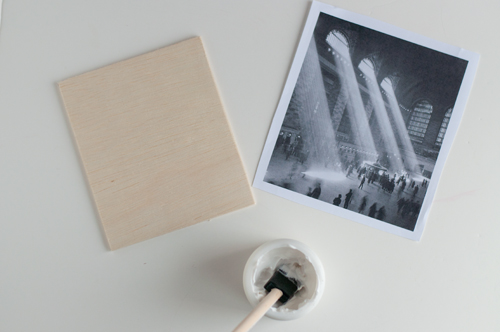
– craft plywood, 1/4 inch thick
– crafting sandpaper
– high resolution, toner-printed image/photo — see important notes below!*
– foam brush
– spray bottle filled with water
– cotton rag, optional (saves your fingers a bit during the transfer)
*Image/Photo – A few notes: Most home printers are ink-jet and they won’t work for this project. You’ll need a toner-based laser printer — the kind you use in copy shops. So take your image into any Kinkos-type place and you’ll be set.
The quality of the image or photo is the clincher for this project. Without a quality image, the transferred image will be lacking. You can use full color or black and white images.
Make sure the image is high resolution. The dimensions can be whatever you’d like but the resolution needs to be high. High resolution means a clearer picture and a clearer picture means a clear transfer. A typical high resolution for a printed piece would be 300 dpi at whatever dimensions you plan to print it.
Make sure to reverse the image. The transfer process flips it so flipping it initially (when you make your photo copy) will set it right. This is especially important for images with text.
Make sure the image is printed on 20lb paper — which is standard copy paper weight. This is necessary. Weightier paper will inhibit the transfer process.
First, cut the plywood down to your desired sizes. Any craft saw will work just fine. Sand the edges. For reference, the smallest ‘post card’ size pictured is 3 1/2″ x 5″ and the largest letter size is 6 1/8″ x 11 1/2″.
Prep the printed images by trimming down the paper.
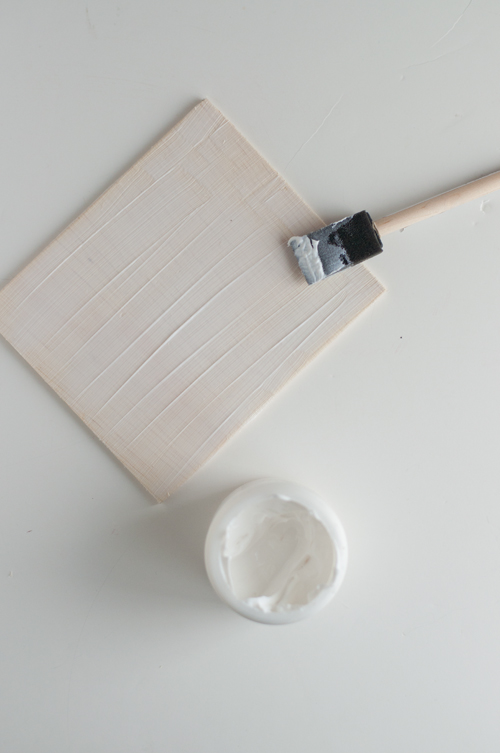
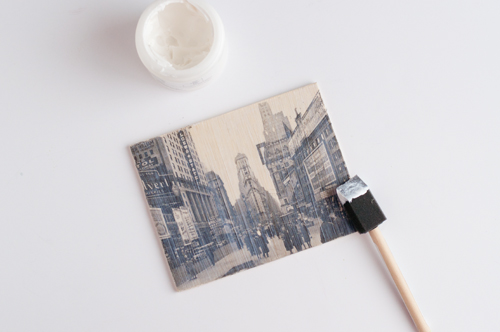
Use the foam brush to spread an even layer of gel medium on the surface of the wood. Not too thick, not too thin. Try to make it as even as possible and make sure the entire surface is covered. Bare spots or globs will cause problems with the transfer.
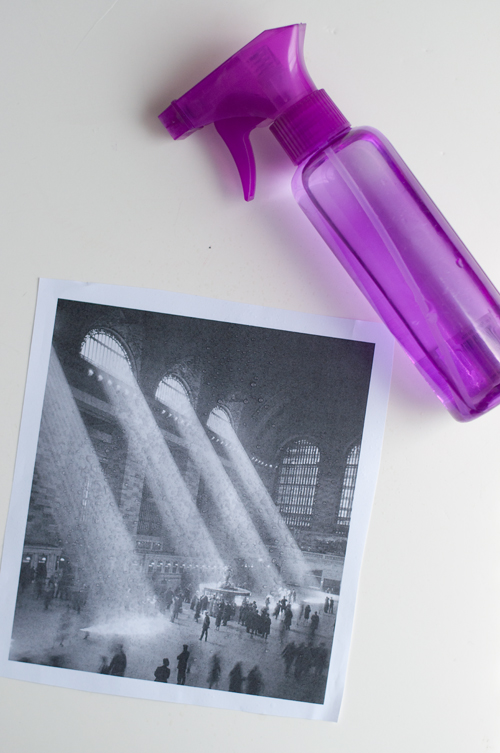
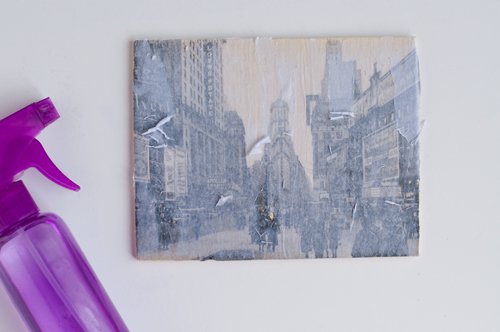
Lightly spritz the printed side of the image and lay it down on the gel-medium-covered surface. Align the image to the edges of the post card.
Smooth out the printed image using your finger, pressing from the center to the edges. The paper is damp which makes it easier to tear — so be careful. As the paper settles, more wrinkles can appear so you’ll need to keep watch, and press them out.
Allow the paper and post card to dry completely.

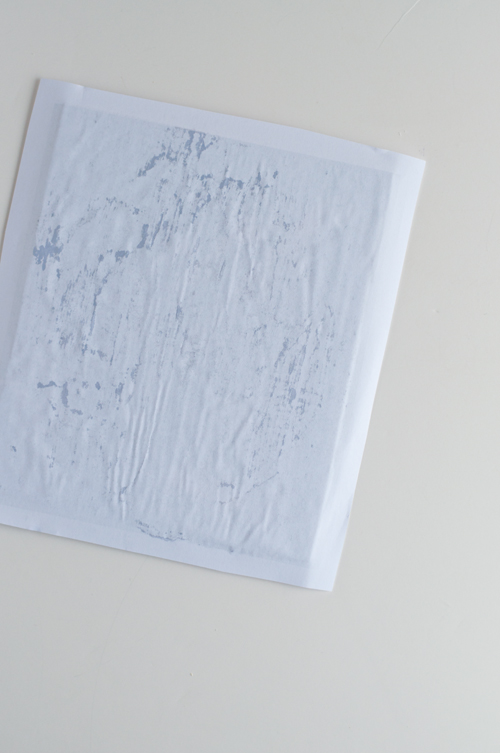
When it is dry, use the spray bottle to wet the paper surface until the image is visible.
Carefully begin to remove the paper. The first time through is typically larger pieces like the portions hanging over the edge and the first few layers of the paper. Be patient and don’t rush. Rushing can cause parts of the image to peel off leaving blank spots.
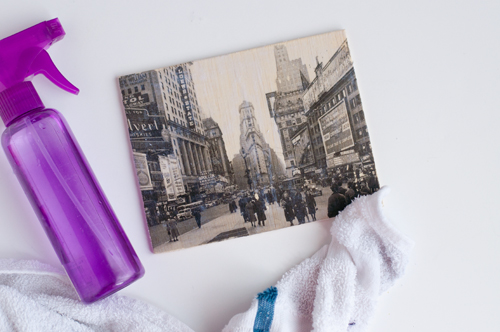
Continue rubbing away the white areas. The wet paper will ball up and peel away. Try using your fingers, or a damp rag to remove the paper. The rag has some texture and really helps remove the paper.
After you’ve removed as much as you can, let it dry a little. As it dries, the white paper will be more visible. Repeat until you are satisfied with the look.
When it’s finished, top it with a clear coat if you’d like.
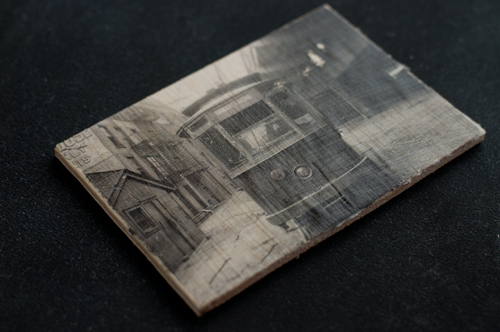
A clear coat can give the image a lovely texture.
I know. Kind of an involved process for something that looks so simple and lovely. But once you practice the technique, you’re set! And it’s an easy bet you will become totally obsessed with photo transfer projects. Antique photos from your grand parents. The faded color photos from your childhood. They’re all packed with wonderful possibilities!
Happy making. And happy photo hunting, too!
P.S. — Like to make things? Check out these projects.
Gabrielle, I LOVE this project. I have been wanting to try image transfers forever, and I am totally impressed by these gorgeous results. What a fun DIY — thank you so much! Can’t wait to try it.
I love these! My husband (who is a talented designer) has made me several cards over the years of photos printed onto wood veneer. I cherish them! This will be a fun thing to try in the future.
I love this idea! Unexpected things in the mail are the BEST! Maybe next you could mail a waffle? http://www.sheknows.com/living/articles/1021415/how-to-make-a-waffle-postcard
Hah! I had no idea that was even an option.
Cute idea! This made me laugh though – my friend sent me a coconut from Hawaii once (I had no idea it was a thing!)….buuuut it was shortly after 9/11 during the whole anthrax thing. Man, I wish there had been a camera on me when i opened up my mail box to see a dark round thing in there. After the initial panic, it was very much appreciated. ;)
Oh my goodness! I can just imagine. Especially because if you haven’t seen a coconut in its husk before, it would look completely unfamiliar!
Fun idea, thank you for precise instructions(another source hadn’t specified the kind of print to use)
Will make great holiday cards
Cheers!
Oh good. The toner+lazer print makes all the difference!
Excellent tutorial! I’m excited to try this. I’ve always wanted to do photo transfers and I can’t believe I still haven’t done it. This could be a fun thing to do with baby pictures to give the grandparents! Thanks!
AAA! So excited about this.
I totally love this idea! I’m excited to try this!
I would love this for some large-scale portraits of some antique family photos! Linking to this today!
Pingback: Nooks and Crannies » West of Grey
Pingback: Wooden Post Cards with Design Mom - this heart of mine
Pingback: Idea: art as a wedding favor | Quintessentially French
omg!!! soooooo excited to try this!!! thank you for the wonderful tutorial!!
Joy :)