Because of my love of the stars, when my daughter was little, I purchased her a night light that shines stars all over her bedroom walls. After seeing a few light-filled jars on Pinterest, I had an idea to fill a jar with the constellations — and I was able to create my own constellation jar, using items I had around the house!


CONSTELLATION JAR TUTORIAL
What you’ll need for your own constellation jar:
– a wide mouth jar – The jar needs to be wide enough to fit the small click light inside. A pickle jar works great.
– an aluminum cake pan
– small click light, like these
– an awl
– scissors

Cut a strip of the cake pan long enough to fit around inside the jar and tall enough to reach to the very top of the jar. Use a spoon to brandish out any writing or crinkled parts.
Use the awl to poke holes for the constellations. Mine are not accurately placed, it is only a small strip of aluminum after all. I included Hercules, the Big Dipper, the Little Dipper, Draco, Cassiopeia, Cepheus, Orion, Cancer and Gemini.

I connected the constellation dots with a silver Sharpie to make them easier to spot.

Fill in the other space with more holes. Make the holes smaller than the ones used to make the constellations because it will set the constellations apart.

Roll the aluminum sheet until it fits snug inside your constellation jar. Hold the circle in place by cutting two tabs and folding them in opposite directions.

Put the encircled aluminum sheet inside the constellation jar. Turn the click light on and place the it inside. Top with the lid. I spray painted my jar lid. It’s looks nicer and smells less like pickles.


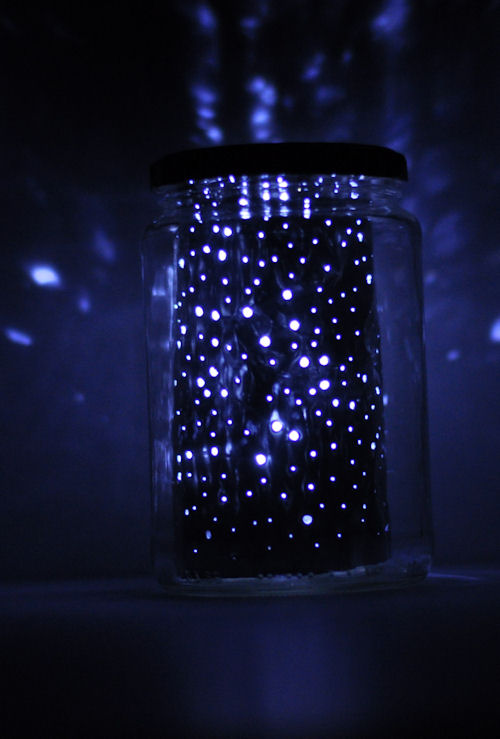
Take into a dark room and enjoy your very own constellation jar.
The night sky in a holdable form. I connected the dots below so you can see them too. The Little Dipper, the Big Dipper, Draco and part of Orion.

P.S. — Check out this DIY kiddie carwash.
—-
Created by Amy of This Heart of Mine for Design Mom.
Now I know one of the summer projects I will make with my kids:)
My daughter just took a school trip to a planetarium and was IN LOVE with it – this will keep her enthusiasm I’m sure! Thanks!
Ohhhh. Speaking of school, wouldn’t this be fun to do as a classroom project?
You may need to see if the pan could cut the kids fingers before you do it in a classroom, but I love this idea!
I just sliced up my fingers badly while making one of these…. beware! But it is so cute, it was definitely worth the bandaids!
I would like to try this using black construction paper instead of a foil sheet. It may be safer but not as shiny. I have done this with black construction paper, baby food jars and a hole puncher for a halloween party but larger as a night light would be truly awesome for a kids room.
Try using tinfoil this work also
I tried the black paper. The problem was getting the holes clean enough for the light to shine through. I had hoped to do this project with a battery operated tealight, but the amber one I had on hand was far too weak to shine through even large holes.
You could line the edge with tape and have students use sharpened pencils instead of costly craft tools, but I would recommend trying it 1st to see if it has the same effect you want.
Great project…will definitely have to add that one to Wed. afternoon craft time with the kids! What fun! Thanks for the idea.
Marvelous project! So fun and worth every minute it takes. Thanks millions for sharing!
This is so wonderful. Thank you for sharing!
Here in Colorado we are super below in water levels and it looks like there will be no open flames this summer. These would be great -and safe- in the bigger, half gallon Mason Jars and set out on the patio for a summer evenings.
Heather! I love that idea. Brilliant.
I so rarely see the stars that I used to love seeing at my home in Hawaii (the grey Pac NW does not make for good star-gazing) — I think this project is a must for my daughter and I!
I keep promising my three year old I’ll get her stars for her ceiling but this is a much more fun project to do together. And cheaper!
I love this! Thank you for sharing… easy and beautiful :)
This would be a perfect addition to the stargazing party that I’m planning. They’d make cute lanterns for the tabletops and shine beautifully once it got dark.
Wow! Very cool! Definitely a great summer project! Can’t wait to try it!
I wonder if you could glue the light onto the lid and place the jar upside down to avoid the gap? Or would it just be distorted? Just a thought. I’ll experiment soon! Great idea, my girlies will love it!
PS-had Blue Lily shoot and they are fantastic!
I love this SOOOOOOOOOOOO MUCH!!!!!!!! Thank you!
When I clicked on the full tutorial, I was surprised how simple it was. I’ve got everything except the click light. I’m hoping an electric tea light will work just as well. Going to test it out with the kids later today.
What an amazing idea! And you’ve made it look so simple. Thanks for sharing, I’ll definitely be trying it out, as soon as I find one of those click lights.
What a fantastic idea! I can’t wait to try this!
Very clever project!!! Love it!!!
So lovely! This is a perfect nightlight. It would also be beautiful in a bunch of big jars for a night wedding reception!
-Jeanne
http://www.domesticspace com
What a fantastic idea. Would make a great nightlight for my daughter or would be fun for little lights outdoors on a summer night too. Love it!
What a cool idea! Reminds me of the exhibit your sister saw in Copenhagen.
very cool. thanks for the idea.
I love this even more than the glow in the dark jars, I’ve seen! Thank you for this one. I can’t wait and will even try it will my 8 year old English Class.
Thanks so much for sharing this. How sweet of you …
Anna :)
Amazing! I am having a space themed bday party for my 3 year old. These would be great decorations or even take homes in a small version. Really cool!
I LOVE this project! I have seen star night lights that are really expensive and they don’t even have constellations on them. My husband would love to make this for a future nursery! Thanks for sharing!
My kids and I made these yesterday. My son who will be 11 in July wasn’t in the mood to do a craft project with his 3 year old sister. However, when I asked him to help me chose a constellation he joined in. He found the constellation Leo in one of his space books. My three year old was fine with just poking holes in the aluminum tray that we used. Once lit it still looked stars.
Tip: make sure they holes are big enough that the light will shine through them.
Happy star gazing!
Amazing and gorgeous! Thanks for showing us how to make it.
Love this idea! So bookmarking this. Thanks :)
Amazing! Can’t wait to try this with my kids.
What a fabulous idea, I love the Stars in France, we have an amazing night sky in Brittany, so much better then London. I’m going to make one of these in the summer with my daughter, and make sure I use sone of the constellations that we can see. Thank you.
Adorable!
(ps. you mean “burnish”, not “brandish” when you’re talking about smoothing out the aluminum!)
hiya, I made two of these for my boys and they loved them… thanks for a fab idea.
What a beautiful idea! Love how you did real constellations!
I’m just wondering, how long do these lights last? Do they have batteries you can replace? If so, what kind? And how does the on/off work? Do you have to try and maneuver the light in and out of the jar each time?
Ashley.. The L.E.D light shown in the image works by pressing the glass in the middle, this could be done with the end of a pencil or something without removing the light from the jar.. The take AAA batteries and last quite a long time & the bulbs themselves, being L.E.Ds, will last yonks too :)
I think attaching the led light to the bottom of the jar lid with velcro or 2 sided tape might make the light a little easier to get to.
This is amazing! I think I’ll make one. I don’t have any children, but I’m sure my dog would get a kick out of this! :) What a great tutorial!
your very creative! :D
wow what a great idea, i love how this is so simple and easy to do! do you think if i spry painted the jar instead of using tin foil will have the same effect? and what would i do if i wanted to make a larger scale out of this project, how would i actually install on the room light?
I love this neat constellation jar! I think it’s amazing and love that it can be made without having to purchase a lot of expensive materials. I hope that it’s okay, I just finished a frugal crafts round-up and just couldn’t resist featuring this. You can see it here: http://jamiebrock.hubpages.com/hub/Frugal-Crafts-15-Easy-Craft-Ideas
I also linked to this heArt of mine and let her know as well. Thank you so much for sharing :)
Great idea! Thanks for sharing!!!
What a wonderful idea! :) I love it!
Do you know by any chance where I could get the small led click light?
Do you think it would be practical to put a candle inside the jar rather than a led light?
Thank you for insipiring post!
We made these using coffee cans. Fill them with water, freeze to hold the shape, use hammer and nails to punch the holes, let water melt and done. No cuttung involved.
Lots of tutorials for these on the web, look for can lanterns.
Looks like a wonderful craft to use this summer with the kids who come camping at the state park.
I am wondering what the “stars” would look like if the holes where punched with the tip of a Phillips screwdriver. (I think I will try the small to medium head Phillips as they kind of already look like stars.) Will have to be careful not to punch too deeply or will lose the pattern.
Super great tutorial and they look so beautiful.
would this work with aluminum foil?
I’m so glad I found this post! I actually found your project on pinterest on this site: http://www.surprisediy.com/diy-249.html, which appears to have scraped your content. So you may want to look into that if you did not give them your images.
All that to say….I think your project is awesome! I started trying to find the original source because we are planning to feature it on Dollar Store Crafts sometime in the next week.
All the Best,
Carissa
Dollarstorecrafts.com
Fantastic idea! Thanks for sharing!
Thanks for this so creative idea! Just found it and have shared your page link here as suggested family project. Also have given another inner version of applying it imaginatively. See here: http://www.facebook.com/pages/Inner-Universe/565681800110195
i am 11 years old and in looking for a constellation handmade project for school and i drifted to this website your very creative and i think i just found my handmade project thanks and keep up all the good work your doing
We love this post and have added it to our round up of constellation crafts! Hope thats OK?! xxx
http://buttonsandpaint.blogspot.co.uk/2013/06/obsessionsconstellations.html
Do you think you cpuld put a tea candle instead of a light??
Totally awesome! We are so doing this!