Because of my love of the stars, when my daughter was little, I purchased her a night light that shines stars all over her bedroom walls. After seeing a few light-filled jars on Pinterest, I had an idea to fill a jar with the constellations — and I was able to create my own constellation jar, using items I had around the house!


CONSTELLATION JAR TUTORIAL
What you’ll need for your own constellation jar:
– a wide mouth jar – The jar needs to be wide enough to fit the small click light inside. A pickle jar works great.
– an aluminum cake pan
– small click light, like these
– an awl
– scissors

Cut a strip of the cake pan long enough to fit around inside the jar and tall enough to reach to the very top of the jar. Use a spoon to brandish out any writing or crinkled parts.
Use the awl to poke holes for the constellations. Mine are not accurately placed, it is only a small strip of aluminum after all. I included Hercules, the Big Dipper, the Little Dipper, Draco, Cassiopeia, Cepheus, Orion, Cancer and Gemini.

I connected the constellation dots with a silver Sharpie to make them easier to spot.

Fill in the other space with more holes. Make the holes smaller than the ones used to make the constellations because it will set the constellations apart.

Roll the aluminum sheet until it fits snug inside your constellation jar. Hold the circle in place by cutting two tabs and folding them in opposite directions.

Put the encircled aluminum sheet inside the constellation jar. Turn the click light on and place the it inside. Top with the lid. I spray painted my jar lid. It’s looks nicer and smells less like pickles.


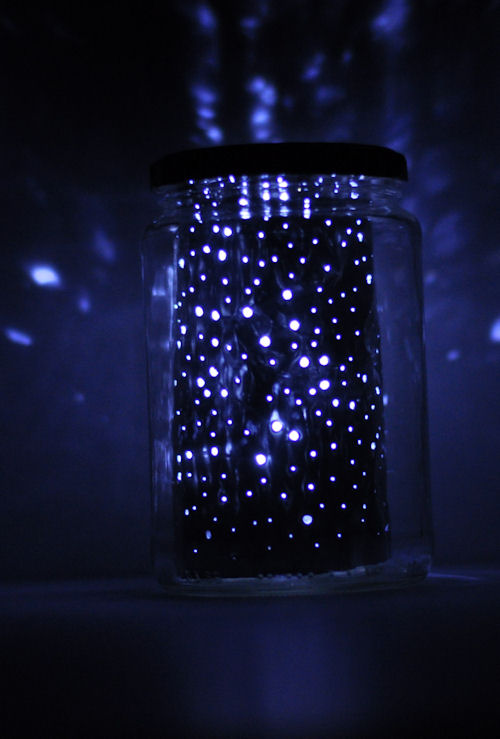
Take into a dark room and enjoy your very own constellation jar.
The night sky in a holdable form. I connected the dots below so you can see them too. The Little Dipper, the Big Dipper, Draco and part of Orion.

P.S. — Check out this DIY kiddie carwash.
—-
Created by Amy of This Heart of Mine for Design Mom.
Made one of these years ago…we used a sturdy piece of paper (color doesnt matter) or light weight cardboard and covered it with aluminum foil…drew the constellations on the uncovered side of the paper and poked them out…connected the dots on the foil side and punched smaller holes to fill in…taped it together, put it in the jar with a battery operated tea light…no fuss, no muss, no sharp edges, therefore no bandages needed…my daughter did this with a daisy/brownie troop when she was a program aid at day camp.
I Love it so much :) thanks
Hey, this is beautiful. I want to make one for my brother. Do I paint the sheet blue?
If you tape aluminum foil to a thin piece of cardboard like a cereal box or poster board,then punch the holes, it would not be sharp and would be easier for the kids to do themselves. It would still be flexible enough to roll and put in the jar also.
Just saw this post and I cant wait to try it!! I think attaching the LED light to the bottom of the jar lid with velcro or 2 sided tape would make the light easier to get to
We are trying to mAke your constellation jars or a party ad was wondering why your jar is blue.
Thank you .
What a great idea thank you for sharing, I am going to try this with my daughter over the summer school holidays x
Love this its perfect for a sleepover!
I love the looks of this!
I love this idea! As a retired teacher, I am always looking for fun ways for kids to learn. I do kids night for 3-12 year olds and this is a winner!! I always had the glow in the dark stars on the ceiling in my kids rooms, and they even arranged them into constellations. I can’t wait to play around with this. I have the lights- closet push -on lights from Target, WalMart, etc. Thank you!!!
Do you think it would work the same if I just used Reynolds Wrap aluminum foil?
I absolutely like this idea! But I have two questions: what is the cake pan used for and what is the small cap next to the awl in the materials needed photo?
omg I absolutely love this! my son is looking for a constellation science project, he’s 9 yrs old, and he would love this! thank you for sharing! =-)
What a fantastic idea!
Use tinfoil it works also
Have seen pix of this on several other sites, w/o directions. So happy to find this, will be making them with my granddaughters – thanks much!
This a simple way to show the stars
what about just using a pop can? You can cut them the same way with scissors and have a sheet of tin.
You could use the pop can like the coffee can. Fill it up with water and freeze. Poke the holes in the can with an awl or hammer and different sized nails (don’t forget the bottom too), allow the ice to melt and drain out, then carefully cut the top off and set it over the light. Be careful of the sharp edge.
Our school is doing a science night and inviting the community for activities….great idea..thank you we will enjoy making them
This is so cool and very beautiful thanks Pinterest for sharing this with all of us sincerely linda.
How would you turn the light off?
Will do this with Sunday School kids when teaching Creation. Young kids so will use aluminum foil and pencils then line jars.
Thank you so much for the wonderful idea. We made these at Cub Scout Day Camp and the kids loved them. We used black craft foam for the middle and thin bamboo skewers to make the holes. This worked well and was easier to work with than foil for the littler ones.
love it
Dear Gabby: I enjoyed Amy’s post, and Lindsay’s post last week, but I felt a tiny letdown both times when discovering that you didn’t write it. I’m wondering what your method is for putting the author’s name at the end rather than at the beginning.
Thanks for the note, Kate. My method for noting the author’s name has certainly changed over the last 15 years of Design Mom, but has also been very consistent for the last 5 years or so. I don’t list an author at the beginning of any posts. If the post is by a contributor, “created by” or “edited by” will be listed at the bottom of the post. For example, the house tours are organized and compiled by Josh Bingham, and he writes the intro and outro, and he is listed as the editor on each one. If no creator or editor is listed, the post is by me. You can assume most food and craft posts are not written by me as I like to reserve my creative time for essays and design.
I originally hired Amy to create this craft post in 2012. I’ve been happy to re-publish some of my older content for readers who are new or might not remember the posts.
I was thinking about your comment again, Kate, and realized I was actually really irritated by it, for two reasons that I can recognize (and maybe other reasons I haven’t recognized yet). First, you’ve been commenting here for a long time, and it seems like you would know that since your comment is not about this craft in particular or constellations or really anything that directly relates to the content of this post, it would be better to send via email instead of as a comment.
The second reason is that I’ve increasingly lost patience with readers who make demands of this free blog that you are free to stop reading at anytime. You felt “letdown” because I didn’t personally spend time making a constellation jar and photographing the DIY for you? You felt “letdown” because I’m not personally an expert on freezing produce? Is the content not as valid or worthy because I sought out creators who I trust and hired them to create the posts? I have a hard time not rolling my eyes.
It’s pretty easy to make and looks wonderful I love it!
Wow! Such an original idea and a smart and one too! In the past I used cracker and cereal boxes along with different lighting methods to try and acheive making a craft just like this! I love novelty lamps and I’m a huge fan of anything that has a space, galaxy or star theme. I also love the idea or recycling or repurposing items headed for the landfill. This idea gives me a chance to give some old everyday items new purpose along with a second life and a very good second life as a beautiful piece that can be used for years to come. Once finished it shall grace the bedside table and will allow my husband and I to enjoy a veiw of the stars even on the most cloudy nights. Thanks for sharing this awsome craft idea! 🌌