In college, when I was studying design, printmaking classes were always my favorite. So when Amy of This LIttle Miggy suggested a DIY for fabric monoprints, I wanted to give her a high-five! I think you’ll love this project. I want to try it on pillowcases and onesies, and maybe a picnic blanket too! Here’s Amy:
——
Hey guys! When it comes to creating, my two great loves are painting and sewing. So it should come as no surprise that I’m always trying to combine the two. I had this idea when thinking back to my art school days. In the world of printmaking the general idea is that you have an image and then make several (hundreds even!) copies of that image. However the beauty and genius of the monoprint is that it’s a one-shot deal. You spread some paint on one surface and transfer it to another surface. One time. It’s a little leap of faith, and who doesn’t need more faith?

Now, some people might ask, why do a monoprint? Why not just paint directly on the fabric? Well I think you’ll see that ‘printing’ gives it a much different look. The texture and feel of the paint is entirely different than if you just painted directly on the fabric. And it’s fun. Duh.
So we’re going to recreate a simple printing press using stuff in your house, and I bet you already have everything on hand.

Supplies:
– Fabric to print on
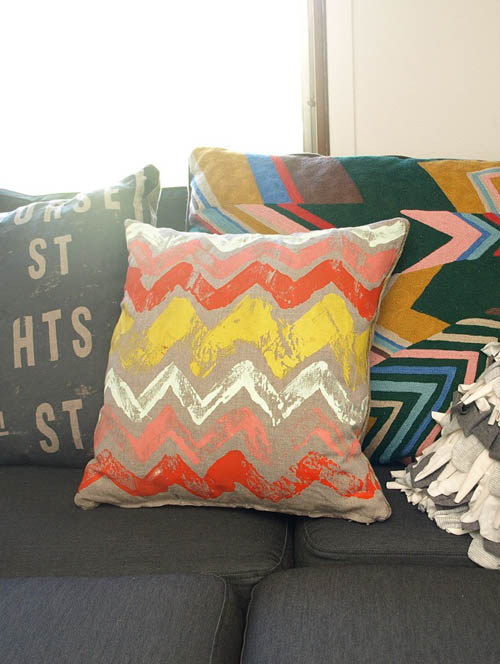
I wanted to make some throw pillows so I cut the fabric to size. You could easily do this on a shirt, onesie, tote bag, etc. Just make sure you put some cardboard between the layers of fabric so paint doesn’t bleed through.
– Paint
Craft paint, fabric paint, latex house paint. It doesn’t really matter. However, for regularly laundered items like onesies and shirts, fabric paint might be your best option. For this project I used sample jars of latex house paint from Home Depot.
– Freezer paper
Wax or parchment would work well too.
– Brushes
– Hard surface to work on
– Rolling pin

Once your supplies are gathered start with laying down some freezer paper to protect your surface. For the width of my fabric I needed two sheets overlapping, side-by-side. Since I was using an artists’ clipboard I used the clips at the top to secure the paper in place. I also used objects to weigh down the bottom corners. Tape would work just as well.

Now you’re going to take another sheet of freezer paper and use this as your creating surface, I used the shiny side up. Now go ahead and paint directly on the paper! You can be as free and abstract or detailed and specific. Just paint fast, because the paint needs to be wet for the printing process! I did some quick freehanded chevron stripes, but I also do a little more spontaneous/abstract piece as well. You’ll want to be generous with your paint, but not overboard. You don’t know exactly how well the paint is going to transfer, spread out and/or blend together. That’s the fun part!

Next take your fabric and carefully lay it over the painted paper. If it’s a large piece of fabric, you may want help laying it down, because once the fabric hits the paint, you don’t want to move it! I used a nicer linen and some inexpensive muslin for these projects. Make sure your fabric is prewashed and preshrunk. I did leave my fabric a little wrinkled and again it added a little depth/texture during the printing process.

Now take more freezer paper and cover your fabric. This is to protect your rolling pin from the paint. You may want to wrap your rolling pin in cling wrap for double protection. Take your rolling pin, press down hard and roll right over the top of your fabric. You can do this a couple times, especially if you weren’t very generous with your paint.

Carefully lift off the top layers of freezer paper and lay it aside — remember there’s still wet paint on there! And then very carefully peel off your fabric. Again it may be helpful to have someone hold down your painted freezer paper while you lift the fabric off.

Ta-da! Take a look at your completely original, 1-in-a-million, new monoprint!

Once the paint has dried feel free to iron the fabric on the reverse side.


Here’s the finished pillow. I love how it turned out. One final tip: You can let the paint on the freezer paper dry, and use it as wrapping paper. Good luck and have fun!
P.S. — Here are a couple of shots of a more abstract monoprint I did. I wonder what I’ll make with it!


Love the rough texture and the imperfections from both the freehand painting and the process. Not having it perfect is what makes it special for me. Could be a great kids project too even if all they did was the painting part. Great idea!
Love this! I’ve always wanted to try printmaking and this sounds like very fun – and do-able. Thanks for the inspiration!
you must have read my mind. i’ve been dying to try printing on some linen i bought on sale, but wasn’t exactly sure how to go about it.
Love it :) Can’t wait to try it!
Ooh, fun! Can you imagine the possibilities?!?
I love this!
This is awesome!! Really want to try it… wondering if I can do it. :)
beach trips this summer have just become more chic. running out to michaels for supplies once the babe awakes!!! thanks for sharing.
This looks so fun, reminds me of all the printing and fun we had when I started school but this is with purpose!
Love this idea…can’t wait to give it a try. I think I might try some smaller prints and use the fabric on cards. Thanks for the great tutorial, Miggy!
What a great idea! And you could use it in so many ways.
This is awesome and I have always loved Miggy’s blog. Thanks for featuring her amazing skills.
I love the texture the printing method makes. A nice change from the typical herringbone pattern!
Hmm, thanks! Might try this and paint some banana leaves or palm trees to transfer. Voila! Cheaper than PB but still as nice and with a personal touch!
Great tutorial! Love the bright chevron print. Might have to try this one myself. :)
Thank you! Doing this w my cubscouts tonight.
This is awesome! I have a bolt of unbleached muslin and I think I know what I’m going to do with it… :)
What to do with the abstract one ??? Hang it on the wall of course. Either put it in a simple white/wooden frame or as I would go for, nail it as it is, or hang it on a nail with a piece of twine :) You can involve all your family and make a huge print on a big fabric ;)
I loved monoprints in college too! I have to try this. thank you.
Cute idea! Versatile. Lots of possibilities.
I’ve been working with stenciling & freezer paper for a bit and never really felt comfortable with the results… this, however, is AWESOME! And a great art idea for trying with my daughter this summer – thanks!
I saw your episode on House Hunters International — beautiful farmhouse — belonged to an artist I think? So funny, I just stumbled across your blog (thanks to Pinterest) — love your painting technique — I like the texture of printing instead of directly painting :)
I love the rough, imperfect look! I’ve done monoprints on paper, but never thought to do a fabric monoprint… durrr haha
Thanks for the inspiration! We feature a DIY project every Monday on our website and this week we featured yours! We love the unique look and style!
Okay, THIS is fantastic! You’ve inspired me to paint some fabric all willynilly, so thank you for that. Also, where the heck is that chevron pillow from?? The one behind the one you made in the tutorial. Meez wantz.
That’s fantastic! Thank you for sharing! I’m soooo doing this. :)
a great thing! I plan t-shirt to make. I like to primitive pattern but I’ll take the turquoise shades. previously i made prints of chopped potatoes. it’s very beautifully
gladly subscribe to your blog
Love this project – caught my eye because we love monoprinting on paper and/or fabric. This would be a great project using our gel printing plate (as the surface)- super easy and fun project. Will be re-posting on our Gelli Arts facebook page! Thanks.
Thanks for a great tutorial! I found this on Pinterest and I’ve pinned to my Craft Ideas board. Can’t wait to make a pillow using this method! Thanks for sharing a terrific idea!
Thanks – this is a great idea. Very excited to try it!!
I am just curious. Why not just paint straight on the fabric? Love the idea.
Just saw you live in the south of France. I was there a year ago for a month, and you are right. It is very dreamy. Life is so different there. There is no describing it, you just have to experience it. I loved the people.
i might just wanna do this! i just moved to a new house and i need new pillows and this seems so easy!!! great DIY!
This Monoprinted Technic is just wonderful, i am gonna try it soon.
I’ve always wanted to learn how to monoprint. It looks really fun!
I once knew Garielle Blair, a dancer from South Africa ( like myself) who attended the Royal Ballet School with me. We met up years later in Toronto Canada.
I was wondering if you are the same person?
Greetings
Hilmar
I love this idea!! Thanks so much for sharing!
Hi! Love your tutorial! Two questions: Can you just paint onto to fabric? Can the fabric be washed afterward? Thank you so much!
Hi Gab,
I love your website! My name is Lyndy Lien and I live in Hawaii. I am interested in pattern designing. I want to design pattern specifically for swimsuit. Do you have any tutorial for that or if you could send me to any other resources that you would recommend? I am will be launching my own swimwear line and I would like to design my own fabric designs! Thanks in advance for your help.
Aloha,
Lyndy
oh my god.. that’s amazing.. I have tried this for the guest room.. and the idea rocked.. thanks for sharing