Our son Ralph created great-looking bleached out tees for his siblings — each one unique and representing something he thought each individual sibling would love. They turned out super cool. And I’ve got the images and techniques ready to share. Find the full DIY below.

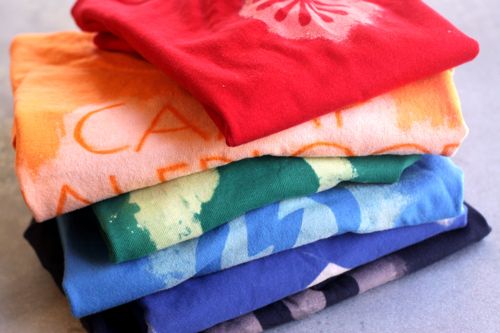
Here are the designs Ralph created — there’s a wide variety and they will give you lots of inspiration and ideas. For Betty, Ralph chose a simplified flower. Cute!

This one’s for Maude. In case you’re wondering, orange Camp Halfblood t-shirts are a major part of the Percy Jackson book series. : ) Ralph made a second one for Maude’s best friend. Maude is going to go nuts over these.

Olive’s favorite color is green and her favorite fruit is a pear.

Ralph made a t-shirt for himself too. He is really into skate brands at the moment, so he recreated the Electric logo.

For Oscar, Ralph used duct tape. Ralph’s happiest about how this one turned out.

J is for June, of course.
Ready to make your own? Let’s get started.
Gather Your Materials
– 100% cotton t-shirt in a bright or dark color (you can use a pastel, but the contrast from the bleach won’t be as intense)
– Bleach
– Rags
– Sticky vinyl to create your designs and block the bleach — we also use duct tape as bleach blocker on one of the t-shirts

Step One: Set Up Your Tee
Spread out the t-shirt, then put a layer of rags or an old towel between the front and back — so the bleach doesn’t bleed through to the back of the shirt.


Step Two: Apply Your Design
Apply the design you want on your t-shirt. For most of our designs, we used sticky-back vinyl that was cut into shapes and letters using a shape cutter — perfect for a Silhouette machine or a Cricut machine.
If you don’t have a shape-cutting machine, you could still buy a sheet or roll of sticky-back vinyl and cut out the shapes you want by hand.
For Oscar’s tee, Ralph put strips of duct tape across the shirt in a diagonal pattern.


Step Three: Add The Bleach
Next, pour some bleach into a container and dip an old rag into the bleach. Press the rag onto and around the vinyl or tape.
When the shirt is as bleached as you’d like it to be, put your hand into the tee and lift the front of the shirt, slip out the rags and immediately rinse the front of the shirt in water to stop the bleaching process.
Be careful not to let the bleached area touch the not-bleached areas until the bleach is rinsed out.


Step Four: Let The Shirt Dry
Dry the shirt in the dryer, or air dry it, and you’re ready to wrap it up. Yay!
(Find a few more troubleshooting tips at the bottom.)


Some helpful tips:
– If the bleach doesn’t seem to be working, there is probably sizing (a chemical often found on new clothes) on the t-shirt fabric. Just wash and dry the shirt and try again. This happened to me twice and washing the shirt did the trick.
– Wider pieces of vinyl seemed to work better than thin pieces. For example, the lettering on the Camp Halfblood t-shirt was super thin and the bleach crept behind the letters. We used an orange fabric marker to correct any over-bleaching. The camp tee was the only design where this happened.
– For the pear we used a sponge brush instead of the rag. The rag makes for cleaner edges around the design. The brush made fuzzy edges. Both can be cool depending on what you’re looking for.
– You’ll probably get a few random dots of bleach on the shirt in places you weren’t planning. Don’t stress. It will look good anyway. : )
P.S. — Make sun-dye bandanas.
OK, so you have completely inspired me to do homemade gifts going forward between my three children. What a great, fun idea! Love them.
Thanks for always inspiring all of us.
Love! Dan is doing t-shirts too!
I love this idea! Something a little different than tie dye but still super simple.
Yes, it’s like the opposite of tie dye. Both are so fun for kids!
I’ve done this with a spray bottle – fun effects either way!
You always provide the greatest ideas. This summer my daughter and her best friend did some potato print painting on t-shirts. They had so much fun and I appreciate how affordable it was.
I am SO Impressed! Love all the colors, designs and ideas!
Thanks millions for sharing!
Can you do this on totes and other cotton items?
I’m sure it would work equally well on pretty much any 100% cotton item. I’d recommend testing an inside seam first. Something like a tote might be chemically treated to repel water — which means it would also repel bleach.
What a great idea! Love it! And I love all of your kids’ names. What a great collection of timeless favorites! Olive was at the top of our list…I think my hubby still kind of wishes we’d gone with that…it was his favorite. And how special to make gifts for each other. I will keep this in the back of my mind for when mine are a little older.
I’ve just remembered that I think I wanted all your kids do it themselves gifts for myself last year too. I love the pear tshirt, would wear and might just make one for myself!
These look awesome! Definitely something we will have fun with! My roomies in college did something like this on hoodies, I forgot about it until now.
I am wondering about washing them… should I wash a bleached item separately so the bleach doesn’t bleed onto other clothes? The 1st time or always? Or it’s not enough bleach to be concerned? Thanks for any tips! ^_^
Hi Melanie! You’re in luck with the washing. As you as you’ve rinsed the bleach out when you’re making the tee, the bleaching process stops. Then you can launder them with related colors as usual.
I LOVE this idea. I have a maternity shirt that got bleach splattered on it after just two wearings and I haven’t had the heart to throw a good shirt away. Now I can just put a design on it and make it look like it was on purpose! Thanks!
These are so cool!!
These are so awesome! Can’t wait to try this tutorial!
I love this idea…my bleachings are always accidental!
I think Ralph must be the best big brother in the world! He even made one for Maude’s best friend – so thoughtful! Ralph Rocks – you’ve done well, Gabby!
Wow, a friend just sent me the link to your blog and I’m hooked – line and sinker! As a stay-at-home mom who does freelance graphic design on the side, I can relate to your story and I’m lovin’ your style. Bravo!
Sorry if someone asked already – but where did you find solid color tees in so many colors? I am having a horrible time finding solid color tees in 2T-4T (that aren’t white)…but I am not giving up yet. any suggestions?
I know this question was asked a year ago, but for anyone else looking, try American Apparel!
I LOVE it!
Am I the only one who had problems with this? The bleach crept under my vinyl letters, even though they were thick. Maybe I used too much bleach?
This is such a definite! I can’t wait to see the face on my little 10 year-old girl skater’s face! I don’t live in the States so I can’t get the fancy supplies but I think I can do a Foundation skateboards logo with just duct tape. Thank you for this fantastic idea!
Cute idea! I once used an old Aqua Doodle pen filled with bleach and drew a design onto a shirt, it looked so pretty when done.
Thank you for the inspiration. I just had my kids (5, 5, and 4) make a couple of shirts using this method for their father for Christmas. They look awesome. I can’t wait for him to see them!
I ran across this posting before Christmas and being on a VERY tight budget this year, I KNEW I had to give this a try. I found my shirts at Michaels, and the 12 month at Walmart in the kids section. Cut 4-wheelers with a saying for the boys and pretty butterflies for my niece out of contact paper I had on hand with a Cricut. Had SO much fun doing this with a friend. Only had problems with one, and my niece LOVED it anyway. THANKS for the wonderful idea and tutorial.
Can you please tell me what font you used for the Camp Half Blood shirts? My son saw these and wants to make them for he and his best friend (who happens to be moving soon). I’ve tried to locate font myself but nothing is looking quite right. Thanks!!!!
Does anyone know – would it work if you tie-dye shirts and then bleach on top of the tie-dye? I have a camo tie-dye in mind and then bleaching on an image or wording for my son’s scout troop. Would love any input.
Very clever
These are so cute! :)
I just did this and it turned out amazing!! I made my t-shirt to remember a mission trip that I just went on… such a great way to do so!! :)
Soo creativee, loove it
itsmineimadeit.com
Thanks for this. I have just made a Christmas tshirt for my 6 year old. He is going to love it. (he celebrates Christmas all year round and it will get plenty of wear.)
We just finished making shirts for Christmas gifts!
I love this. I was actually thinking this would be a great summer project and an awesome way to recycle the tees the kids have gotten those little oily stains on. I want to try to do a fairy design for my daughter and drum sticks for my son….
Where do you get the cute colored t-shirts?? Love them!!
Have you tried using rubber stamps? Wonder what we could use as ‘resist’ that bleach wouldn’t bleed through. Perhaps a water based glue that would wash out after the bleaching process was complete.
Instead of using a rag to dab the bleach on, I would suggest using a spray bottle with diluted bleach. In the very least it can add a speckled look if you ever need it. That’s what I do whenever I bleach shirts
Just finished making these as Hanukah for my nieces and nephews. I actually recommend not washing them first. Having the sizing on there to give you a lot more control even though it takes longer for the color to fade. My first (pre-washed) batch was a complete fail because the bleach so quickly seeped right under the vinyl designs. thanks for another great idea Gabby!
what font is the Percy Jackson tee in?
I have made some of these bleached t’s! I’m on my third shirt and now I’m using some cool tribal animal prints to make some for my boys! It’s quite addicting!
I am having issues with the bleach going under the letters, even though they are firmly stuck to the fabric…any hints or suggestions?
Hi, I love your tutorial! It’s descriptive and the best one I’ve seen! I was wondering if this would work if i made a stencil and put the bleach in a spray bottle?
I’m the Editorial Assistant for Fun Family Crafts and I wanted to let you know that we have featured your bleached t-shirt project! You can see it here:
http://funfamilycrafts.com/bleached-out-t-shirts/
If you have other kid friendly crafts, we’d love it if you would submit them. If you would like to display a featured button on your site, you can grab one from the right side bar of your post above. Thanks for a wonderful project idea!
I did these and used White Glue as my stencil for the words….works really well and washes out very nicely. Awesome way to personalise our Girl Scout Troop shirts.
does it work with yellow?
I know this is an old post, but thank you very much for the idea. I’m a girl scout leader and my troop makes troop t-shirts each year. This is our 5th year and I was running out of ideas (and so done with tie dye and fabric/puffy paint. This is fabulous new option!
How exactly do you wash them after?? :)
what if you use paper or cardboard?
using a spray bottle of bleach will give you softer edges instead of the hard lines you get using a rag or sponge
Hi there.
Do you know if non-chlorine bleach would work in the same way?
I would love to borrow your ideas for our Library summer kids’ blog, either paraphrasing or reblogging. Is that okay with you?