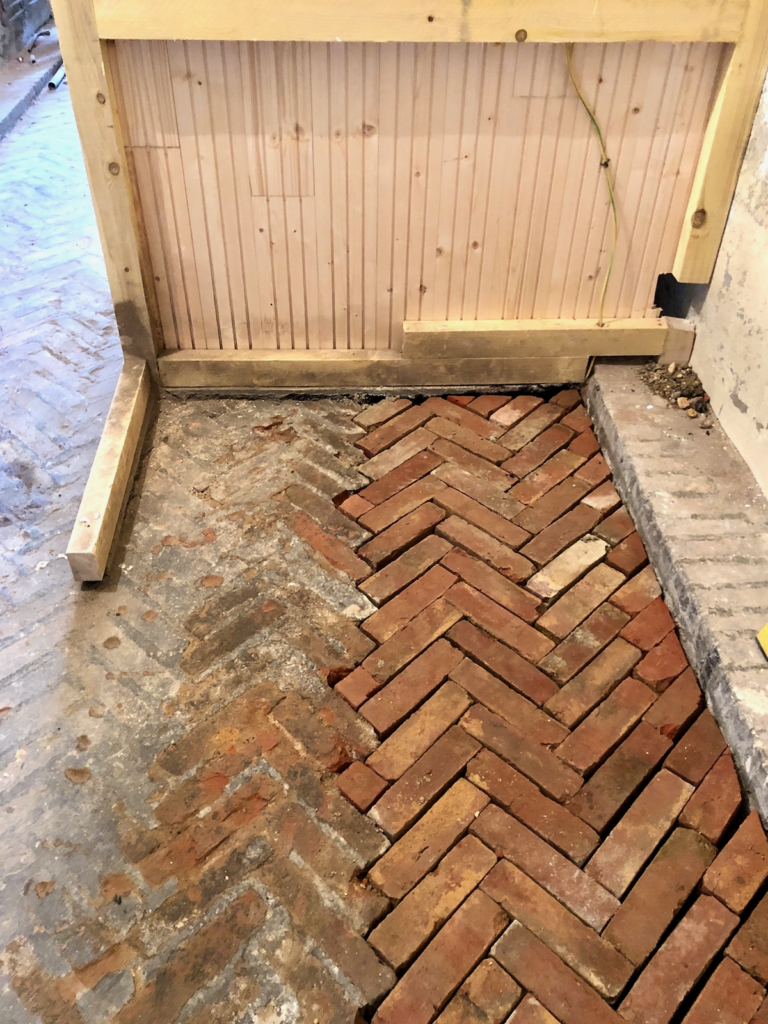
One of the most satisfying projects we’ve tackled so far is repairing the brick floor in the entry and dining room. You might remember, we found the brick floor when we removed a layer of asphalt, but along one side, and at the entry, the bricks were missing (we don’t know why they were removed).
We have a great source for reclaimed bricks, so we planned to hire a mason to fill in the missing brick, but Christophe (he’s done most of our other masonry work) was booked, and apparently, so is everyone else. So we decided to try doing the work ourselves.
Here’s a report of how it’s going to so far:
We started by clearing out the space, buying 100 bricks, and then cleaning the bricks. Then we mixed sand and chaux (lime) and started putting in the bricks. Gijsbert coached us and helped when we got stuck — this was our first time trying a masonry project and we had lots of questions.
The next day, we returned and Grant taught us how to fill in the joints. We completed the bathroom area, and experimented with cleaning the tar/asphalt residue off the older bricks (no success with that yet). We are so pleased with how the repairs turned out!
We were feeling confident about our work on the powder room floor, so we decided to attempt the brickwork in the entry, which is a bigger space. We cleared the dirt and rubble from half the entry space, then we went back to the brickyard and picked up 200 bricks, and we started putting the bricks in.
4/2 Update: We finished the entryway bricks! Come see:
Now that the entry is done, there’s still one long, narrow section in the dining room that we need to fill in. We’d like to do the dining room bricks with the kids. I think they would enjoy it — it’s satisfying work and you can see the progress happen right before your eyes.
It feels so good to try our hand at a new skill, and it makes me want to try some masonry skills in other spots too — like putting a path in the Secret Garden. Your turn: Have you had a chance to learn a new skill lately? I’d love to hear.
P.S. — More Tall House updates.
After having 5 contractors come through and decline the work (too small a project in an area with a construction boom?), I decided to tackle our shower myself. I did everything from demoing the old tile with a sledge hammer, which is highly therapeutic, to fixing the framing, installing backer boards, building a shower niche, waterproofing everything, and now: tiling. In a time of such uncertainty, it is incredibly satisfying to work with my hands and see daily progress. And we’re saving ourselves SO much money. So glad the contractors declined! Love following the progress on your French maison!
I love these updates! I can only imagine how much hard work has gone into your project. You do such a good job of conveying your sense of satisfaction, and I appreciate your “go with the flow” attitude about the setbacks you have faced along the way.
I’m not sure if this would work on old asphalt but I worked for a concrete company in college and we used diesel fuel to clean asphalt off tools after spreading asphalt. We just poured some on, let it sit for a minute to dissolve and scrubbed off the asphalt. That’s why gas stations have cement not asphalt under the pumps. I know that’s probably not the ideal thing to use inside your house but it might work!
Hi Gabrielle,
your brick floors look fantastic!
Did you consider putting insulation beneath the bricks?
We live in a pre WWII house. When we discovered during renovations that there was only gravel under the livingroom floor, we were able to put a layer of insulation under the new floor. Still it is the coldest place of the house and we use an area rug so the kids can play on the ground there.
I wish you all the best for your renovations and life in your new house.
Also: I really like your renovation posts. 😀
Have a happy Easter weekend !
The transcript from the design chat is great! Some really good ideas in there!
If you can’t get the old bricks cleaner, you could experiment with staining the new ones for a more cohesive look. They look great!