Images and text by Amy Christie for Design Mom.
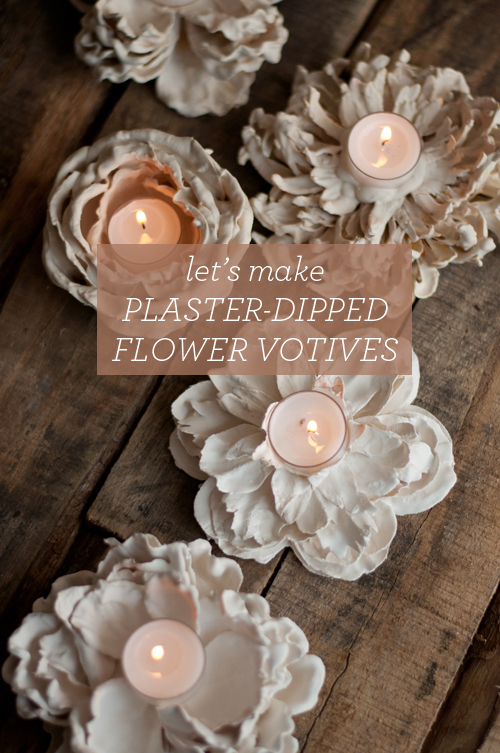
I’ve been loving all the plaster of Paris flowers across the web. They have such an ethereal and dreamlike look to them. Building on the process, I took it a step further and turned the plaster-ed flowers into votives. Dainty and functional.
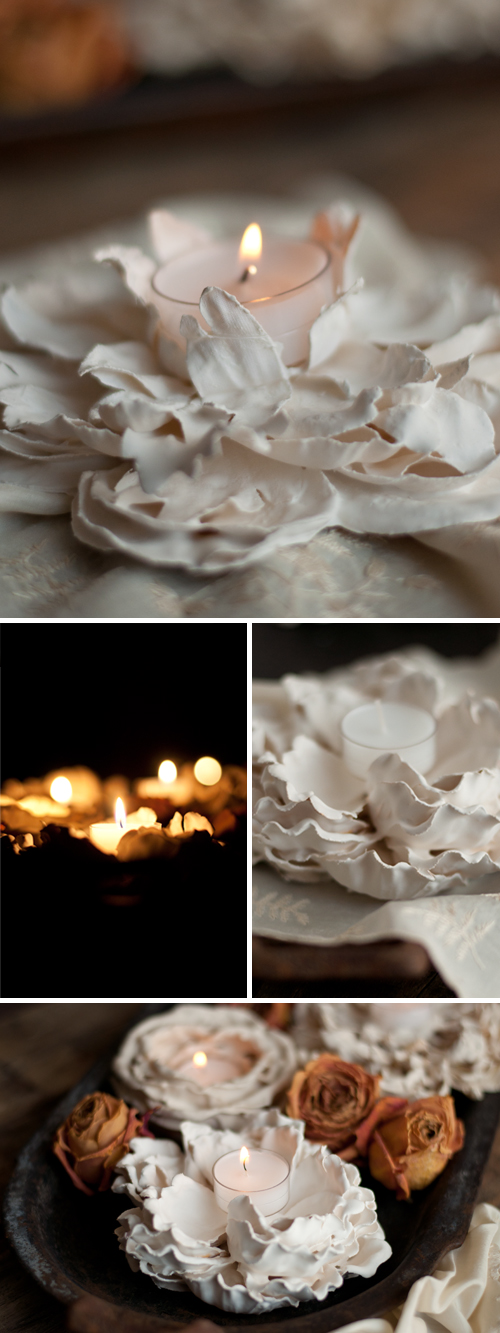
Plaster is a fun medium to work in. A liquid become a solid in a few short minutes and you get to decide how to form it. For dipping, the plaster coats the petals, freezing them in creamy white loveliness. With the stamina of the plastic flower, the votives appear fragile but aren’t so.
(If you haven’t noticed, I love working with plaster — as seen in these posts: gold leaf votives, leaf napkin rings, quote votives.)
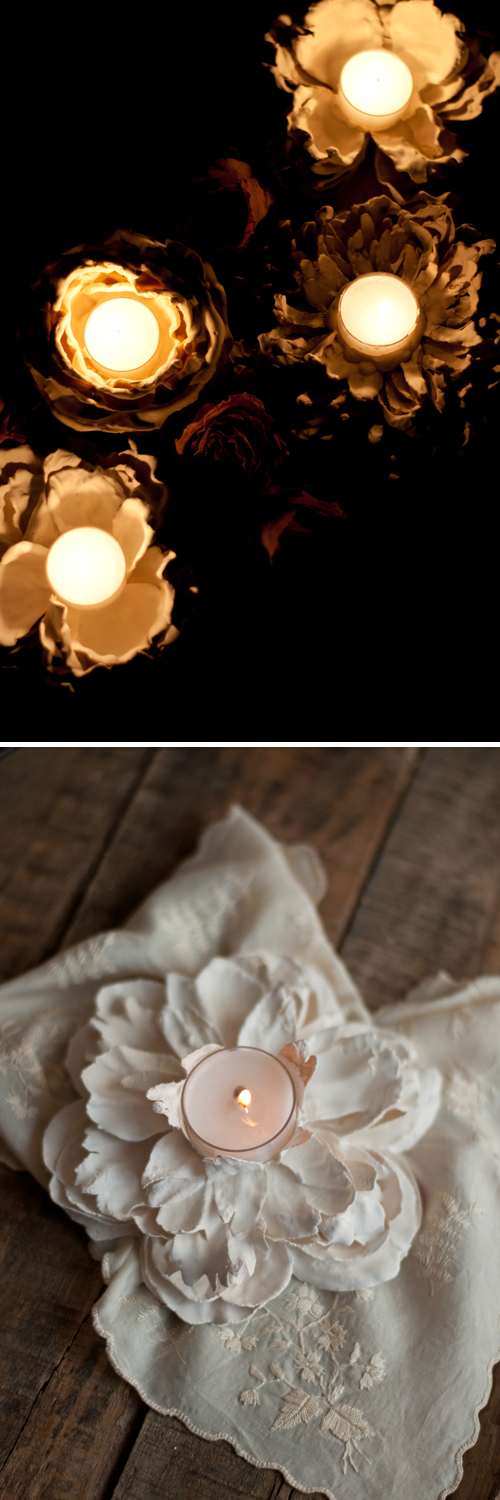
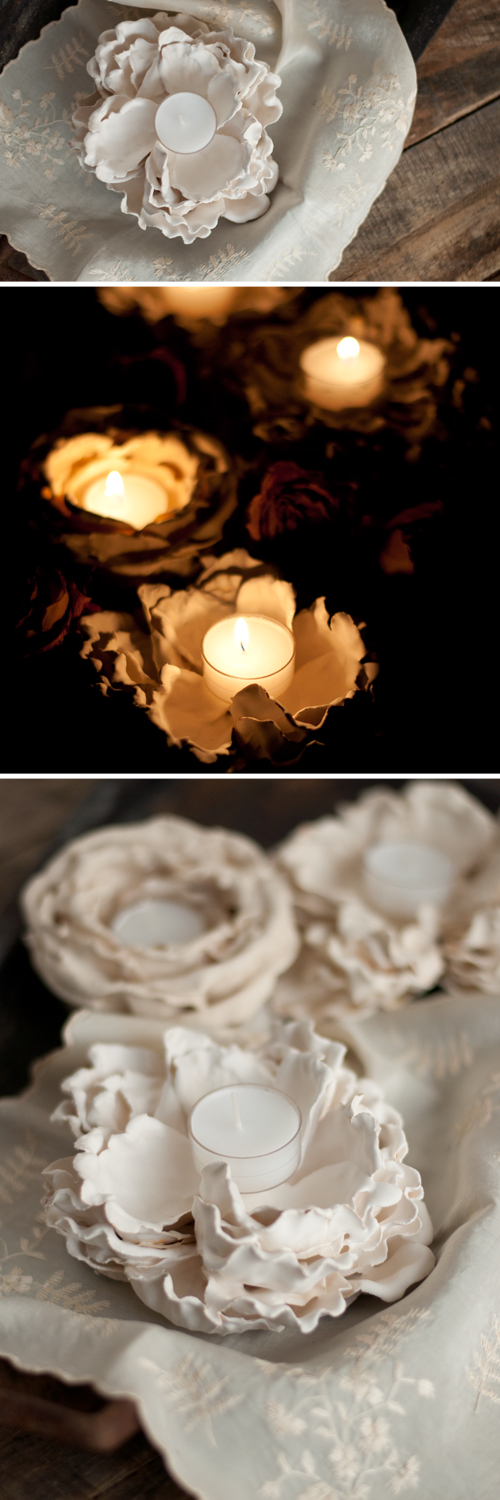
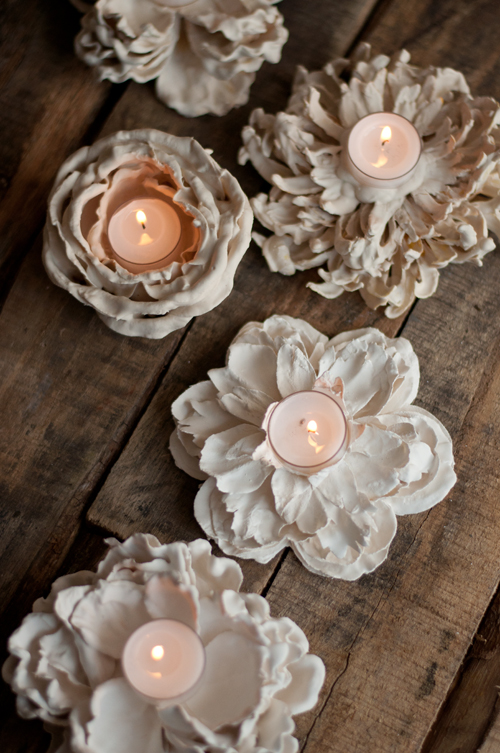
The coated plaster of Paris flowers are still ethereal and dreamlike and now, with the addition of a candle, rather romantic. Gather a few for a shelf in a living room, or on a bedroom mantle.
I think a collection of these would make a gorgeous centerpiece for a dinner party — or even as wedding decor!
Ready to get a little bit messy?
DIY PLASTER OF PARIS FLOWERS VOTIVES
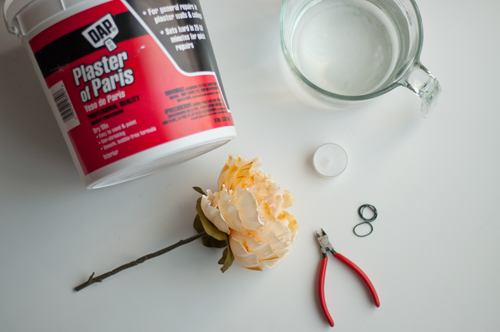
Supplies for your Plaster of Paris Flowers Votives:
-faux flowers
-plaster
-water
-bucket to mix – best shape is something that is more tall than wide
-wax paper or non-porous surface to lay dipped flowers on
-votive for sizing
-small rubber bands
-metal clippers
-small bit of glue – hot glue works great!
-tint* – optional
*You can tint plaster in a variety of ways, all with differing results. One option is to purchase tints made specifically for plaster, found with a simple internet search. I’ve tried food coloring, liquid watercolors and fabric dye powder. I got some color draining and settling with the food coloring and liquid watercolors. For me, the fabric dye gave the most consistent of color with minimal color spotting.
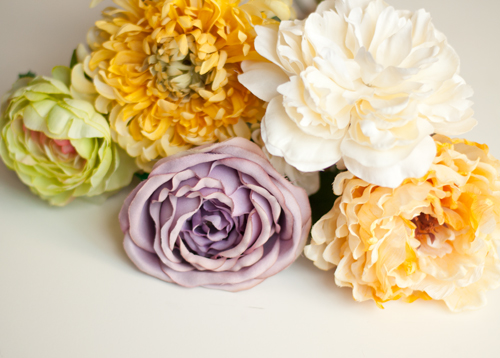
A word on the faux flowers. Just about any kind will do. Some of the stems I chose were the $1.99 variety, a couple were $6.99. Keep in mind that plaster will weigh down and flatten all but the very stiffest of flowers. I got the best results on flowers with larger, stiffer petals. The softer, ‘fragile’ petals just clumped together in the plaster, creating a blob of plaster.
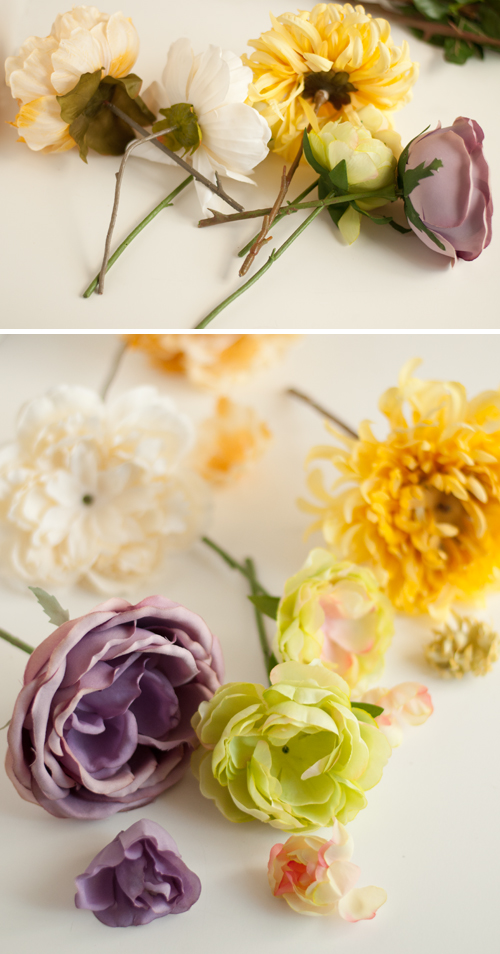
Prep the flowers. Pull the leaves off the stem and pluck out the center (I even cut down the stem. They are so looooong!). The amount that you remove from the center is up to you. To decide, I used a votive to ‘measure’ adequate space.
Most of the time the center is the part that keeps the flower and its petals together. Once you remove the center, add a little glue to keep the pieces together while dipping.
Once the flowers are ready, prep all the plaster items. Because the window of time for useable plaster is rather short, it’s best to get the water, plaster and optional tints set out with all the prepped flowers and then put it all together. Follow the manufacturer’s directions to mix the plaster.
Note: I found it easier and got better results with plaster that had a titch more water than recommended in the package directions. Not a measurable amount more, just a splash or two. It made the plaster more liquidy and it covered the flower better.
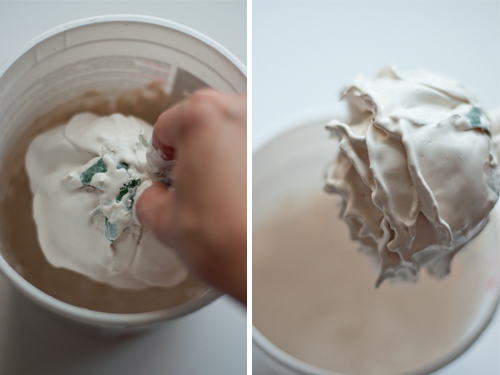
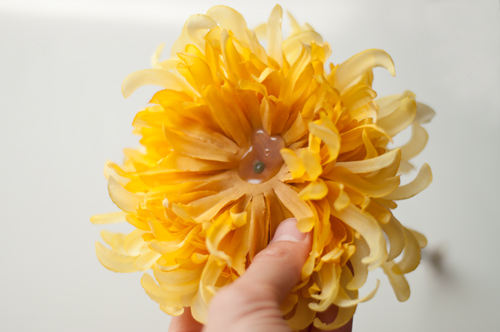
Now for the dipping of your plaster of Paris flowers. Your hands are going to get messy. Immerse the entire head of the flower in the plaster, quickly coating every part. Press the flower in the plaster, turning it often to make sure to get it in the layers, all the way to the center by the stem. Remove the excess plaster by gently but briskly shake the flower head by the stem. Do this inside the dipping container because the plaster will fly everywhere!
After a little shaking, check on the look of flower head. If it needs more plaster in some places or needs a better coat, dip it again. Then shake it. Keep dipping and shaking until you are happy with the look. Again, you will have to move quickly, especially if you are doing more than one flower.
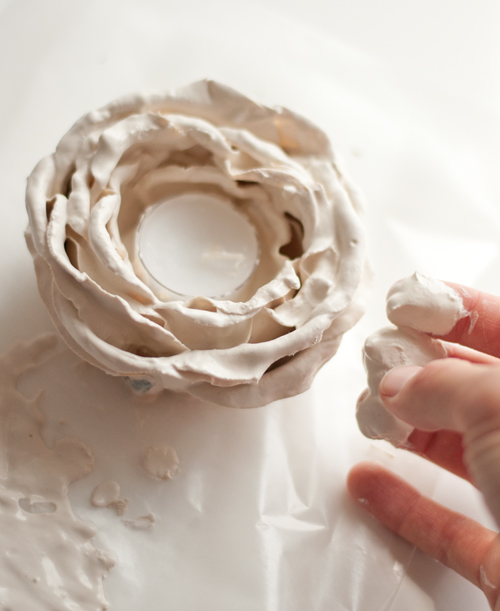
When the flower is finished, pluck or cut the flower head from its stem. Place it with the petals up to get a flat base. I added the votive right then to make sure there was adequate space for it before the flower set. If you find parts not covered in plaster or clumps, use your fingers to either apply or remove plaster.
I used small rubber bands to sculpt the petals on a few flowers.

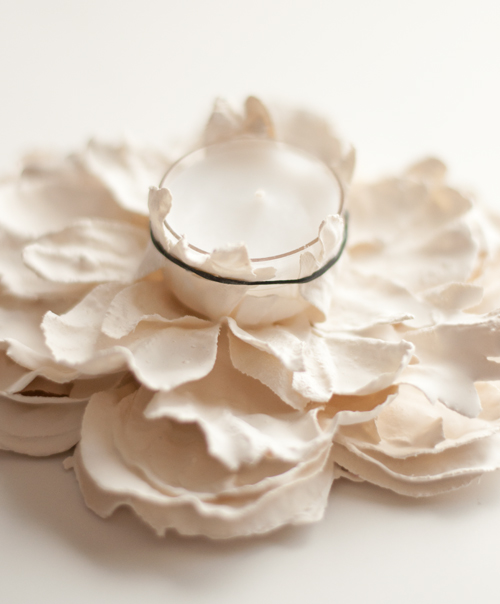
Allow your plaster of Paris flowers votives to fully dry and then add a lit votive candle.
Gorgeous!
P.S. — Like to make things? Click here for lots of fantastic projects.
These are gorgeous and delicate. I am excited to try making them.
So pretty!
I am making these tomorrow. I am going to surprise my client on her wedding day. She will DIE!!!! I am dying!!!! OMG THANK YOU. I’ll post to my blog when done. I put in the tab above…..but just in case rsvpshindig.com/diary THIS IS AWESOMEEEEEEEEEEEE!!!!!!!!! As DJ Lance says. LOL DYING DYING DYING I can’t wait to do this. I hope they dry fast? It’s been humid….we live in Denver. We’ll see.
Hello. I want to do the same thing. 2018. When did you post and do you have a picture?
Also how did you shape or sculpt with the rubber bands. Please comment Thank you
So cool! I know I can do this!
simplyonelove.com
I really like these! I’m sending this to my cousin, she loves to do things like this.
gorgeous!! definitely giving this a go!
These are unbelievably gorgeous!!
AH! These are absolutely stunning. It’s posts like these that make me hate myself as a blogger for not coming up with the idea first (kidding…kind of ;). Seriously, this project is awesome! I am so making these in anticipation of outdoor dinner parties next year at our new house. xoxo!
Haha! Thanks Katy. :)
Love this. Thank you so much. Just love your blog, though I’m a bit sad now as my only just went off to college in NYC and I’m in Houston, Texas.
Pingback: Centsational Girl » Blog Archive » BOTB 8.30.13
Your flowers are very lovely. Are these very delicate once dry?
Thanks for the tutorial.
~Margaret
If they are dropped, the plaster will probably crack and could break off.
My plaster just wouldn’t stick to the flowers. I was having a Pinterest fail time. Was it to thick? Did you dunk them then let set then re dunk ? Thanks
This is so gorge! I L.O.V.E this! I’m going to have to try this and maybe some other materials as well, thank you for sharing.
Pingback: Love Links | in backyards
See, I wish I could tell you I thought these were pretty. But, then, that would be a complete waste of an all-caps **GORGEOUS**! Wedding decor would be amazing! LOVE!
Gorgeous! Do you have to coat them with anything to protect them?
I’m sure you can coat them with something but you don’t need to.
Pingback: Crafty Tutorials to Check Out
These are awesome! I was just going to throw some flowers out but now I think I will do this instead!
Pingback: DIY with Design Mom: Plaster Flower Votives | this heart of mine
Oh. my. WORD. These? Incredible. I’ve never worked with plaster, but you’ve inspired me to try!
GORGEOUS flower candle voltive holders!
Can this be done with real flowers?
Maybe but the result won’t be the same. Real flowers don’t have the strength faux flowers do so I wonder if it would just clump them all together. And then the flowers will probably rot. But I don’t know. Give it a try and see how it goes!
You can wax real flowers successfully by the same dipping method!
Pingback: DIY Plaster Flower Votives » Bliss Bridal Magazine and Blog
Pingback: DIY Plaster Flower Votives » Bliss Bridal Magazine | Waco, Temple, Belton and Salado Wedding Magazine
I love this idea! I have been looking and looking for wooden appliques to fancy up two bathroom mirrors. They’re crazy expensive and all very common. I think I’m going to try this, but actually lay them out on the mirror to dry (maybe wax paper underneath?) so they’ll fit the curve of the mirror. Oh, my wheels are spinning! :) Thank you!!
Pingback: Mondayitis | High Tea with Dragons
I have worked with plaster a few times and found it difficult. I am inspired by the fact that you love it :) I think these are beautiful and may just try the plaster again.
Way to go!
Ashley Rane Sparks
http://www.makeitrane.com
Pingback: Plaster Dipped Flowers for Centerpieces: DIY | Wedding Websites by eWedding.com
no hay posibilidad para que los que manejamos solo español, tengamos forma de recibir en español, me encanta esta página pero quedo en las mismas y no puedo seguir instrucciones
Pingback: 9 DIY Gift Ideas with an Artist's Touch - Three Sixty Ecotique
I tried these and they fell apart, is there something other than water you added to the plaster of Paris?
Sharon
Did you try with melted paraffin as well ?
Oh my God, imagine with eatable flower dipped into melted chocolate ?! I must try it!!!! I just loved the technique !!! Thanks!!!
Wonderful idea! I am going to try poinsettias for Christmas dinner table.
Pingback: Top 10 Simple, Yet Festive DIY Candle Holders - Top Inspired
I tried to make these and got “nailed it!” results… As in mine look awful! The dye from the flowers bled through the plaster and I was never able to get the flower covered enough that the fabric didn’t show through. It was at least fun to try something new.
Pingback: Candeleros con flores de yeso « manualidades
OOOHHHH I can’t wait to try and make these!
Is there anyway I could buy these from you?? Ha I attempted to make them myself but just as Anne the color of the flowers bled through the plaster . Or do you have any tips to keep this from happening? I HAVE to use these at my wedding! :)
Pingback: Plaster of Paris | A Listly List
Pingback: SENZAȚIONAL! Ce a putut face cineva cu niște flori artificiale! - decorette
Pingback: Plaster of Paris Crafts | A Listly List
Pingback: Plaster-Dipped Flower Votives | pinfollow.me feeds
Pingback: Top 10 Romantic DIY Candle Holders - Top Inspired
Pingback: Next Project – Plaster Paris Flower Votive Holders | cehalles
I got hung up on Pinterest and have started a blog of my own to show the projects I’m doing. This one is my next one, wish me luck. I hope you don’t mind but I’m using your main image and your “how to” with links back to your page for now. I will add my own as I start the project myself. I’m so excited, these are so beautiful…I hope I do the image justice…thank you https://cehalles.wordpress.com/2014/02/14/next-project-plaster-paris-flower-votive-holders/
Pingback: DIY: Plaster Flower Votives | Nine Space
I found your amazing tutorial on Pinterest, I love,love, love these gorgeous votives. I have blogged about them, with a link back to your post. I hope you don’t mind, I just had to share, it is such a simple idea, with amazing results. I can not wait to try these myself.
http://diamondintheflock.wordpress.com/2014/02/03/february-first-hits-and-wham/
Gemma
Pingback: March first hits and wham…. | Diamond in the Flock
Pingback: 16 Creative Do-it-Yourself Flower Projects
Wow!!!!!!!! Amazing… Information you are sharing.. Thank you