Sigh. It’s true. We live in a throw-away clothing culture. We pick up inexpensive pieces, fully aware that they’ll wear out and need to be replaced next season. But with new interest in slower, sustainable living, choosing clothes that last, and maintaining them so they’ll last even longer, is gaining momentum. Which means patches are back!


And I say hooray. The thought of wearing a favorite piece of clothing over years instead of months is wonderfully appealing. And if your pockets are feeling empty, the idea of dungarees that will handle a thousand hours on the playground, sounds especially smart.

So here’s a useful patching clothes guide that will aid even the non-sewers among us. In this post, I’ll cover three patch types: A simple no-sew patch in both fabric and leather. A contrasting “under patch” that will add a nice texture — using iron-on fusible web and a few decorative hand-sewn stitches. And third, a patch that works with knits (like sweaters) and can be hand-sewn in minutes.

PATCHING CLOTHES WITH OVER PATCHES
To start, you’ll need some type of iron-on interfacing. This helps strengthen the fabric as well as adhere it to the area being patched. It’s basically a sheet of fabric glue that melts between your piece of clothing and patch when you iron it. I recommend Heat n’ Bond. Because it can be used on lower heat settings, doesn’t require steam, and works with a wide variety of fabrics, including synthetics. It’s also much stronger than traditional fusible web. You’ll want to cut it exactly the right size, using the patch as a pattern. Remove any stray threads.
Secret #1 for Patching Clothes: If you need a really precise edge, skip the scissors and use a rotary cutter with a straight edge tool instead. Rotary cutters are also good for thick, tough-to-cut materials, such as leather.

The rough side of the Heat n’ Bond goes against the fabric.

Iron until it is melted and has completely adhered. Let cool and remove the backing. Position the patch where you want it on the pants or jacket or whatever you’re patching. It might be pretty easy to tell where the patch should go, but just in case, try on the clothing so you can place it correctly.


You will want to iron the outside and inside of the clothing to make sure the interfacing has totally melted.
Secret #2 for Patching Clothes: Corners and thicker areas are the trickiest parts. Double-check that these are totally adhered. If they’re not, add more heat.

If you’re making a patch with leather instead of fabric, replace the iron-on interfacing with a strong fabric glue. Cut the shape you want (perhaps hearts for some little girl jeans : ). I cut the basic rectangle from leather with the rotary cutter and rounded the edges with sharp scissors.

Place glue on the underside of the leather and place it on the pants.

Press firmly and let dry. Easy as can be.

PATCHING CLOTHES WITH UNDER PATCHES
Sometimes you may want to use an under patch, like when holes develop in the knees of your favorite jeans.

Pick a fun, contrasting fabric that will peek through the holes and a coordinated thread.


Cut a piece of Heat n’ Bond the same size as your fabric patch, leaving a hole in the center that will align with the hole in the jeans.

Pin it directly behind the holes in the knees and iron as directed.

Secret #3 for Patching Clothes: I wanted to make the fabric patch extra strong to ensure it would hold up longer, so I used Heat n’ Bond to attach some sturdy twill to the back of the fabric.


As a final step, I used embroidery floss to make some stars that match the fabric. The hand-sewn stitches aren’t just cute, they also help keep the patch firmly in place.

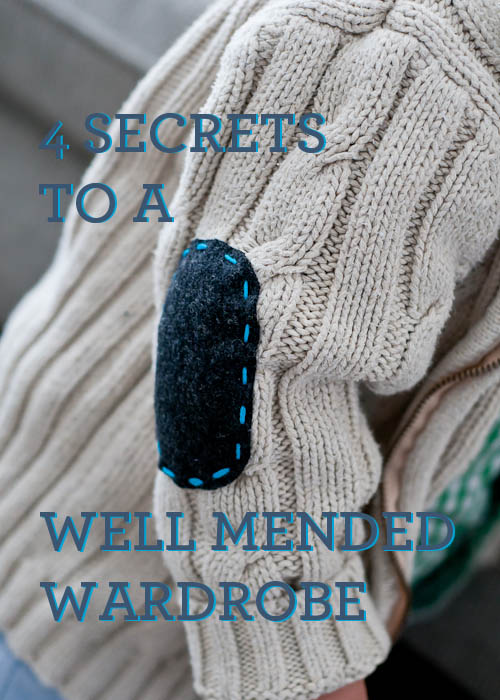
PAtCHING CLOTHES – KNITS
When patching a knitted clothing item, such as a sweater, you won’t want to use the heat n’ bond or glued or under-patching techniques above. Instead, you’ll want to pick a sturdy fabric that coordinates with the sweater and use a simple stitch to sew it on.

For the elbow patch pictured, heavy upholstery felt was used. Regular felt strengthened with interfacing will work too. Or even leather would also make a handsome patch.
Secret #4 for Patching Clothes: Sometimes, patches on knits are used to reinforce instead of repair. But, if you are using the patch to cover a hole, you will need to mend the hole a bit first so it doesn’t keep unraveling under the patch.
In the example pictured, there is no hole to mend. The patches are being added because they’re cute. : )

Mark where the patch should go and pin it in place.


Use embroidery floss to make quick stitches all the way around the patch, making sure to tie strong knots at the beginning and end. Simple as that.

Happy patching! And here’s hoping you’ll be wearing that favorite sweater for many, many years.
By Lindsey of Café Johnsonia for Design Mom.
How do you sew the stars in the knee without going all the way to the back side of the other layer of the pants? Did you use a small hoop? Or just your hand?
Thank You will any help on this.
RoseMary
I did something similar and I just used my hand. It is hard to patch with embroidery anywhere near the knee area of pants but easier than using a sewing machine!
When the knees are too bad, I open up the seams of the jeans, cut out that portion or the jean from seam to seam, and replace the knee all of the way across, and resew the seams in the jeans with topstitching if needed. Be sure to add seam allowance x 2 so you can attach this material and it will fit the leg as it should.
I love the way you patched the jeans with the yellow fabric! I did a patch job on some holey jeans of my own with some fabric from a bright muu muu. Mine was a little time consuming but my pants look cool now. :)
creationsbylauraj.wordpress.com
Thanks for the great tutorial, I have just used your directions to repair two pairs of jeans for my not quite three year old. I’m so pleased with the results, thanks again
http://littleblackduckblog.wordpress.com/2013/09/22/pinned-it-tried-it-patching-jeans/
I have never had much luck with heat and bond patches staying on after washing what am i doing wrong? also my 5 year old loves her hanna andersson cotton leggings but she has 2 now with holes in the knees they are big enough to warrant a patch,…any suggestions? Stretchy knit is always complicated to me.
My daughter has about 3 pairs if corduroy pants with holes at the knee. I think you have a great tutorial here, and I am going to see if she can get some more use out of pants with a good mending. Thanks!
I have done most of these already. May I make a suggestion? When I repair a knitted item I take the item to the store and find a yarn that is near identical (if I don’t already have it at home). I darn the hole and catch the wandering piece of yarn. I have done some repairs well enough that it was impossible to find the hole without peaking on the inside of a garment. I have also used lace and crochet items to repair a hole to make it look like it was originally that way. I would hesitate to use a heavy duty patch only because it isn’t pretty (in my opinion).
Thank you very much for the sharing of the beautiful mended hole in the trousers.;-D I have a hole as well, because of my livestyle i allways work on the floor and after just a year there will be a beginning hole.
but because of my not so rich life, i had to mended it. Only when you’re allmost 60th isn’t fun to mended with a shape of heart or bird.
so i like this one and i’m thinking to try this one myself.
thank you this is more an adult pretty fun mended idea.
I like the mending, i does this for many years, but i’m from the 1955 so in europe there was still a leack of all materials. It costed more time to find more materials. But by my mom i learned allready the mending of clothes and living with less.
I’m still great of that live lesson;-D
I love making jeans that are too short by the ankle into cute shorts that I can wear for summer. First I cut it to the length that I want, then I hem the bottem with a colorful thread. Then I make rips near the top and patch It with a piece of pretty scrap fabric. My favorite craft.
I’ve found that using the fabric glue makes the fabric rather stiff and thick, making it difficult to hand sew on it. Did you have this problem when embroidering those stars?
Swati, I don’t think I used fabric glue for the patch with the stars. I did use the heat n’ bond, which is a little stiff and hard to push the needle through, but not impossible. But I do agree that the fabric glue would be very difficult to stitch through for sure!
What kind of Heat N Bond did you use on the jeans knee patch? It looks clear. I’ve never seen that kind before.
You have very cute ideas. I just wanted to add a plug for my favorite fabric glue. It doesn’t get stiff when washed and I haven’t had any patches that want to come off. I usually patch from the inside like you did on the jeans. https://www.tearmender.com/howto.php
Reading through all of these tips, I finally found some that will help me
cover up a small grayish stain on a white sweater type top.
Thank you all from a Mom who, hasn’t done any sewing or embroidering
for years !!
I just read your post about patching jeans. So, you take a fun piece of fabric, apply heat ‘n bond around the edges of the back of the material (but not behind the hole to match the jeans?) Then you place a piece of twill behind the heat ‘n bond to reinforce it? Sorry, Im a newbie to this!
Yes! That’s what I do. I’m sure there are other methods out there, but that’s what’s worked for me. :) Basically the fun fabric is just to add some style to what would otherwise be an ugly patch. The twill will help reinforce the knee. Otherwise the fabric will wear right through again. So it may not be necessary if the patch is somewhere else. My kids still get holes in their knees even though they’re older now – they were quite a bit smaller back when I wrote this post. Ha!
For the yellow fabric patch you sewed that peeked through the ripped knee hole in the jeans couldn’t I just sew it on instead of using Heat N’ Bond?
Thank you for a great explanation. I was looking online for a similar idea and really appreciate it
Custom Embroidery Digitizing
Thank you for a great explanation. I’ll take your advice! engagement rings dallas
Thanks for your great share.
As I work on the floor and kitchen, within just a year, there always be a beginning hole.
I’m in a middle-class family. I’ve learned from you a good practice.
You don’t know how big your help is!!
Amaze to see how easily it has been done. This DIY guide will surely help many. We can’t use a sewing machines for patching woolen items.
Awesome guide, I would really like an sewing guide if you could!
Hi! I just noticed that your Facebook and Instagram accounts were no longer in effect. Was that intentional? I really enjoyed following along with your house renovation, but can totally understand if you are trying to be more intentional with your time and finding social media getting in the way of that.
Hmmm. I’m currently the most active on Instagram (even more active than I am here on the blog), and I cross-post my Instagram images to Facebook. So I’m still active on both of those platforms.
Thanks for these instructions; they are super helpful. One item I have not been able to develop a good solution for patching is boiled wool slippers. I have a few pairs with holes in the big toe area, and otherwise, the rest of the slipper is in good shape. Any fixes to recommend?
This might be one where needle felting works.
One thing about patching I learned the hard way is to choose your patch fabric to match the original in weight and stiffness. I patched the elbows of my son’s plaid shirt with stiffer iron on patches and the patches tore new holes in the thin/worn sleeve fabric.