I love using flour sack towels in the kitchen — I appreciate their lack of leftover lint on dishes, and they dry items amazingly! They also make a wonderful, big, blank canvas. Sticking with the simplest of materials — a sheet of foam and paint — the towels can easily be changed from plain to modern and chic. The design and color options are endless! They can be customized to match anyone’s taste.
Now they don’t just do the hard work, they look good too.


Supplies:
– flour sack towels
– foam sheet — have you noticed there is really thick foam available now?
– fabric paints
– cutting blade
– cutting surface
– tape, not pictured
– pencil

Draw your designs and then cut them out.

To make the foam cut out a stamp, cut a smaller foam piece and stick it to the backside of the stamp like a little handle. If you are planning on keeping the stamp long term, you can glue it to a piece of cardboard or mat board. If by chance you have a stamp base, it can be used as well. Just add a couple rolled pieces of tape to the backside of the foam piece and stick it down.


After loading the stamp up with paint, start stamping the towels.
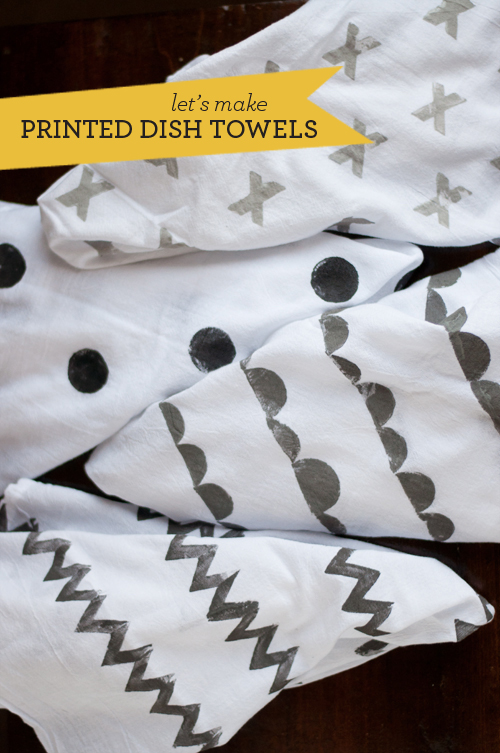
You can be as structured or laid-back as you prefer. For the zigzags and scalloped lines, I eye-balled the spacing. For the x’s I measured more accurately. For the dots, I just went for a random pattern — if you’re in a hurry, stick with the dots! : )
The examples shown here feature bold black & white prints, but you could use whatever color scheme you like. That big blank canvas is irresistible!

Once the stamping is complete, allow the paint to fully dry.
This project really fills a new-home-goods-itch. Plus, it’s so fun and easy, you’ll keep thinking of other items you can add patterns to. In fact, this technique would be amazing on a baby blanket — especially those big white swaddling blankets. Adorable.
P.S. — Love making things? Find more DIYs and tutorials here.
Created by Amy Christie for Design Mom.


Pingback: Go Win Something Pretty | Cheerful Abundance
So chic! I think they’re lovely. And what a great hostess gift…or maybe even get the kids involved for grandma’s mother’s day prezzy! Oh boy!
Making these!!!
Make a set for me, Amy. Pretty please? They are fantastic!
Thanks for this tutorial! I’ve been ogling beautiful, but pricey, dish towels online lately. This is such a good reminder that creating prints is something that one can do oneself.
Pingback: DIY: Printed Dish Towels
Pingback: DIY | Estampa tus propias telas | DIY: Hazlo tu... | DIY | Estampa tus propias telas
These are beautiful! I found some vintage woodcut stamps at an antique store in the middle of nowheresville Kansas, and I’ve used those to beautify my flour sacks in the past. The stamps work similarly to what you’ve made and the sacks are so much better with a bit of flair.
Pingback: DIY with Design Mom: Printed Towels | this heart of mine
I was recommended this blog through my cousin. I am now
not sure whether or not this put up is written through
him as nobody else know such targeted approximately
my trouble. You’re amazing! Thank you!
Pingback: This Weekend | Dejlige Days
do you think the towel should be washed & dried before stamping?
Does the paint make the painted places feel stiff? I’m thinking about doing something similar for swaddling blankets.
Pingback: DIY Gifts for $5
Lovely idea!
Easy, and totally achievable with little at the helm too :-)
– Very excited about all the good stuff I’ve been reading about your book! It looks fantastic …You’ve done an outstanding job!
I made tea towels for everyone a few years ago! Instead of foam I used carrots – that gave me perfect dots and triangles according to how I shaped the carrot 😊