I asked Kate of Mini Eco to create a Back to School themed project for us to try. I think making beads out of colored pencils is brilliant! Wouldn’t these beads be fun for your elementary school-ers to string for a class project? It would also be a fun activity at an art-themed birthday party. Here’s Kate:
Lately I have become a little addicted to making (and wearing) colored pencil jewelry. The items pictured are really easy to make and only require a few basic tools. You don’t even need to buy any materials, simply chop a few centimeters from the end of your kids crayons…if you do this neatly then they will be none the wiser!!
I think the results look great and you, or your child, will definitely stand out from the crowd wearing them!
Supply List
- Colored Pencils
- Junior hacksaw
- Fine sandpaper
- Drill and small drill bit
- Thread (for the necklace)
- Superglue (for the brooch and earrings)
- Brooch back (for the brooch)
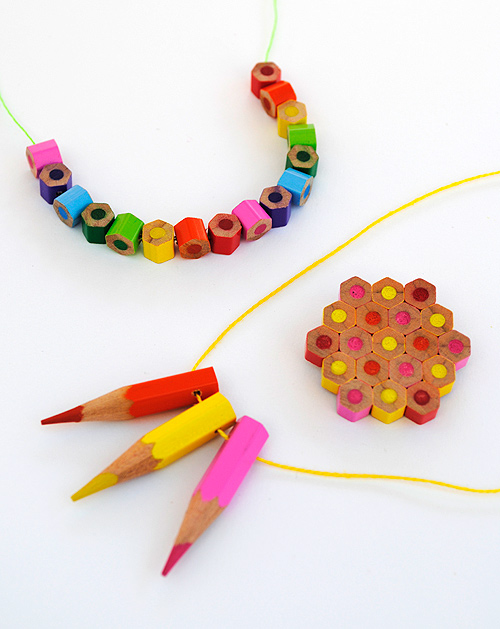
How to: Basic Bead Necklace

1. For the basic necklace you will need to begin by making your beads. You can use either hexagonal or round crayons. The beads I cut were 7mm long. To cut your beads use a small, sharp, hacksaw blade. (In the UK you can pick up a junior hacksaw for a pound or two in most hardware shops). Take your time when cutting the crayons and try not to apply too much pressure…that way you are less likely to chip the paint off the outside.
2 & 3. Don’t worry if the cut surface of your beads look a bit scruffy…all they need is a quick rub with some sandpaper. I found it easier to lay the sandpaper on a flat surface and rub the bead along it.
4. Now drill a hole in the side of each bead using a small drill bit. Make sure you place a scrap piece of wood underneath. It’s not a good idea to get holes in the kitchen table!

Once you have cut a number of beads simply string them onto a length of thread…job done!

Tip: These little beads are also make lovely bracelets. If bright colours aren’t your thing then try some more subdued shades. White colored pencil beads look especially nice.
How to: Pointy Necklace

1. Begin by sharpening your colored pencil, then cut the end off as before. My beads measured about 3.5cm in length.
2. Drill a small hole through the end of your beads
3. String the beads onto some thread. You can add some co-ordinating beads if you wish.
How to: Brooch

If you fancy a bit more of a challenge then why not have a go at making the colored pencil brooch?
1. You will need to use hexagonal pencils for the brooch. Cut your beads as before. Mine were 6mm in length. You need 19 beads to make the brooch pictured.
2. Put some sandpaper on a flat surface and sand the beads so they are nice and smooth.
3. Work out how you want the beads to be arranged before you being gluing. Once you have decided simply start sticking the beads together using superglue.
4. Once your beads are all stuck together sand the underside of the brooch until it is flat and smooth.
5. Superglue a ‘brooch-back’ to the back of the brooch.
Tip: The best way to avoid making a wonky brooch is to assemble it on a flat surface. The underside of the brooch will be the most even so make sure this becomes the front of the brooch.
Make sure you only use the tiniest dab of superglue on each bead….and don’t stick your fingers together! I have done this before and was reminded how powerful superglue is!
Finally, remember these necklaces are not recommended for under three’s. I would also avoid making the pointy bead necklace for any child…for obvious reasons.
This is so adorable!! Thanks a lot for posting the tutorial :)
This is so cute and I want to make a couple for two little girls. But I haven’t been able to find the right type of colored pencils — the ones with the hexagon shape and has exterior color not just plain yellow on the outside. Could you recommend me a place or brand?
You will find drilling the holes much easier if done before cutting the pencil to length. More to hold on to.
Thanks so much…now I know how to make these great looking neckalces/bracelets. I am sooo excited…it’s worth buying a new set of colored pencils just to make these goodies!
My hubby and daughter are making this right now.
do the colored pencil necklaces rub off onto clothing at all?
Oh my..how cute!! nice work…
uauuu!!! That´s nice! I really love the jewlery made out of color pencils!. I´m going to try myself. Thank you! wonderful blog!!!
lahermanafieltrovitz.blogspot.com
awesome! cute idea!
I have made an article on my blog with your idea. It will publishe tuesday. Tell me if you like.
Just stopping by to let you know that I’ve featured your craft on Family Fun Crafts! You can see it here:
http://funfamilycrafts.com/colored-pencil-jewelry/
If you have other kid friendly crafts, I’d love it if you would submit them. :) If you would like to display a
featured button on your site, you can grab one from the right side bar of your post above.
How did you “clean” the cut pieces? When I was sanding the colors of lead was all around the wood. I tried the eraser but was not to successful. Any hint? Thx
I would like to know that too. I tried it today and I had the same problem… Along with some other porblems doing it ;)
Love this idea but we are having such a hard time getting a clean drill—without splitting the pencil or some if the paint chipping off. Any other tips??? Please help. It can’t be this difficult! Yours look so nice!
I already had this problem sawing them : they splited or the paint came of at the outside … Maybe it depends on the kind of wood they used for the pencils ?
I tried a lot, very gentil and carefully, but didn’t succeed.
After more than 2 hours trying to get nice pieces, i quited frustrated …
I think I have 3 pieces who could be used , but I need couples to make earrings and I didn’t succeed in making 2 of them in the same color…
I absolutely love this project! I hope I can try it soon!
exelent….
I dont’ know…these are very “cute” but a lot of work to cut and then drill these itty bitty things. If you are used to doing jewelry it might work. Then again, I’m an art teacher and I would have liked to have the pencils to actually DRAW with for my kids. When they are no longer usable, maybe then I would consider drilling holes.
Cute though.
I especially like the colored pencil necklace. This makes a perfect teacher gift.
Just shared this fun tutorial on our blog and hopefully alot of people will pop over your way to see it! Thanks so much for sharing your fabulous ideas! So cute and creative!! You can see the post at http://www.nevernola.com!
Hi! :)
I love this so much, I featured it in a blog post! :D Keep up the great work :)
Here’s the link:
http://thegentleflower.blogspot.no/2012/08/up-cycled-crafts-clothing-home-decor.html
Katrine :)
thegentleflower.blogspot.com
I think these will make great coasters!
Hey
I made a necklace DIY roundup a while ago.
I featured your DIY in it.
And I forgot to tell you (so sorry)
Better late than never.
If you aren’t okay with it, please tell me.
http://birdsandkittens.blogspot.nl/2012/06/diy-roundup-necklaces.html
Please check it out!
Quand la créativité se joint au recyclage, le résultat est étonnant…Bravo.
J ‘aimerais partager votre idée sur mon blog , avec votre accord bien sûr .
http://www.enmodebijoux.com/
Wow…it’s really very beautiful made by pencil color…Awesome idea….!
Fun ideas with colored pencils! Take a look at zincwhite.co.uk for some fun things they are doing with colored pencils too!
Hi! This little project is great, so I linked it on my blog (http://freshtrash.blog.com/), hope u don’t mind! Feel free to stop by!
Have a nice day! :)
What a unique idea-gotta love those bright colors
Wonderful! I love the first necklace! But drilling in such small pieces really scares me…
what a good idea!!! my husband suggest me to drill the holes before making the beads…easier to do ….thank you !
Such a great idea! My daughter love it.
Love this project – turn those used pencils from making art to being art!
This is gonna stain your shirt, unless you spray it with a clear protectant coat of some sort.
Hi, love your ideas and I saw that someone else experienced the same problem as i did and that is of the smearing of the colour inside when you saw the pencil. How is it possible that your cuts are so clean. Will you share your secret?
Nevertheless lovely idea.
Rixt
Having this same problem. Sandpaper only smeared it worse. Did you find a solution?