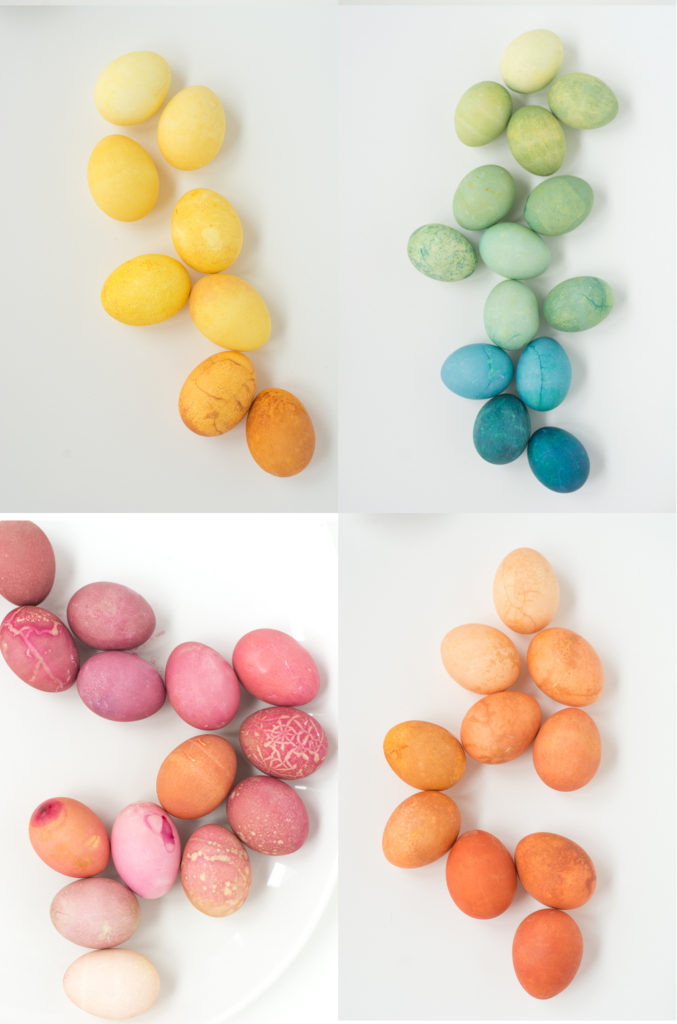
Making easy natural dyes for easter eggs is super simple, but also really fun — it feels like a combination of science and magic. To get the full color spectrum you’ll need red cabbage, yellow onions, beets, tumeric, blueberries and vinegar. Making the dyes is quick, putting the eggs in the dye is quick. The only thing that requires a bit of patience is letting your eggs sit in the dye bath until they reach the desired color intensity.
Ready to get dyeing? You’ll find all the notes and tips below.
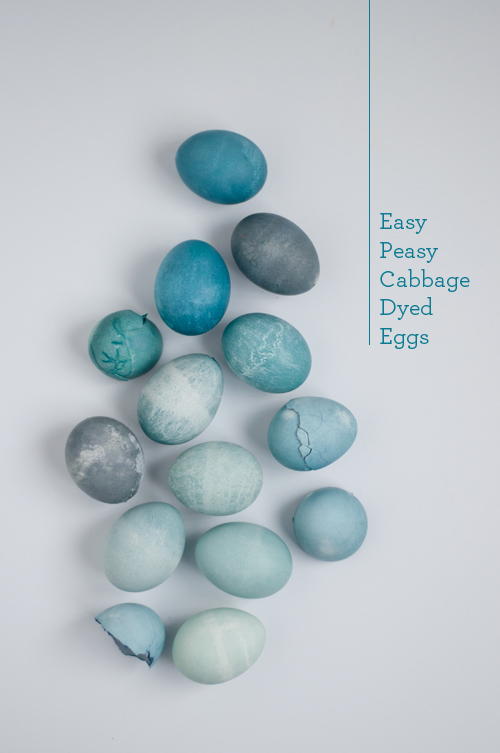
Blue Natural Dye for Easter Eggs
Supplies for Blue Dye
– 1 head of red cabbage, chopped
– 4-5 cups of water, dependent on the size of the cabbage head
– 1 tablespoon white vinegar (extra to deepen color)
– eggs, emptied or hard-boiled
– large saucepan
– cups (to dye the eggs in)
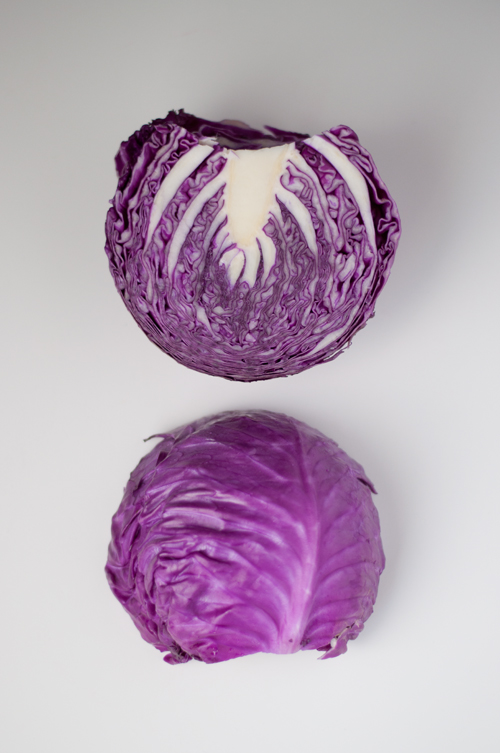
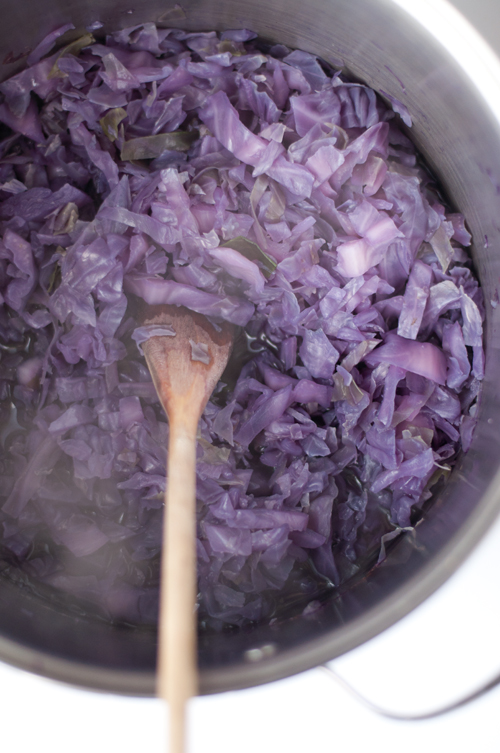
Toss the chopped cabbage into a large pot with the water. Bring the water to a boil and then simmer for 20-30 minutes. If you add white vinegar, the tone will lighten to a more purply hue. If you add a pinch of baking soda it will turn the tone more blue.
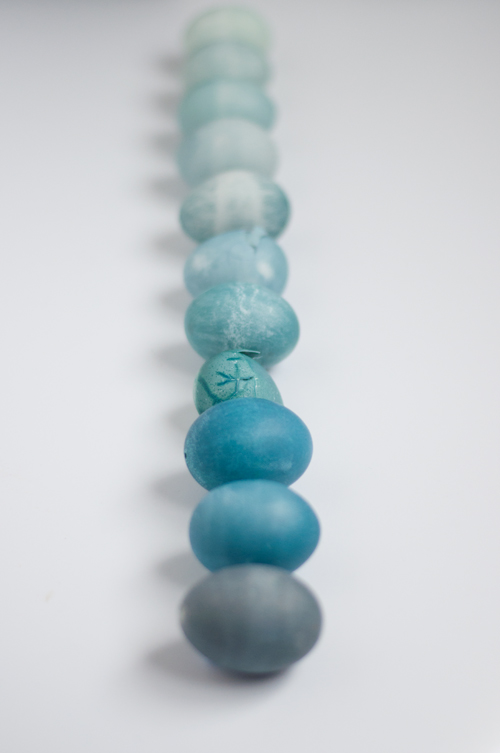
So how do you get the different tones of blue? Easy peasy. Simply vary the length of time the eggs spend in the dye bath. The deeper the tone, the longer the time. In fact, the deepest tones sat overnight! Simply submerge the eggs and periodically check on them until you like the color.
Here are other notes on dying eggs blue:
– All of tones in the blue eggs pictured were achieved with cabbage — with one exception. The navy tone was achieved using a blueberry dye. Blueberries make a reddish dye. Mix a little of that with your blue dye to get the navy.
Blueberry Dye Mix
2 cups water to 2 cups blueberries
Boil them together for about 30 minutes and then I added 1/2 Tbsp of white vinegar
– In order to dye the eggs overnight, we put the dye in disposable cups (inside of a plastic container) to avoid staining non-disposable cups.
– If your eggs are hollow, you will have to use something to weigh them down. We suggest using another disposable cup with a little bit of water in it and setting it down on top of the hollowed egg. If your eggs are hard-boiled, they’ll sink by themselves.
– If you are using hard-boiled eggs, unintentional (or intentional) cracks add to the beauty. And don’t worry about the dye getting inside (because it will), it’s natural!
Red Natural Dye for Easter Eggs
Supplies for Red Dye
– 6 medium beets
– 4 cups water
– 1 tablespoon white vinegar (extra to deepen color)
– eggs, emptied or hard-boiled
– large saucepan
– vegetable peeler, knife, slotted spoon/strainer
– cups (to dye the eggs in)
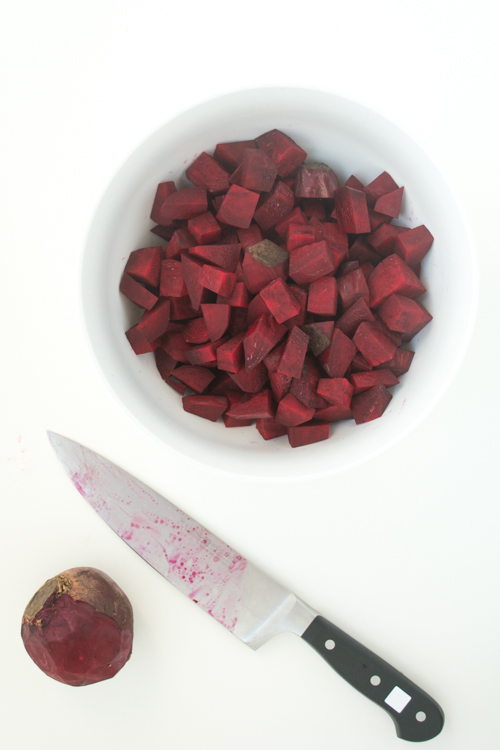
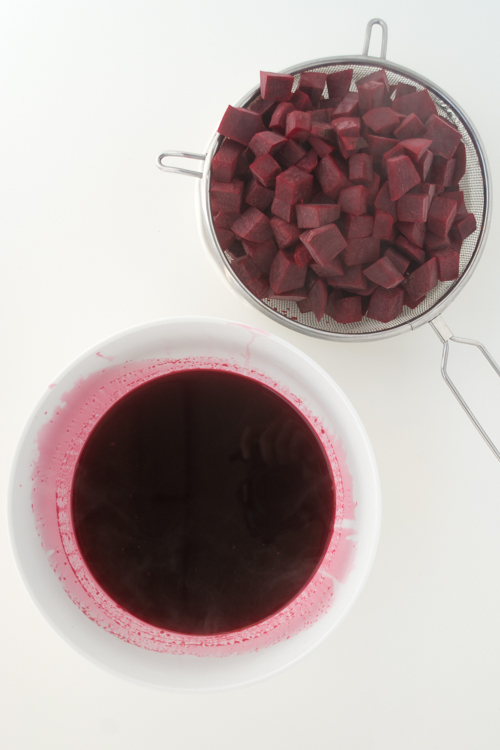
Begin by adding the water to the saucepan and bringing it to a boil. While the water is heating, peel and chop the beets into chunks. When the water is boiling, add the beats and the vinegar and simmer for 25-30 minutes. Remove the beets with a slotted spoon (or pour through a strainer), leaving just the dyed water.
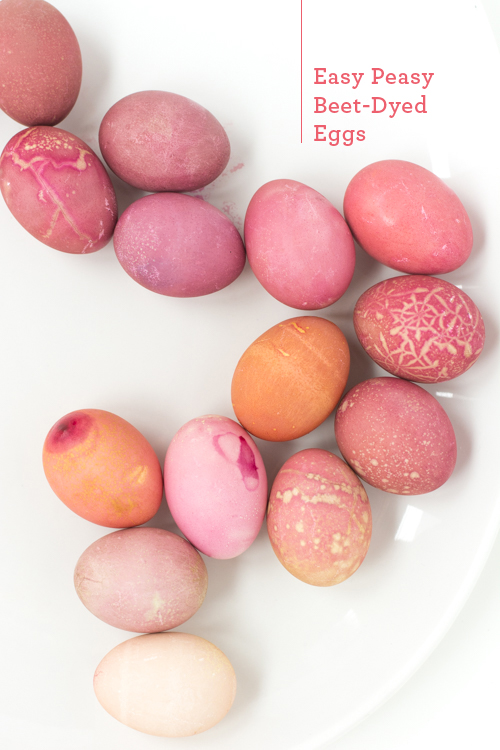
Then dye the eggs! Soak the eggs until they reach the desired hue. Dye times for the colors pictured ranged from 5 minutes to almost 24 hours; lighter colors, less time, deeper tones, more time. 30-40 minutes is a nice sweet spot. Remove the eggs and set in the egg carton to dry.

Note: Rinsing the eggs after the dye bath can really diminish the color, so we recommend pulling the eggs from the dye and setting them on the carton to dry and letting the dye soak in. Also, this is a deep red dye so be careful not to spill on anything you don’t want to alter to a pink hue.
Here are other notes on dying eggs red and pink:
– We used the dye when it was still warm and when chill. If we had to pick, we thought the slightly warm dye worked faster.
– To get an orange-red, first dye the egg in the turmeric natural dye (recipe below), then add it to the red.
– To get a purple-red, dye the egg first in red, then add it to the blue dye (recipe above). Make sure you have a strong red before adding it to the blue, as the blue can easily overpower the other dyes. For an even deeper purple, we dyed the eggs in the red, then the blue, then the red once more to really give the color a push.
– In order to dye the eggs overnight, we put the dye in disposable cups (inside of a plastic container) to avoid staining non-disposable cups.
– If your eggs are hollow, you will have to use something to weigh them down. We suggest using another disposable cup with a little bit of water in it and setting it down on top of the hollowed egg. If your eggs are hard-boiled, they’ll sink by themselves.
– If you are using hard-boiled eggs, unintentional (or intentional) cracks add to the beauty. And don’t worry about the dye getting inside (because it will), it’s natural!
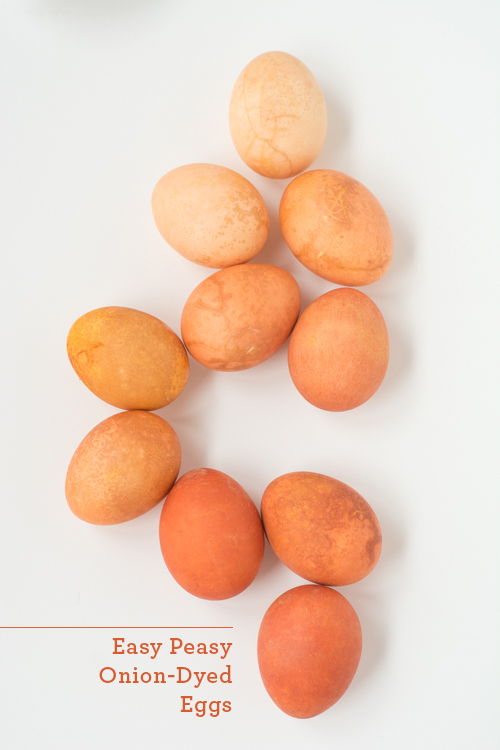
Orange Natural Dye for Easter Eggs
Supplies for Orange Dye
– the outer skins of 6 yellow onions
– 1 tablespoon white vinegar
– 3 cups water
– eggs – empty or hard-boiled
– saucepan
– cups (to dye the eggs in)
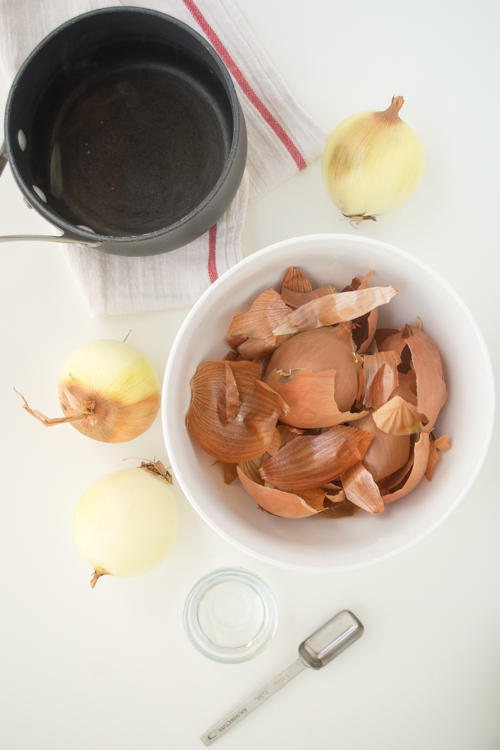
To make natural orange dye, start by boiling the water on the stove. While the water heats up, peel the outer skin off of the onions. Add the onion skins along with the white vinegar to the boiling water and simmer for 20 minutes. Pour the mix through a strainer to remove the onion skins.
Now, you’re ready to dye! Soak the eggs in the dye mixture until they reach the hue you like. Our dye times ranged from 5 minutes to almost 24 hours. 30-40 minutes is a nice sweet spot. Set them in the egg carton to dry. Note: We found rinsing the eggs after the dye bath really diminished the color so we recommend pulling the eggs from the dye and setting them on the carton to dry and letting the dye soak in.
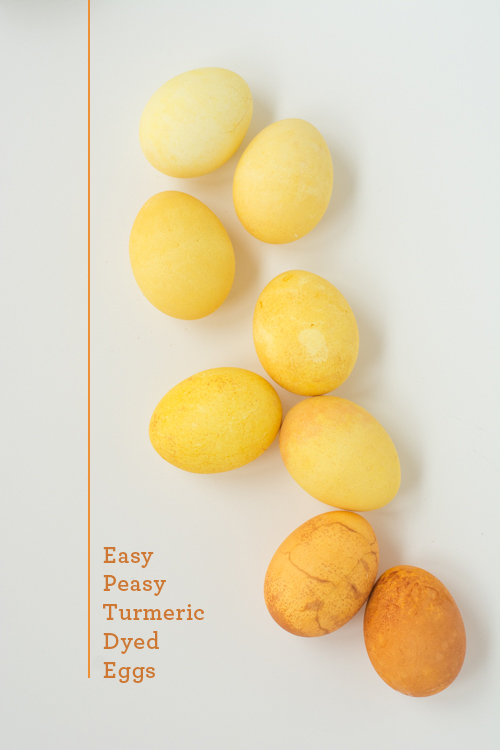
Yellow Natural Dye for Easter Eggs
Supplies for Yellow Dye
– 6 tablespoons turmeric
– 1 tablespoon white vinegar
– 4 cups water
– eggs – empty or hard-boiled
– saucepan
– cups (to dye the eggs in)
To make yellow dye, add the turmeric and vinegar to 4 cups of extra hot water. Stir the turmeric until it has dissolved.
Get the eggs in the dye! Add the eggs to the dye and soak them until they reach the desired hue. Dye times for the eggs pictured ranged from 5 minutes to almost 24 hours but the yellow dye alone seemed to peak at about 20 minutes. We found rinsing the eggs affected the yellow dye the most so we recommend pulling the eggs from the dye and laying them in the egg carton to dry. When dry, dust off any residual turmeric powder.
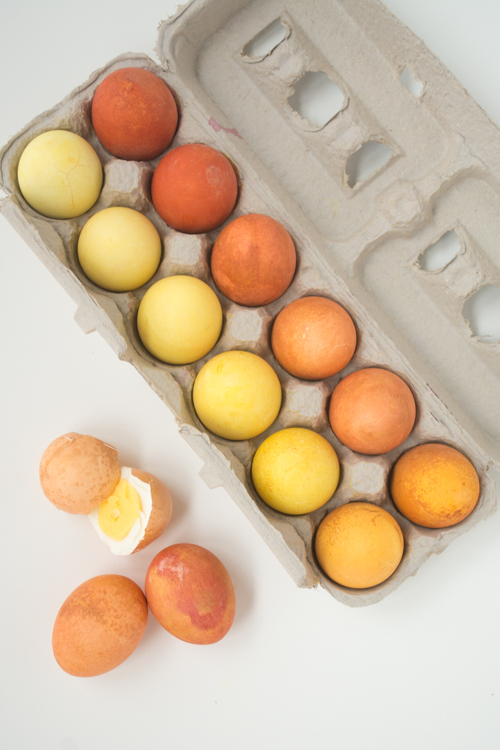
Here are other notes on dying eggs orange and yellow:
– The intensity of the color depends on how long you leave the eggs in the natural dye, to a point. The yellow dye peaked at about 20 minutes but dropping it in the orange or red dye changed the tones.
– Weirdly enough, the yellow dye was the hardest on the bowl that we were working in! If you’re worried about stains, be careful with this one. (We scrubbed ours with baking soda afterwards to clean off the yellow and it worked like a charm).
– The orange intensity leveled off after 20-30 minutes of soaking, though the really deep tones were achieved by almost 24 hours in the dye.
– The orange color almost makes the eggs look like natural brown eggs. To add interest, you can dye the eggs yellow, then orange to get a brighter hue. Another alternative would be to dye the eggs in orange, then dip them in the natural red dye (recipe above).
– What was the most exciting was how the dye looked on the individual egg shells. One looks like it has metallic spotting and one looks like a banana peel. If the shell happens to be cracked a bit, it really adds to the loveliness.
– In order to dye the eggs overnight, we put the dye in disposable cups (inside of a plastic container) to avoid staining non-disposable cups.
– If your eggs are hollow, you will have to use something to weigh them down. We suggest using another disposable cup with a little bit of water in it and setting it down on top of the hollowed egg. If your eggs are hard-boiled, they’ll sink by themselves.
– If you are using hard-boiled eggs, unintentional (or intentional) cracks add to the beauty. And don’t worry about the dye getting inside (because it will), it’s natural!
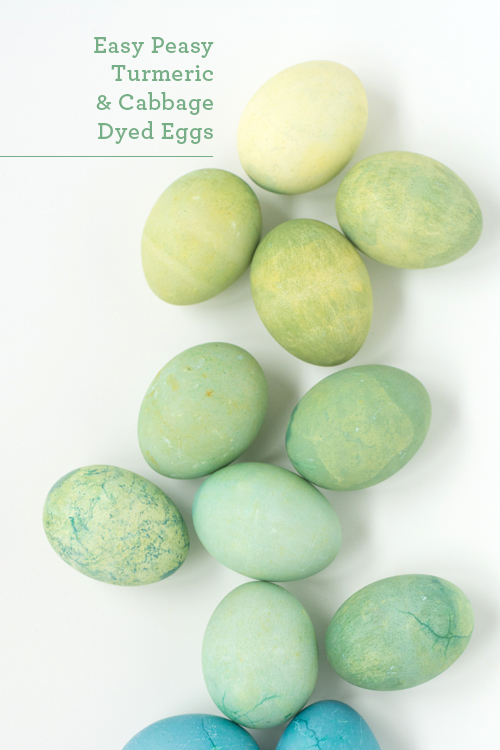
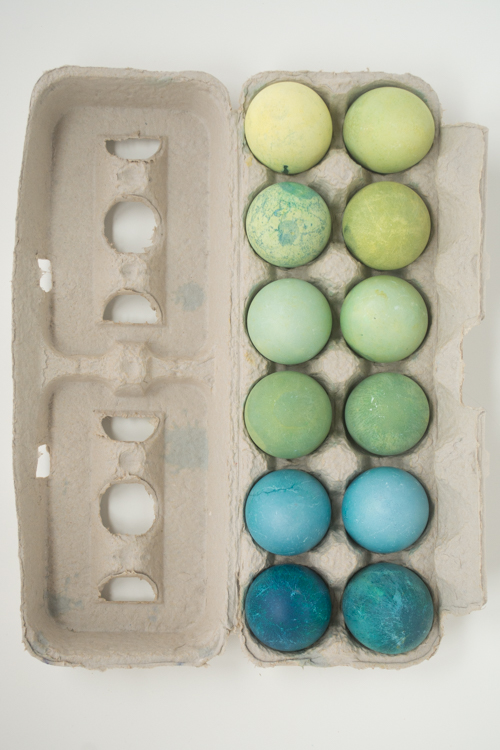
Green Natural Dye for Easter Eggs
Supplies for Green Dye
– batch of blue dye from cabbage (recipe above)
– batch of yellow dye from tumeric (recipe above)
– eggs, empty or hard-boiled
– eggs – empty or hard-boiled
– saucepan
– cups (to dye the eggs in)
For green eggs, you’ll need to mix up one batch of turmeric dye and one batch of cabbage dye, and then dip eggs in both to achieve different shades. It’s like a lesson in color theory, plus a lesson in egg dyeing, all in one!
To create green, first soak the eggs in the natural yellow dye. When they’ve been dyed the intensity of yellow that you would like, add the eggs to the blue dye and let them soak. When they’ve reached the hue you’d like, set them in the egg carton to dry.
Here are other notes on dying eggs green:
– To make green, you must have both yellow and blue natural dye (recipes above).
– To keep the yellow dye clean, first dip the eggs in the yellow, then in the blue. It doesn’t really work the other way around.
– The intensity of the color depends on how long you leave the eggs in the dye. The more time they sit in the dye, the brighter and more intense the colors will be. Yellow seems to level off after 20-30 minutes but the blue deepens and deepens. The darkest hues were achieved after about 12 hours in the blue.
– The springy green was made by dying it yellow and then giving it a blue bath for between 5-10 minutes.
– The crazy designs are all due to cracks and the individual shells themselves.
– To dye the eggs overnight, put the dye in disposable cups inside a plastic container to avoid staining your own.
– If your eggs are hollow, you will have to use something to weigh them down. We suggest using another disposable cup with a little bit of water in it and setting it down on top of the hollowed egg. If your eggs hard-boiled, they’ll sink by themselves.
Such a satisfying project! Simple materials. Simple processes. And such beautiful outcomes. If you’ve tried creating natural dyes for easter eggs, and you have notes to add to these, feel free to share your knowledge in the comments.
Some of these recipes seem expensive and wasteful, i.e. blueberries. It would be good to know how many eggs each batch dyes and also if the recipes can be cut in half. Can you eat the beets after the dye is made?
Blue cabbage and beets are quite inexpensive, and I can confirm that the cabbage gives gorgeous blue hues! And no, I don’t think you want to eat the veggies afterwards with all that vinegar. The number of eggs is unlimited, because you can dye them in batches in the same preparation of dye. Which also means you can just prepare less dye (I’m planning to halve the turmeric recipe this year, since we don’t need many eggs). Good luck!
How about using only the peels of the beets for making the dye and boiling the rest separately to eat? Alternatively boiling the beets without vinegar and adding it later for dyeing the eggs. Also: A strong chamomile tea makes a beautiful yellow, too.
Thanks for posting this. I had fun making blue, yellow, and green eggs using these instructions. The blues were very easy and turned out well, the yellow worked best for me when I used steaming hot water to dissolve the turmeric rather than just extra hot water from the tap, and the greens all were a bit different from each other which added some nice variety.
We are still in progress with this fun experiment. Surprisingly the cabbage dye has only resulted in a very pale blue egg so far, even after an overnight soak. The turmeric didn’t fully dissolve, even in water heated to steamy on the stove, but after soaking overnight it’s produced a nice yellow color. We couldn’t get fresh beets so tried it with pre-cooked, which has just produced a brown egg, sadly. We also didn’t do onion skins, thinking that the turmeric would cover that part of the spectrum, which seems to have worked out fine. Can’t wait to find out how things turn out later today!