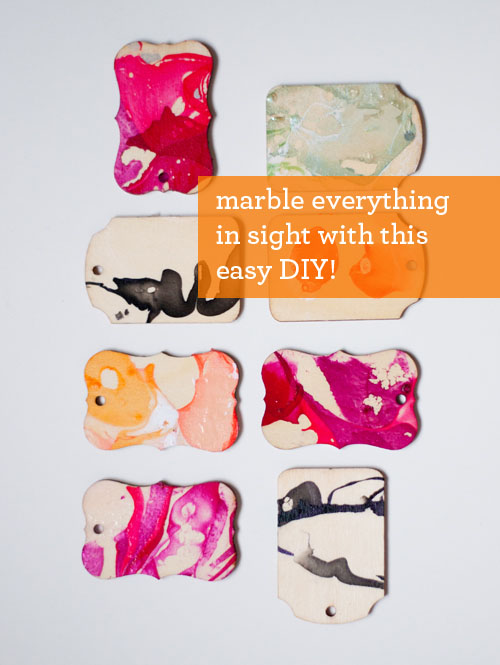
I did a bunch of experimenting and found that nail polish and water offer up an extremely easy way to marble just about anything you desire — from glass to wood to metal to cardboard. The options are endless! I used this nail polish marbling technique on glass jars, metal bowls, wooden gift tags, and papier-maché boxes.
It would be a fun technique for bridal shower favors, or making simple jewelry boxes at a birthday party for your kid. Or you could marble a carafe and two glasses as a drinking water set for the guest room. (I could go on and on…)
And with the seemingly limitless color selection in polish now a days, there is sure to be a color scheme to your liking.
Come learn this technique!


NAIL POLISH MARBLING TECHNIQUE
Supplies Needed:
-fingernail polish – new is best for freshness and liquidity but price point is your choice!
-tub
-water
-boxes, tags, metal containers — almost anything you can imagine
-scrap paper for completed pieces to dry
-optional – wooden sticks, not pictured
-acetone, polish remover – for clean up
Also important, make sure the work area is well-ventilated. Nail polish is stinky stuff!

Fill the tub with a couple of inches of water. Most of the time, only a few inches of water is needed. If you are marbling an especially deep object, add enough water that the piece can be submerged completely.
Beginning dropping in the polish. The first color to hit the water will span out over the whole surface so beginning with a light color is best. Continue to add colors to your desire. However, you must work fast. With the fast-drying polish on the market, there is only a small window of time!

If you can be fast and want to modify the polish, you can drag a wooden stick through the polish/water and creating various patterns and looks.

Once you (quickly) have things just right, press your item to be marbled into the polish/water bath. There are two ways that I’ve found for transferring the polish to the object. 1.) You can, like the photo above, press your item straight down through the polish, into the water. This will cover the item on all sides, enveloping it in the surrounding pattern. And 2.) You can also ‘roll’ the object on the colored water surface, using the length of the tub to cover each side. This method works well on larger pieces that you don’t want to submerge or when a certain pattern is desired on all sides. Experiment and see what works best for you.

Once the object has picked up the color, place on the scrap paper to dry. You may redip a piece if the marbling isn’t to your liking or there is a gap in the color.
The polish dries rather quickly and the excess water can be wiped away. Thankfully the odor doesn’t stick around too long either.

I found this nail polish marbling technique so satisfying that I’m kind of obsessed at the moment. I find myself collecting boxes and bowls and tags and what not just so I can marble them. : ) I’m already using upcoming holidays (hello Easter!) as an excuse for future projects.
What about you? Does the marble look appeal to you? What sorts of things would you marble? Have you tried nail polish marbling before?
Images and text by Amy Christie for Design Mom
it looks so, so pretty! if only i had that many nail polish colors…
Que bonito queda todo ;)
LOVE it!
So fun! I was just recently introduced to the idea of using nail polish for craft projects (don’t know why it didn’t occur to me before!) and now I’m totally hooked! I made these awesome push pins a few weeks ago and am so thrilled with how they fancy up my office: http://plumfieldshop.blogspot.com/2013/02/fancy-thumb-tacks.html
Those are fun Lauren!
Another great reason to stop biting my nails, this looks so fun
thanks
I do have a piece of furniture I’d love to do this to- can you tell me how to do it?
I believe the technique is the same Rachel. A couple inches of water with the polish floating on top. You will just need to find a tub or basin large enough to allow the furniture piece to be dipped into. Good luck!
With furniture if its probably easier to use spray paint if its larger then a mug or vase
Gorgeous. But how did you hold everything to avoid spoiling the pattern with your fingers? I’m just not as graceful about these things….
This is beautiful! I definitely want to try something similar for a DIY project soon. Thanks so much for the inspiration!
Cheers,
Marjorie
Beyond amazing. Love the effects you got!
Pingback: DIY with Design Mom: Marbling with Nail Polish | this heart of mine
I’m going to try wooden eggs for Easter! And add a little god leaf! Love this, thanks so much =)
LOL *gold* leaf, but *God* leaf sounds pretty awesome!
Very nice idea. I will definitely try this. Thanks for sharing!
What a lovely idea!
Loving the marble look, what a great idea! How about marbling some Easter eggs so they don’t look like chocolate, the kids will love that! Teehee
This is amazing! Easter eggs, here we come! Perfect use of my old nail polish, which, sadly, my knobby working hands look silly wearing these days! Thanks for the great tutorial!
I can’t wait to try this. As Holly said in the comments, it’s a great way to use up all of my nail polish! Also, just found your blog and I love it!
LOVE this idea—I’ve recently begun to use gel nail polish….and have stashed of the “regular” stuff I hate to see go to waste–I’ve been looking for something like this. AWEsome–thanks for sharing.
Pingback: Weekend Pretties | All Sorts of Pretty
I LOOOOVE this! I have so many polishes that I don’t like the color on me or ones that I’m tired of but hate to see go to waste. And even if I still use/love my polish I like that I can get some permanent usage out of it by doing this and admire the color at the same time. Thank you
What a sad waste of Zoya and Orly. DO you people have no respect for nail polish?
Данная техника известна в России давно. При дефиците обоев по такой технологии делали самодельные обои под мрамор. Применяли не лак для ногтей, а масляную краску.
P.S. Добавлю, применение масляной краски значительно дешевле.
i loved it verymuch!
I see marbled flower pots in my very near future…been looking for something neat for my stargazer lily bulbs to grow in..thanks for the inspiration!! keep up the creativity!!
they turned out amazing! thanks so much!!
Pingback: Favorite Party Ideas this Week | Birthday Party Ideas
You can also spray alcohol ( perfume or a spray hand sanitzer) across the surface of the polish to form spots. The polish doesn’t mix with the alcohol, but instead where each droplet of alcohol lands the polish shrinks back forming a circle. This method is so stunning used on nails also!!!
Thanks for the tip!!
I LOVE this idea. Thank you so much for sharing!!
Pingback: Crafty and creative links // 74 fun things 10 | 74 Lime Lane
Very creative! I could make this easy technique. Thanks! ;)
Can you use any nail polish or only certain ones? I don’t know what I did wrong….but my polish would just sink. :(
Was the water too hot? room temp or a little cooler will make it stay on top. Then, one drop at a time as close to the water as you can without touching. Hope that helps.
Pingback: Weekend Links
Pingback: Weekly Rewind | Fossil Blog
hi, i’d love to try this on a outside birdbath!!!! can’t imagine the ratio of water to polish. CAN ANY ONE HELP????? also, does this idea require finishing, like shellac or polyurathane????? thank you. hugs, leslie
answer the above comment question. thanks
Leslie,
The water ratio depends on the size of the bird bath. Whatever the depth/size of the object, you will need enough water in order to dip the surface.
As for a finishing product, I have no idea. I have never used this method for an object outside. If you do experiment, I’d love to know what you find.
Thanks!
Pingback: Inspiration + Weekend Reads | ConfettiStyle
Pingback: DIY :: Marbleized Easter Eggs | Camille Styles
Pingback: Easter Decoration: Marbled Votives. | blue. white. striped.
Pingback: » COOLEST EASTER DIYs | Zombie Eggs, Gold Leaf Eggs, Chalkboard Pen Eggs, Geometric Eggs… | Please Enjoy This Series of Easter-Themed DIY Projects That Don’t Suck. May I Have The Ring
I absolutely love this idea. I wanted to know if there is any material which just won’t work for this technique. I mean, obviously it has to be able to get wet, but apart from that is there any object to which the polish just wont stick?
thanks!
I tried this but it completely didn’t work! I followed your instructions to a T?! hmmm
oh no! Any more info you can share that could help me diagnose an issue?
Great idea! Definitely going to have a go! :-)
Pingback: Make It Crafty: Earth Day Craft for Kids - KidStyleFile
Pingback: Shak In Style » All Your Marbles
I love this idea, but am wondering how you get the items in and out of the water without messing up the pattern? Thanks
Please do answer my question as I really do want to try this, but I don’t know what to use to get it out of the water after the pattern is on the object…I want to try it on some large round pearls to use for jewelry…thanks so much..
great little tutorial, thanks for sharing, my attempt is here
http://abimakes.blogspot.co.uk/2013/05/nail-varnish-marbling.html
I agree. It turns out so pretty, I love it.
Pingback: PHOTOS: 7 Projects That’ll Make You Look At Nail Polish In A New Way - Fashion News Cloud
Pingback: Design Inspiration in the Unexpected |
so going to try this! Love the idea. Thank you so much for sharing :D
Pingback: PHOTOS: 7 Projects That’ll Make You Look At Nail Polish In A New Way | Fashion Trends